# Git
# 新规
# remote: Support for password authentication was removed on August 13, 2021. Please use a personal access token instead
- 1、去github官网生成token
- 点击头像->Settings->Developer settings->Personal access tokens
- 一般勾选【repo】即可
- 有效期看情况而定,一般
不建议【永久】
- 2、两种方式
- 之后用自己生成的token登录,把上面生成的token粘贴到输入密码的位置
- 把token直接添加远程仓库链接中,这样就可以避免同一个仓库每次提交代码都要输入token了
git remote set-url origin https://<token>@github.com/<username>/<reponame>.git

git remote set-url origin https://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@github.com/htring1314/ff-web.git
2
3
# 浏览器中使用vscode阅读GitHub代码
TIP
只需在域名中github后追加1s即可;
如:https://github.com/htring1314/ant-design-pro调整为:
https://github1s.com/htring1314/ant-design-pro
# 下载Clone
git clone --depth=1 https://github.com/htring1314/myExp.git myExp(本地文件夹名)

git clone -b 分支名仓库地址
2
3
# 添加进版本控制
git add .
# 提交
git commit -m "提交信息" (注:“提交信息”里面换成你需要,如“first commit”)
message的格式:<type>:<subject>
# type
- type
- feature: 新功能(feature)
- fix: 修补bug、style等
- refactor: 重构(即不是新增功能,也不是修改bug的代码变动)
- test: 增加测试 chore: 构建过程或辅助工具的变动
- subject
- 提交目的的简短描述,描述做了啥或者改了啥,如果有团队管理工具(issue ,JIRA)或者产品需求,必须以内部命名的需求代号作为描述信息的一部分,方便查看日志,合并和cherry-pick。
| feat | 新功能(feature) |
|---|---|
| fix | 修补bug |
| docs | 文档 |
| style | 格式(不影响代码运行的变动) |
| refactor | 重构(不新增功能,也不是修改bug的变动) |
| perf | 性能(提高代码性能的改变) |
| test | 增加测试或者修改测试代码 |
| build | 影响构建系统或者外部依赖项的更改(maven,gradle,npm等) |
| ci | 对CI配置文件或者脚本的更改 |
| chore | 对非src和test目录的修改 |
| revert | Revert a commit |
举例
- feature:开发完成#代号 XXX.XXX需求
- fix:修改 #代号 XXXX查询问题
# scope
用于说明commit的影响范围。比如数据层、控制层、视图层等等
# subject
commit的目的的简短描述,不超过50字符,主要介绍此处代码更改的主要内容
举个栗子:feat(订单模块):订单详情接口增加订单号字段
# push
# 第一次提交
git push -u origin master

# 之后再提交
git push origin master

# 如果提交报错可尝试
git push -f origin master
# 这是一种强制上传方案,第一次可以使用,今后不建议使用。因为这条命令会直接覆盖远程仓库的版本信息。
2
3
4
5
6
7
8
9
# 保持清洁的提交记录
# 善用 git commit –amend
可以帮助我们修改 最后一次提交
假设我们有这样一段 log 信息
* 98a75af (HEAD -> feature/JIRA123-amend-test) feat: [JIRA123] add feature 1.2
* 119f86e feat: [JIRA123] add feature 1.1
* 5dd0ad3 feat: [JIRA123] add feature 1
* c69f53d (origin/main, origin/feature/JIRA123-amend-test, origin/HEAD, main) Initial commit
2
3
4
假设我们要修改最后一个 log message,就可以使用下面命令:
git commit --amend -m "feat: [JIRA123] add feature 1.2 and 1.3"
可以发现,我们用新的 commit-id 5e354d1 替换了旧的 commit-id 98a75af , 修改了 message,并没有增加节点
* 5e354d1 (HEAD -> feature/JIRA123-amend-test) feat: [JIRA123] add feature 1.2 and 1.3
* 119f86e feat: [JIRA123] add feature 1.1
* 5dd0ad3 feat: [JIRA123] add feature 1
* c69f53d (origin/main, origin/feature/JIRA123-amend-test, origin/HEAD, main) Initial commit
2
3
4
现在我们的 repo 中文件是这样的:
.
├── README.md
└── feat1.txt

0 directories, 2 files
2
3
4
5
假设我们提交 feature 1.3 的时候,忘记了一个配置文件 config.yaml , 不想修改 log,不想添加新的 commit-id,那下面的这个命令就非常好用了
echo "feature 1.3 config info" > config.yaml
git add .
git commit --amend --no-edit
2
3
git commit --amend --no-edit 就是灵魂所在了,来看一下当前的 repo 文件:
.
├── README.md
├── config.yaml
└── feat1.txt

0 directories, 3 files
2
3
4
5
6
再来看一下 git log
* 247572e (HEAD -> feature/JIRA123-amend-test) feat: [JIRA123] add feature 1.2 and 1.3
* 119f86e feat: [JIRA123] add feature 1.1
* 5dd0ad3 feat: [JIRA123] add feature 1
* c69f53d (origin/main, origin/feature/JIRA123-amend-test, origin/HEAD, main) Initial commit
2
3
4
# 善用 git rebase -i
可以看着,上面的 log 都是在开发 feature1,我们在把 feature 分支 merge 到 main 分支之前,还是应该继续合并 log commit 节点的,这就用到了
git rebase -i HEAD~n
其中 n 代表最后几个提交,上面我们针对 feature 1 有三个提交,所以就可以使用:
git rebase -i HEAD~3
运行后,会显示一个 vim 编辑器,内容如下:
 1 pick 5dd0ad3 feat: [JIRA123] add feature 1
 2 pick 119f86e feat: [JIRA123] add feature 1.1
 3 pick 247572e feat: [JIRA123] add feature 1.2 and 1.3
 4
 5 # Rebase c69f53d..247572e onto c69f53d (3 commands)
 6 #
 7 # Commands:
 8 # p, pick <commit> = use commit
 9 # r, reword <commit> = use commit, but edit the commit message
10 # e, edit <commit> = use commit, but stop for amending
11 # s, squash <commit> = use commit, but meld into previous commit
12 # f, fixup <commit> = like "squash", but discard this commit's log message
13 # x, exec <command> = run command (the rest of the line) using shell
14 # d, drop <commit> = remove commit
15 # l, label <label> = label current HEAD with a name
16 # t, reset <label> = reset HEAD to a label
17 # m, merge [-C <commit> | -c <commit>] <label> [# <oneline>]
18 # .       create a merge commit using the original merge commit's
19 # .       message (or the oneline, if no original merge commit was
20 # .       specified). Use -c <commit> to reword the commit message.
21 #
22 # These lines can be re-ordered; they are executed from top to bottom.
23 #
24 # If you remove a line here THAT COMMIT WILL BE LOST.
25 #
26 #   However, if you remove everything, the rebase will be aborted.
27 #
28 #
29 # Note that empty commits are commented out
2
3
4
5
6
7
8
9
10
11
12
13
14
15
16
17
18
19
20
21
22
23
24
25
26
27
28
29
合并 commit-id 最常用的是 squash 和 fixup , 前者包含 commit message,后者不包含,这里使用 fixup, 然后 :wq 退出
1 pick 5dd0ad3 feat: [JIRA123] add feature 1
2 fixup 119f86e feat: [JIRA123] add feature 1.1
3 fixup 247572e feat: [JIRA123] add feature 1.2 and 1.3
2
3
我们再来看一下 log, 这就非常清晰了
* 41cd711 (HEAD -> feature/JIRA123-amend-test) feat: [JIRA123] add feature 1
* c69f53d (origin/main, origin/feature/JIRA123-amend-test, origin/HEAD, main) Initial commit
2
# 善用 rebase
上面的 feature1 已经完整地开发完了,main 分支也有了其他人的更新,再将 feature merge 回 main 分支之前,以防代码有冲突,需要先将 main 分支的内容合并到 feature 中,如果用 merge 命令,就会多处一个 merge 节点,log history 中也会出现拐点,并不是线性的,所以这里我们可以在 feature 分支上使用 rebase 命令
git pull origin main --rebase
pull 命令的背后是自动帮我们做 merge 的,但是这里以 rebase 的形式,再来看一下 log
* d40daa6 (HEAD -> feature/JIRA123-amend-test) feat: [JIRA123] add feature 1
* 446f463 (origin/main, origin/HEAD) Create main.properties
* c69f53d (origin/feature/JIRA123-amend-test, main) Initial commit
2
3
# Git的四个工作区域
Git的四个工作区域如下图所示,分别是:
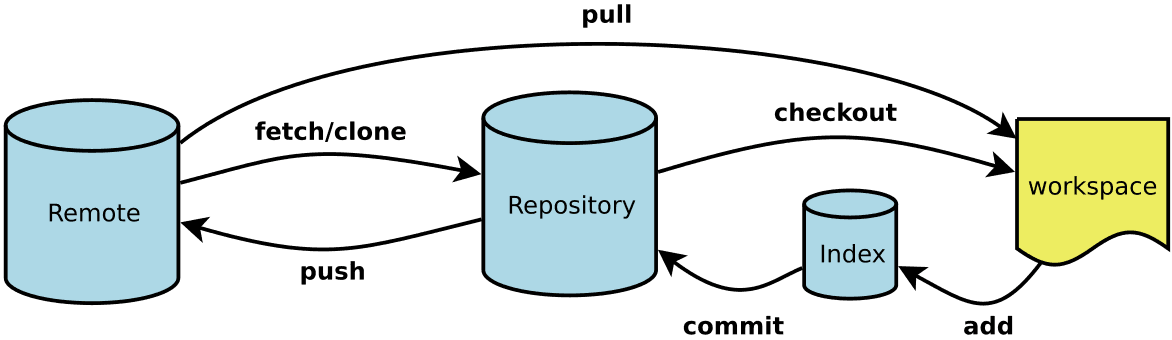
- 工作区(Workspace):工作区,就是平时存放代码的地方;
- 暂存区(Index/Stage):暂存区,用于临时存放改动,事实上它只是一个文件,保存即将提交到文件列表信息;
- 本地仓库(Repository):本地仓库;
- 远程仓库(Remote):远程仓库,即托管代码的服务器。
我们经常操作的是前三个区域,如下图所示:
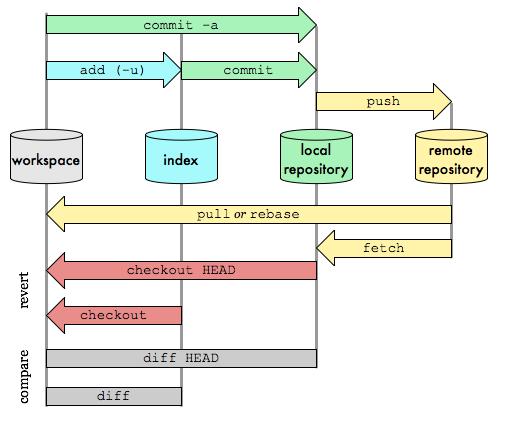
# Git工作流程
了解了Git的四个工作区域和代码文件的四种状态,Git的工作流程其实也就清楚了:
在工作区中添加、修改文件; 将修改后的文件放入暂存区域; 将暂存区域的文件提交到本地git仓库; 将本地git仓库的修改推送到远程仓库。
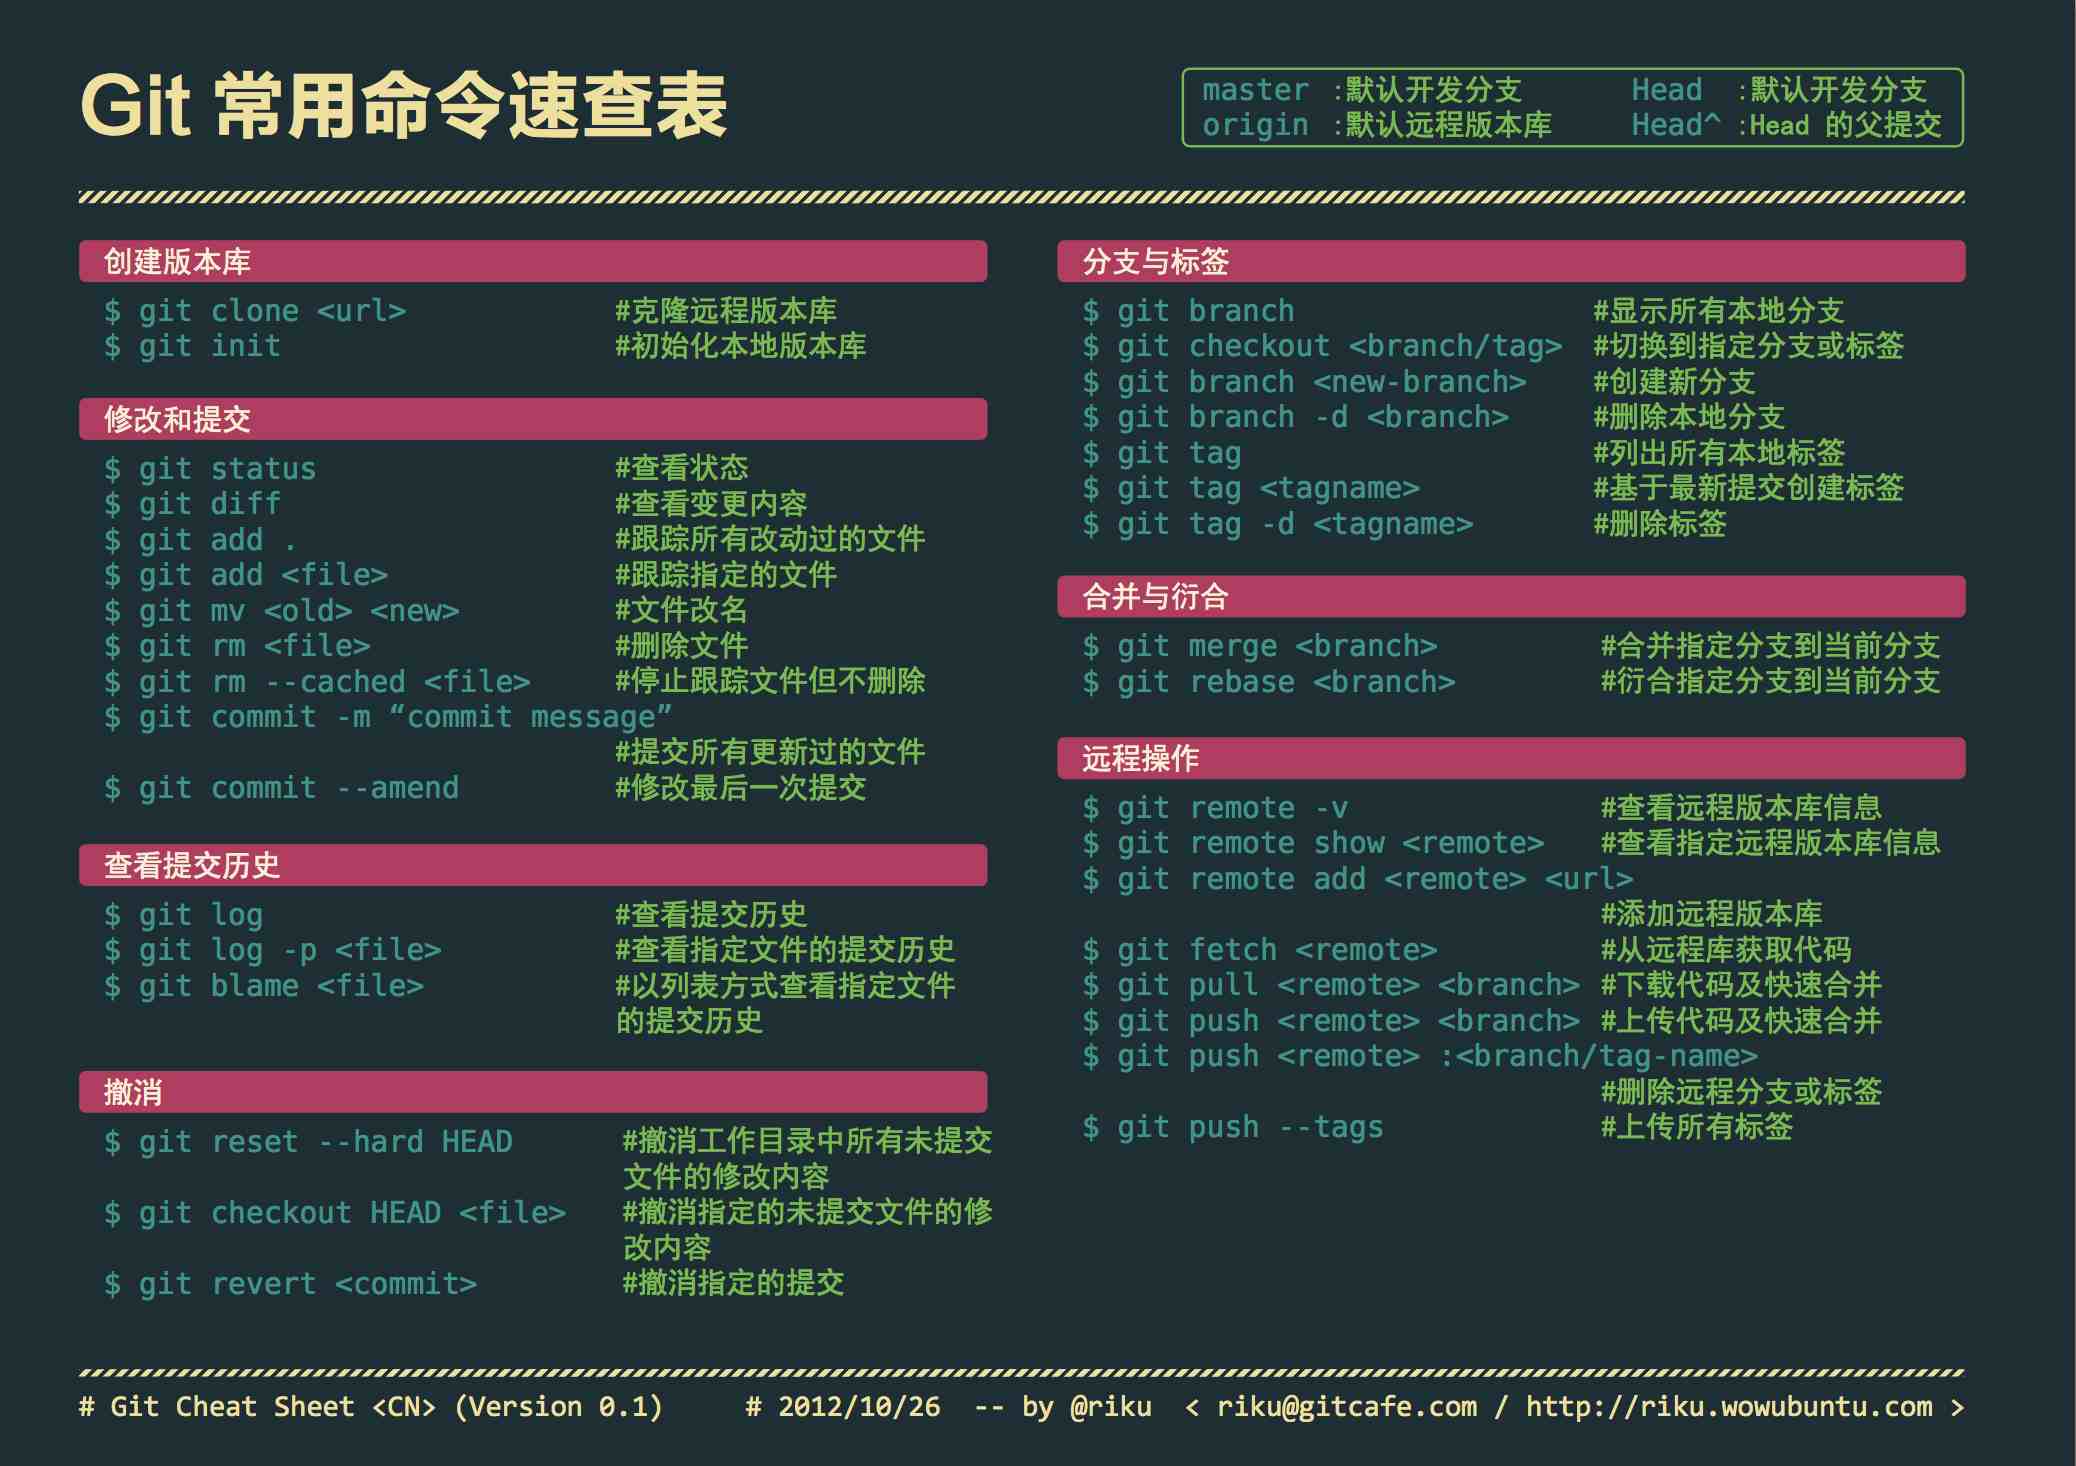
# 命令速查表
# 用户信息配置
#全局配置用户名字和邮箱
git congfig user.name "xxxx" --global
git config user.email "xxx@xx.com" -global

#查看不同作用域的配置信息
git config --list --local
git config --list --global
git config --list --system
2
3
4
5
6
7
8
# 其他配置
git config --global merge.tool "kdiff3"

# Git不用管换行符的事情
git config --global core.autocrlf false

# gui中的中文乱码
git config --global gui.encoding utf-8

# 避免status显示中文乱码
git config --global core.quotePath off
2
3
4
5
6
7
8
9
10
# Windows上还需要配置
git config --global core.ignorecase false
# Git SSH key
ssh-keygen -t rsa -C "htring@outlook.com"
- 键入以下命令,
~/指的是用户目录下
ssh-add ~/.ssh/id_rsa

# 如果执行ssh-add时出现Could not open a connection to your authentication agent执行ssh-add ~/.ssh/id_rsa报标题之前像执行 eval `ssh-agent` (~键上的`),再执行ssh-add ~/.ssh/id_rsa成功ssh-add -l就有新加的rsa了

cat ~/.ssh/id_rsa.pub
2
3
4
5
# 初始化仓库
#在已存在的项目初始化仓库
cd <project-path>
git init

#新建项目并初始化仓库
git init <project-path>
2
3
4
5
6
# 将 GitHub 仓库与我们本地的 Git 仓库进行关联
git remote add origin https://github.com/qqdb/example01.git
# 提交修改
#查看git状态
git status

#提交某个文件的修改
git add <file-name>
#提交已经跟踪的所有修改
git add -u
#提交所有修改
git add --all
git add .
#颗粒化提交修改
git add -p

#提交修改到仓库
git commit -m "<message>"
#直接提交所有的已跟踪的修改到仓库
git commit -a -m "<message>"
git commit -am "<message>"
#修改上一次提交
git commit --amend
git commit --amend --no-edit
2
3
4
5
6
7
8
9
10
11
12
13
14
15
16
17
18
19
20
21
# 查看提交历史
#查看工作区和暂存区之间的区别
git diff
#查看某个文件工作区和暂存区之间的区别
git diff -- <file-name>
#用于查看暂存区和上一个提交之间的区别
git diff --cached
#用于展示工作区和上一次提交之间的区别
git diff HEAD
#用于展示两个提交之间的区别
git diff <commit-id> <commit-id>

#用于查看所有的提交
git log
#用于查看最近n次提交
git log -<number>
#用于展示每次提交log以及每次的改动
git log -p
#用于展示每次提交log以及每次的改动的简要统计
git log --stat
#用于展示一行简略信息
git log --oneline
#用简单图形展示
git log --graph

#用于展示上一个提交的修改
git show
#用于展示特定提交的修改
git show <commit-id>
#用于展示特定提交的修改的文件名
git show --name-only <commit-id>

#打印最近操作所对应的commit id
git reflog
2
3
4
5
6
7
8
9
10
11
12
13
14
15
16
17
18
19
20
21
22
23
24
25
26
27
28
29
30
31
32
33
# 文件删除安全重命名忽略
#从工作区删除文件,并且从仓库中移除对某个文件的跟踪
git rm <file-name>
#只移除对该文件的跟踪,但是依旧在工作区保留文件
git rm --cached <file-name>

#安全重命名
git mv <old-name> <new-name>

#删除未跟踪并且未被.gitignore忽略的文件
git clean
#查看哪些文件将会被删除,但是不会真正删除
git clean -n
2
3
4
5
6
7
8
9
10
11
12
# 撤销修改代码回滚
#撤销工作区某个文件修改
git checkout <file-name>
#撤销所有文件
git checkout .
#恢复某个commit的指定文件到暂存区和工作区
git checkout <commit-id> <file-name>

#撤销当前暂存区的修改
git reset <file-name>
#版本回退
#只移动仓库中`HEAD`指针的位置,工作区和暂存区的修改都不变
git reset --soft <commit-id>
#移动`HEAD`指针的位置,并使用回退的到版本重置暂存区,工作区的修改保持不变
git reset --mixed <commit-id>
#移动`HEAD`指针位置,并使用回退的到版本重置工作区和暂存区,保持与指定的提交一致
git reset --hard <commit-id>

#重置修改
#新建一个提交重置目标提交
git revert <commit-id>
#重置目标提交,但是不会新建提交,而是修改工作区和暂存区
git revert -n <commit-id>
#重置多个提交(不包括start-id,但是包括end-id)
git revet <start-id>...<end-id>

#在revert遇到冲突并解决冲突后,继续执行撤销操作
git revert --continue
#终止revert,但保留当前的结果
git revert --quit
#撤销revert
git revert --abort
2
3
4
5
6
7
8
9
10
11
12
13
14
15
16
17
18
19
20
21
22
23
24
25
26
27
28
29
30
31
# 分支
#列出本地所有分支
git branch
#列出所有远程分支(后文会讲解什么是远程分支)
git branch -r
#列出所有本地和远程分支
git branch -a
#查看分支的详细信息
git branch -v

#新建分支
git branch <branch-name>
#新建分支并切换分支
git checkout -b <branch-name>
#切换分支
git checkout <branch-name>
#切换到上一个分支
git checkout -
#删除分支(针对已经合并过的分支)
git branch -d <branch-name>
#删除分支(不管是否合并)
git branch -D <branch-name>

#合并分支
git merge <branch-name>
#不使用fast-forward模式合并
git merge --no-ff <branch-name>

#挑选一个commit合并到当前分支
git cherry-pick <commit-id>
#挑选指定分支的最新提交
git cherry-pick <branch-name>
#挑选连续多个提交(左开右闭,不包括start-commit)
git cherry-pick <start-comm-id>...<end-commit-id>
挑选连续多个提交(左闭右闭,包括start-commit)
git cherry-pick <start-commid-id>^...<end-commit-id>

#在解决冲突后,继续执行下一个cherry-pick
git cherry-pick --continue
#退出操作,保留当前进度
git cherry-pick --quit
#撤销本次操作
git cherry-pick --abort
2
3
4
5
6
7
8
9
10
11
12
13
14
15
16
17
18
19
20
21
22
23
24
25
26
27
28
29
30
31
32
33
34
35
36
37
38
39
40
41
42
# 打上Tag
#查看所有tag
git tag
#筛选相应的tag
git tag -l <tag-name>
#查看某个commit上所有的tag
git tag --points-at <commit-id>
#查看某一个tag
git show <tag-name>
#查看所有tag以及它们分别对应的commit
git show-ref --tags

#新建tag
git tag <tag-name>
#在指定的提交新建tag
git tag <tag-name> <commit-id>
#添加一个tag和message
git tag -a <tag-name> -m <message>
#删除tag
git tag -d <tag-name>
2
3
4
5
6
7
8
9
10
11
12
13
14
15
16
17
18
19
# 紧急加塞使用stash
#新建stash
git stash
#指定你想要的messge信息
git stash save <message>
#将未跟踪的文件也加入暂存
git stash -u
#将所有文件加入暂存(即使该文件被git忽略)
git stash -a

#查看暂存的历史
git stash list
#查看某一个次特定的暂存
git show stash@{<number>}

#取出最近的暂存
git stash apply
#取出目标暂存
git stash apply <number>
#取出最近暂存,并删除该暂存的记录
git stash pop

#删除最近暂存
git stash drop
#删除目标暂存
git stash drop <number>
#清空历史
git stash clear
2
3
4
5
6
7
8
9
10
11
12
13
14
15
16
17
18
19
20
21
22
23
24
25
26
27
# 变基
#合并分支
git rebase <branch-name>
#可以交互式的操作到commi-id为止的提交(不包括commit-id所指向提交)的所有提交
git rebase -i <commit-id
2
3
4
# 远程仓库
#拉取代码,并使用默认的远端仓库的名字
git clone <url>
#拉取代码,自定义本地仓库名字
git clone <url> <new-name>

#添加远程仓库
git remote add <remote-name> <remote-url>
#查看远端仓库信息
git remote -v
#删除远程仓库
git remote remove <remote-name>
#重命名远程操作名字
git remote rename <old-remote-name> <new-remote-name>

#推送分支到特定的远程仓库,如果只有一个远程仓库可以省略,第一次推送需要加入`-u`参数
git push <remote-name> <branch-name>
#推送指定tag到远端
git push <remote-name> <tag-name>
#推送所有tag到远端
git push <remote-name> --tags

#拉取更新
git fetch
#获取远端仓库更新,并自动合并到本地分支(相当于`git fetch && git merge`)
git pull
#使用rebase方式拉取更新
git pull --rebase
2
3
4
5
6
7
8
9
10
11
12
13
14
15
16
17
18
19
20
21
22
23
24
25
26
27
# Git详细使用技巧
# 创建分支
分支管理可以说是Git的灵魂。想要创建新分支,只需点击master的下拉列表,在文本框中输入新分支的名称,然后敲一下回车。
# 提交修改(commit)
在GitHub上,保存修改被叫做commits。每个commit都关联了提交信息,这些信息能捕捉到你修改的历史,这样其他的贡献者就能知道你都做了什么,以及为什么做这些修改。
怎么提交呢?也不用敲代码了,点击进入新创建的分支,里面会有一个README.md文件,再点一下右上角的铅笔标志,就能开始编辑了。
# 拉取请求(Pull Request)
Pull Request是GitHub上合作的核心。
先进入Pull Request选项卡,点击New pull request。
# git获取指定分支
在Git中,你可以使用-b选项指定克隆(git clone)或拉取(git pull)代码时要使用的分支。以下是一些示例:
克隆时指定分支:
git clone -b branch-name https://github.com/username/repository.git1例如,如果你要克隆
master分支,可以这样:git clone -b master https://github.com/username/repository.git1拉取时切换分支:
如果你已经克隆了仓库,可以使用以下命令拉取并切换到指定分支:
git checkout branch-name
git pull origin branch-name
1
2例如,切换到
develop分支并拉取最新代码:git checkout develop git pull origin develop1
2
确保替换branch-name、username和repository为你实际使用的分支、GitHub用户名和仓库名称。
# merge(合并)
现在,你可以把修改的代码合并到主线当中了,同样只需按下一个按钮。
# 图形化git工具
# 10种Git技巧,让你省时省力又省心
- 从另一分支切换单个文件
git checkout some-other-branch -- yarn.lock
同时,也可以使用相同的技巧从特定提交项切换出某个文件。
git checkout 9146367 -- yarn.lock
- 查看日志时无需合并提交
git log --oneline --no-merges
- 改写上一个提交信息
git commit -v --amend
- 移除所有未跟踪更改
git clean -f –d
- 输出酷炫的可视化日志
git log --pretty=oneline --graph --decorate --all
- 向git请求一个变更日志
git shortlog <commit>..HEAD
如git shortlog HEAD~20..,以此来获取最近20次提交的短日志
- 查看特定日期范围的日志
git log --since='FEB 10 2016' --until='FEB 19 2016'
- 列出所有git别名
git config -l | grep alias | sed 's/^alias\.//g'
- 搜索包含关键字的提交
git log -S"config.menu_items"
- git教程超级机密列表
git help -g
- 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
vercel:46884kih28qKjgjnPWY0KVFg
# 绿色安装Git
"绿色"安装通常指的是直接下载二进制分发版并解压,而不是通过包管理器进行安装。以下是在Linux上安装"绿色"版本的Git的基本步骤:
下载Git:
访问Github的Git Release页面选择并下载想要的版本的二进制分发包(通常是
.tar.gz或.zip格式)。# 使用wget下载示例(根据你的需求选择版本) wget https://github.com/git/git/archive/v2.x.x.tar.gz1
2或者你也可以使用浏览器下载,并将文件上传到你的Linux系统。
解压Git:
选择一个目录,并解压下载的二进制分发包。
tar -zxvf v2.x.x.tar.gz1这将在当前目录下创建一个名为
git-2.x.x的目录。编译和安装Git:
进入解压后的Git目录,并执行以下命令来编译和安装Git。
cd git-2.x.x
make prefix=/usr/local all
sudo make prefix=/usr/local install
1
2
3这将把Git安装到
/usr/local目录中。你可以根据需要更改prefix的值。验证安装:
执行以下命令来验证Git是否成功安装:
git --version1如果一切设置正确,你应该看到Git的版本信息。
请注意,上述步骤中的版本号需要替换为你所下载的Git版本号。确保替换命令中的版本号和文件路径,以匹配你的实际情况。
# 自动检出并maven打包
以下是一个简单的Shell脚本示例,用于自动检出Git代码并打包Java Maven项目。确保你已经安装了Git和Maven,并替换脚本中的占位符为你的实际项目信息。
#!/bin/bash

# 设置项目信息
git_repo="https://github.com/yourusername/yourrepository.git"
project_dir="/path/to/your/local/project"
artifact_id="your-artifact-id"

# 克隆Git仓库
git clone "$git_repo" "$project_dir"

# 进入项目目录
cd "$project_dir" || exit

# 执行Maven打包命令
mvn clean package

# 检查打包结果
if [ $? -eq 0 ]; then
    echo "Maven打包成功!"

    # 复制生成的JAR文件到指定目录(如果需要)
    # cp target/$artifact_id.jar /path/to/destination

else
    echo "Maven打包失败."
fi
2
3
4
5
6
7
8
9
10
11
12
13
14
15
16
17
18
19
20
21
22
23
24
25
26
请替换以下信息:
https://github.com/yourusername/yourrepository.git:你的Git仓库地址。/path/to/your/local/project:你想要将代码克隆到的本地目录。your-artifact-id:你的Maven项目的Artifact ID。
确保给予脚本执行权限:
chmod +x your-script.sh
然后运行脚本:
./your-script.sh
这个脚本将克隆Git仓库,进入项目目录,执行Maven打包命令,并根据打包结果输出相应的信息。