# 线程
| 🐉 Java并发工具类CyclicBarrier与CountDownLatch | 🐉 线程一些常见操作,如休眠等 |
|---|---|
| 线程池 | ThreadLocal |
| 进程和线程基础知识全家桶 |
# 结构化并发
# 同步
# 1.synchronized
同步是一种高开销的操作,因此应该尽量减少同步的内容。
通常没有必要同步整个方法,使用synchronized代码块同步关键代码即可。
测试发现存在问题,结果虽然对但是过程中出现过问题,
# 2.volatile(废弃)
修饰需要同步的变量
# 3.ReentrantLock
注:关于
Lock对象和synchronized关键字的选择:
- 最好两个都不用,使用一种***java.util.concurrent***包提供的机制, 能够帮助用户处理所有与锁相关的代码。
- 如果synchronized关键字能满足用户的需求,就用synchronized,因为它能简化代码。
- 如果需要更高级的功能,就用ReentrantLock类,此时要注意及时释放锁,否则会出现死锁,通常在
finally代码释放锁。
# 各种锁
准确的来说我们使用锁就是为了安全。
Java中加锁准确的来说是为了保证并发安全,同时也是为了解决内存中的一致性,原子性,有序性三种问题
# 悲观锁
Java中悲观锁的实现有synchronized关键字和Lock的实现类都是悲观锁
# 乐观锁
在数据库中我们可以使用
version版本号去实现。在Java中我们是使用CSA来实现
private AtomicLong atomicLong = new AtomicLong();//乐观锁

    @Test
    public synchronized void testLock(){//悲观锁

    }
2
3
4
5
6
# CAS
CAS(Compare And Swap)算法是一种无锁算法,是Java提供的非阻塞原子性操作。
简单的来说CAS就是一个死循环,在循环中判断预期的值和内存中的值是否相等,如果相等的话就执行修改,如果如果不相等的话就继续循环,直到执行成功后退出。
CAS需要三个操作值:
- 预期值的 A
- 内存中的V
- 将要修改的B
# 公平锁和非公平锁
private ReentrantLock fairLock = new ReentrantLock(true);
    private ReentrantLock unfairLock = new ReentrantLock(false);
    private ReentrantLock defaultLock = new ReentrantLock();

    public static void main(String[] args) {
        final ThreadTest threadTest = new ThreadTest();
        ExecutorService executorService = Executors.newCachedThreadPool();
        for (int i = 0; i < 5; i++){
            executorService.execute(() -> {
                System.out.println("线程ID:"+Thread.currentThread().getName()+",我来了");
                threadTest.lockTest();
            });
        }
    }

    public void lockTest(){
        try {
            fairLock.lock();
            Thread.sleep(1000);
            System.out.println("获取锁的进程ID:"+Thread.currentThread().getName()+",拿到了锁");
        } catch (InterruptedException e) {
            e.printStackTrace();
        } finally {
            fairLock.unlock();
        }
    }
2
3
4
5
6
7
8
9
10
11
12
13
14
15
16
17
18
19
20
21
22
23
24
25
26
线程ID:pool-1-thread-1,我来了
线程ID:pool-1-thread-2,我来了
线程ID:pool-1-thread-4,我来了
线程ID:pool-1-thread-5,我来了
线程ID:pool-1-thread-3,我来了
获取锁的进程ID:pool-1-thread-1,拿到了锁
获取锁的进程ID:pool-1-thread-2,拿到了锁
获取锁的进程ID:pool-1-thread-4,拿到了锁
获取锁的进程ID:pool-1-thread-5,拿到了锁
获取锁的进程ID:pool-1-thread-3,拿到了锁
2
3
4
5
6
7
8
9
10
按照顺序来的,可以发现。在需要公平资源的场景下使用公平锁,如果不需要特殊的公平对待的话尽量使用非公平锁,因为公平锁会带来性能的开销。
其他如共享锁、独占锁、自旋锁
# Semaphore的使用和详解(限制并发数量)
Semaphore的作用:限制线程并发的数量。类似springBoot中
[七、应用限流]
public Semaphore(int permits) {
        sync = new NonfairSync(permits);
    }
2
3
类Semaphore的构造函数permits 是许可的意思,代表同一时间,最多允许permits执行acquire() 和release() 之间的代码。
例如:
Semaphore semaphore = new Semaphore(1);
表示
同一时间内最多只允许1个线程执行 acquire()和release()之间的代码。
- 方法acquire(n) 的功能是每调用1次此方法,就消耗掉n个许可。
- 方法release(n) 的功能是每调用1次此方法,就动态添加n个许可。
- 方法acquireUnnterruptibly()作用是是等待进入acquire() 方法的线程不允许被中断。
- 方法availablePermits() 返回Semaphore对象中当前可以用的许可数。
- 方法drainPermits() 获取并返回所有的许可个数,并且将可用的许可重置为0
- 方法 getQueueLength() 的作用是取得等待的许可的线程个数
- 方法 hasQueueThreads() 的作用是判断有没有线程在等待这个许可
- 公平和非公平信号量:
有些时候获取许可的的顺序与线程启动的顺序有关,这是的信号量就要分为公平和非公平的。所谓的公平信号量是获得锁的顺序与线程启动的顺序有关,但不代表100%获得信号量,仅仅是在概率上能保证,而非公平信号量就是无关的。
例如:
Semaphore semaphore = new Semaphore(1,false);
False:表示非公平信号量,即线程启动的顺序与调用semaphore.acquire() 的顺序无关,也就是线程先启动了并不代表先获得 许可。
True:公平信号量,即线程启动的顺序与调用semaphore.acquire() 的顺序有关,也就是先启动的线程优先获得许可 。
- 方法tryAcquire() 的作用是尝试获取1个许可。如果获取不到则返回false,通常与if语句结合使用,其具有无阻塞的特点。无阻塞的特点可以使不至于在同步处于一直持续等待的状态。
- 方法tryAcquire(n) 的作用是尝试获取n个许可,如果获取不到则返回false
- 方法tryAcquire(long timeout,TimeUnit unit)的作用是在指定的时间内尝试获取1个许可,如果获取不到则返回false
- 方法tryAcquire(int permits,long timeout,TimeUnit unit) 的作用是在指定的时间内尝试获取n 个许可,如果获取不到则返回false
- 多进路-多处理-多出路:允许多个线程同时处理任务
@Test
    public void test3(){
        try {
            semaphore.acquire();
            log.info("[{}]开始时间:[{}]",Thread.currentThread().getName(), Instant.now().toEpochMilli());
            for (int i = 0; i < 10; i++) {
                log.info("[{}]打印[{}]次",Thread.currentThread().getName(),i+1);
            }
            log.info("[{}]结束时间:[{}]",Thread.currentThread().getName(),Instant.now().toEpochMilli());
            semaphore.release();
        } catch (Exception e){
            log.error(e.getMessage());
        }
    }
2
3
4
5
6
7
8
9
10
11
12
13
14
private final Semaphore semaphore = new Semaphore(1);

public Result rtuCommand(JSONObject param) throws Exception {
    ExecuteCommand executeCommand = new ExecuteCommand(param);
    return executeCommand.call();
}

class ExecuteCommand implements Callable<Result> {
    private JSONObject param;

    public ExecuteCommand(JSONObject param) {
        this.param = param;
    }

    /**
        * Computes a result, or throws an exception if unable to do so.
        *
        * @return computed result
        * @throws Exception if unable to compute a result
        */
    @Override
    public Result call() throws Exception {
        semaphore.acquire();
        String type = param.getString("ctrl");
        Result result;
        if (StringUtils.isBlank(type)) {
            result = rtuRead(param);
        } else {
            result = rtuOrder(param);
        }
        semaphore.release();
        return result;
    }
}
2
3
4
5
6
7
8
9
10
11
12
13
14
15
16
17
18
19
20
21
22
23
24
25
26
27
28
29
30
31
32
33
34
# CompletableFuture
CompletableFuture是java8中新增的一个类,算是对Future的一种增强,用起来很方便,也是会经常用到的一个工具类
- 在Java8中,CompletableFuture提供了非常强大的Future的扩展功能,可以帮助我们简化异步编程的复杂性,并且提供了函数式编程的能力,可以通过回调的方式处理计算结果,也提供了转换和组合 CompletableFuture 的方法。
- 它可能代表一个明确完成的Future,也有可能代表一个完成阶段( CompletionStage ),它支持在计算完成以后触发一些函数或执行某些动作。
- 它实现了Future和CompletionStage接口
# CompletionStage接口
- CompletionStage代表异步计算过程中的某一个阶段,一个阶段完成以后可能会触发另外一个阶段
- 一个阶段的计算执行可以是一个Function,Consumer或者Runnable。比如:
stage.thenApply(x -> square(x)).thenAccept(x -> System.out.print(x)).thenRun(() -> System.out.println()) - 一个阶段的执行可能是被单个阶段的完成触发,也可能是由多个阶段一起触发
# 常见的方法
# runAsync 和 supplyAsync方法
public static CompletableFuture<Void> runAsync(Runnable runnable)
public static CompletableFuture<Void> runAsync(Runnable runnable, Executor executor)
public static <U> CompletableFuture<U> supplyAsync(Supplier<U> supplier)
public static <U> CompletableFuture<U> supplyAsync(Supplier<U> supplier, Executor executor)
2
3
4
没有指定Executor的方法会使用ForkJoinPool.commonPool() 作为它的线程池执行异步代码。如果指定线程池,则使用指定的线程池运行。
示例:
//无返回值
public static void runAsync() throws Exception {
 CompletableFuture<Void> future = CompletableFuture.runAsync(() -> {
 try {
 TimeUnit.SECONDS.sleep(1);
 } catch (InterruptedException e) {
 }
 System.out.println("run end ...");
 });
 future.get();
}
//有返回值
public static void supplyAsync() throws Exception {
 CompletableFuture<Long> future = CompletableFuture.supplyAsync(() -> {
 try {
 TimeUnit.SECONDS.sleep(1);
 } catch (InterruptedException e) {
 }
 System.out.println("run end ...");
 return System.currentTimeMillis();
 });
 long time = future.get();
 System.out.println("time = "+time);
}
2
3
4
5
6
7
8
9
10
11
12
13
14
15
16
17
18
19
20
21
22
23
24
# 计算结果完成时的回调方法
public CompletableFuture<T> whenComplete(BiConsumer<? super T,? super Throwable> action)
public CompletableFuture<T> whenCompleteAsync(BiConsumer<? super T,? super Throwable> action)
public CompletableFuture<T> whenCompleteAsync(BiConsumer<? super T,? super Throwable> action, Executor executor)
public CompletableFuture<T> exceptionally(Function<Throwable,? extends T> fn)
2
3
4
# whenComplete 和 whenCompleteAsync 的区别
whenComplete:是执行当前任务的线程执行继续执行 whenComplete 的任务。whenCompleteAsync:是执行把 whenCompleteAsync 这个任务继续提交给线程池来进行执行。
示例:
public static void whenComplete() throws Exception {
 CompletableFuture<Void> future = CompletableFuture.runAsync(() -> {
 try {
 TimeUnit.SECONDS.sleep(1);
 } catch (InterruptedException e) {
 }
 if(new Random().nextInt()%2>=0) {
 int i = 12/0;
 }
 System.out.println("run end ...");
 });
 future.whenComplete(new BiConsumer<Void, Throwable>() {
 @Override
 public void accept(Void t, Throwable action) {
 System.out.println("执行完成!");
 }
 });
 future.exceptionally(new Function<Throwable, Void>() {
 @Override
 public Void apply(Throwable t) {
 System.out.println("执行失败!"+t.getMessage());
 return null;
 }
 });
 TimeUnit.SECONDS.sleep(2);
}
2
3
4
5
6
7
8
9
10
11
12
13
14
15
16
17
18
19
20
21
22
23
24
25
26
# thenApply
当一个线程依赖另一个线程时,可以使用 thenApply 方法来把这两个线程串行化。
public <U> CompletableFuture<U> thenApply(Function<? super T,? extends U> fn)
public <U> CompletableFuture<U> thenApplyAsync(Function<? super T,? extends U> fn)
public <U> CompletableFuture<U> thenApplyAsync(Function<? super T,? extends U> fn, Executor executor)
2
3
T:上一个任务返回结果的类型、U:当前任务的返回值类型
示例:
private static void thenApply() throws Exception {
 CompletableFuture<Long> future = CompletableFuture.supplyAsync(new Supplier<Long>() {
 @Override
 public Long get() {
 long result = new Random().nextInt(100);
 System.out.println("result1="+result);
 return result;
 }
 }).thenApply(new Function<Long, Long>() {
 @Override
 public Long apply(Long t) {
 long result = t*5;
 System.out.println("result2="+result);
 return result;
 }
 });
 long result = future.get();
 System.out.println(result);
}
2
3
4
5
6
7
8
9
10
11
12
13
14
15
16
17
18
19
# handle
handle 是执行任务完成时对结果的处理。
handle 方法和 thenApply 方法处理方式基本一样。不同的是handle 是在任务完成后再执行,还可以处理异常的任务。thenApply 只可以执行正常的任务,任务出现异常则不执行 thenApply 方法。
public <U> CompletionStage<U> handle(BiFunction<? super T, Throwable, ? extends U> fn);
public <U> CompletionStage<U> handleAsync(BiFunction<? super T, Throwable, ? extends U> fn);
public <U> CompletionStage<U> handleAsync(BiFunction<? super T, Throwable, ? extends U> fn,Executor executor);
2
3
示例:
public static void handle() throws Exception{
 CompletableFuture<Integer> future = CompletableFuture.supplyAsync(new Supplier<Integer>() {
 @Override
 public Integer get() {
 int i= 10/0;
 return new Random().nextInt(10);
 }
 }).handle(new BiFunction<Integer, Throwable, Integer>() {
 @Override
 public Integer apply(Integer param, Throwable throwable) {
 int result = -1;
 if(throwable==null){
 result = param - 2;
 }else{
 System.out.println(throwable.getMessage());
 }
 return result;
 }
 });
 System.out.println(future.get());
}
2
3
4
5
6
7
8
9
10
11
12
13
14
15
16
17
18
19
20
21
# thenAccept
接收任务的处理结果,并消费处理,无返回结果。
public CompletionStage<Void> thenAccept(Consumer<? super T> action);
public CompletionStage<Void> thenAcceptAsync(Consumer<? super T> action);
public CompletionStage<Void> thenAcceptAsync(Consumer<? super T> action,Executor executor);

public static void thenAccept() throws Exception{
 CompletableFuture<Void> future = CompletableFuture.supplyAsync(new Supplier<Integer>() {
 @Override
 public Integer get() {
 return new Random().nextInt(10);
 }
 }).thenAccept(integer -> {
 System.out.println(integer);
 });
 future.get();
}
2
3
4
5
6
7
8
9
10
11
12
13
14
15
# thenRun
跟 thenAccept 方法不一样的是,不关心任务的处理结果。只要上面的任务执行完成,就开始执行 thenRun 。
public CompletionStage<Void> thenRun(Runnable action);
public CompletionStage<Void> thenRunAsync(Runnable action);
public CompletionStage<Void> thenRunAsync(Runnable action,Executor executor);

public static void thenRun() throws Exception{
 CompletableFuture<Void> future = CompletableFuture.supplyAsync(new Supplier<Integer>() {
 @Override
 public Integer get() {
 return new Random().nextInt(10);
 }
 }).thenRun(() -> {
 System.out.println("thenRun ...");
 });
 future.get();
}
2
3
4
5
6
7
8
9
10
11
12
13
14
15
# thenCombine
public <U,V> CompletionStage<V> thenCombine(CompletionStage<? extends U> other,BiFunction<? super T,? super U,? extends V> fn);
public <U,V> CompletionStage<V> thenCombineAsync(CompletionStage<? extends U> other,BiFunction<? super T,? super U,? extends V> fn);
public <U,V> CompletionStage<V> thenCombineAsync(CompletionStage<? extends U> other,BiFunction<? super T,? super U,? extends V> fn,Executor executor);

private static void thenCombine() throws Exception {
 CompletableFuture<String> future1 = CompletableFuture.supplyAsync(new Supplier<String>() {
 @Override
 public String get() {
 return "hello";
 }
 });
 CompletableFuture<String> future2 = CompletableFuture.supplyAsync(new Supplier<String>() {
 @Override
 public String get() {
 return "hello";
 }
 });
 CompletableFuture<String> result = future1.thenCombine(future2, new BiFunction<String, String, String>() {
 @Override
 public String apply(String t, String u) {
 return t+" "+u;
 }
 });
 System.out.println(result.get());
}
2
3
4
5
6
7
8
9
10
11
12
13
14
15
16
17
18
19
20
21
22
23
24
25
# thenAcceptBoth
当两个CompletionStage都执行完成后,把结果一块交给thenAcceptBoth来进行消耗
public <U> CompletionStage<Void> thenAcceptBoth(CompletionStage<? extends U> other,BiConsumer<? super T, ? super U> action);
public <U> CompletionStage<Void> thenAcceptBothAsync(CompletionStage<? extends U> other,BiConsumer<? super T, ? super U> action);
public <U> CompletionStage<Void> thenAcceptBothAsync(CompletionStage<? extends U> other,BiConsumer<? super T, ? super U> action, Executor executor);

private static void thenAcceptBoth() throws Exception {
 CompletableFuture<Integer> f1 = CompletableFuture.supplyAsync(new Supplier<Integer>() {
 @Override
 public Integer get() {
 int t = new Random().nextInt(3);
 try {
 TimeUnit.SECONDS.sleep(t);
 } catch (InterruptedException e) {
 e.printStackTrace();
 }
 System.out.println("f1="+t);
 return t;
 }
 });
 CompletableFuture<Integer> f2 = CompletableFuture.supplyAsync(new Supplier<Integer>() {
 @Override
 public Integer get() {
 int t = new Random().nextInt(3);
 try {
 TimeUnit.SECONDS.sleep(t);
 } catch (InterruptedException e) {
 e.printStackTrace();
 }
 System.out.println("f2="+t);
 return t;
 }
 });
 f1.thenAcceptBoth(f2, new BiConsumer<Integer, Integer>() {
 @Override
 public void accept(Integer t, Integer u) {
 System.out.println("f1="+t+";f2="+u+";");
 }
 });
}
2
3
4
5
6
7
8
9
10
11
12
13
14
15
16
17
18
19
20
21
22
23
24
25
26
27
28
29
30
31
32
33
34
35
36
37
38
# Future
# FutureTask
futureTask.get()方法要想捕获实际方法抛出的异常,需要catch ExecutionException,否则只会被Exception吞噬
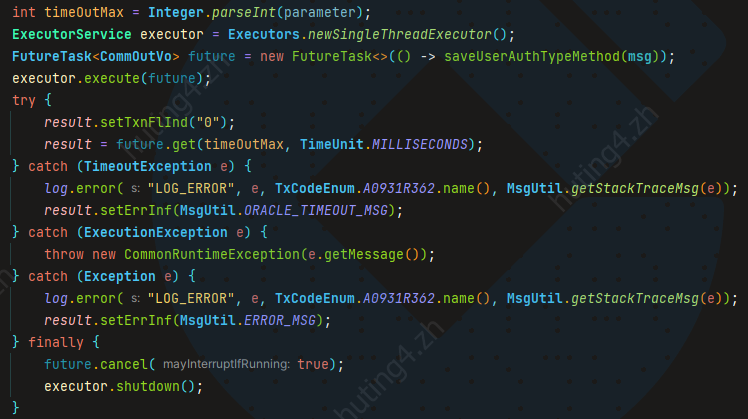
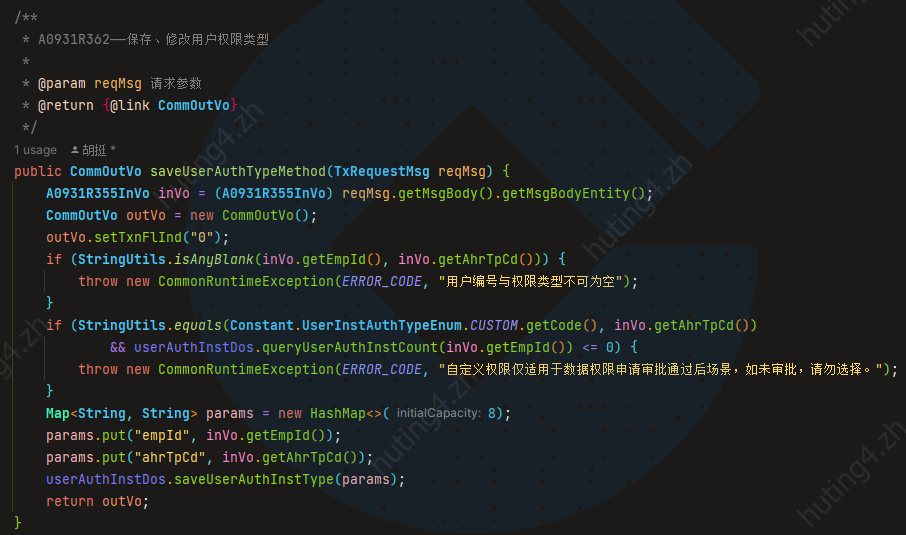
上面的实例中,即使在future.get()中捕获CommonRuntimeException,也无济于事,最终都只会走到Exception中,
必须捕获ExecutionException,再通过e.getCause()获取真实的异常类型
# java并发编程:一步一步带你手写CountDownLatch
LockSupport 用于锁定线程
ConcurrentLinkedQueue用于同步线程队列countdownlatch没有实现任何的类,其最基本的两个方法 await和conutdown
package com.gunplan.toutiao.pages;
public class MyCountDownLatched {
 public MyCountDownLatched(int value){
 }
 public void await(){
 }
 public void countDown(){
 }
}
2
3
4
5
6
7
8
9
- 需要有一个对于目前数字的记录器,count值,因为这个类肯定会被并发访问,所以我们用atomticInt的cas机制来解决线程安全的问题
同时使用volatile关键字,是volatile写对所有读同步(happens-before)原则
private volatile AtomicInteger count;
public MyCountDownLatched(int value) {
 count = new AtomicInteger(value);
}
2
3
4
- 下面我们来实现countdown,这个其实也很简单
public void countDown() {
 count.decrementAndGet();
}
2
3
- 下面我们写一下await方法
public void await() {
 if (count.get()!=0)
 {
 LockSupport.park();
 }
}
2
3
4
5
6
- 当数量不为0的时候,线程等待,将其记录下来,当conut为0时唤醒
使用这个队列进行记录。
private ConcurrentLinkedQueue<Thread> threads = new ConcurrentLinkedQueue<>()
- countdown需要具有唤醒功能
public void countDown() {
 if (count.decrementAndGet() == 0) {
 //这里线程安全,因为==0只能有一次
 threads.parallelStream().forEach(LockSupport::unpark);
 threads.clear();
 }
}
2
3
4
5
6
7
- 完整代码
package com.gunplan.toutiao.pages;
import java.util.concurrent.ConcurrentLinkedQueue;
import java.util.concurrent.CountDownLatch;
import java.util.concurrent.atomic.AtomicInteger;
import java.util.concurrent.locks.LockSupport;
public class MyCountDownLatched {
 private volatile AtomicInteger count;
 private volatile ConcurrentLinkedQueue<Thread> threads = new ConcurrentLinkedQueue<>();
 public MyCountDownLatched(int value) {
 count = new AtomicInteger(value);
 }
 public long getCount() {
 return count.intValue();
 }
 public void await() {
 if (count.get() != 0) {
 threads.add(Thread.currentThread());
 LockSupport.park();
 }
 }
 public void countDown() {
 if (count.decrementAndGet() == 0) {
 //这里线程安全,因为==0只能有一次
 threads.parallelStream().forEach(LockSupport::unpark);
 threads.clear();
 }
 }
}
2
3
4
5
6
7
8
9
10
11
12
13
14
15
16
17
18
19
20
21
22
23
24
25
26
27
28
# java多线程里面经常提到原子性
通过
volatile关键字解决可见性问题,一个线程对共享变量的修改,能够及时的被其他线程看到。只要加了volatile关键字,所有对变量的读取立刻进行同步。volatile关键字的用途:禁止缓存;相关的变量不做重排序。
# 线程安全
线程安全是多线程编程时的计算机程序代码中的一个概念。当多个线程访问某个方法时,不管你通过怎样的调用方式或者说这些线程如何交替的执行,我们在主程序中不需要去做任何的同步,这个类的结果行为都是我们设想的正确行为,那么我们就可以说这个类时线程安全的。
# 两个线程进行数据交换都不会
Exchanger就是线程之间的数据交换器,只能用于两个线程之间的数据交换
private static void test1() {
    Exchanger exchanger = new Exchanger();

    new Thread(() -> {
        try {
            Object data = "-公众号Java技术栈AAA";
            System.out.println(Thread.currentThread().getName() + data);

            // 开始交换数据
            data = exchanger.exchange(data);
            System.out.println(Thread.currentThread().getName() + data);
        } catch (InterruptedException e) {
            e.printStackTrace();
        }
    }).start();

    new Thread(() -> {
        try {
            Object data = "-公众号Java技术栈BBB";
            System.out.println(Thread.currentThread().getName() + data);

            // 开始交换数据
            data = exchanger.exchange(data);
            System.out.println(Thread.currentThread().getName() + data);
        } catch (InterruptedException e) {
            e.printStackTrace();
        }
    }).start();
}
2
3
4
5
6
7
8
9
10
11
12
13
14
15
16
17
18
19
20
21
22
23
24
25
26
27
28
29
private static void test4() {
    Exchanger exchanger = new Exchanger();

    for (int i = 1; i <= 10; i++) {
        Integer data = i;
        new Thread(() -> {
            try {
                Object exchange = exchanger.exchange(data);
                System.out.println(Thread.currentThread().getName() + "-" + exchange);
            } catch (InterruptedException e) {
                e.printStackTrace();
            }
        }, "Java技术栈" + i).start();
    }
}
2
3
4
5
6
7
8
9
10
11
12
13
14
15
发现两两交换数据
Thread-1--3
Thread-2--0
Thread-7--6
Thread-9--8
Thread-6--7
Thread-4--5
Thread-5--4
Thread-8--9
Thread-3--1
Thread-0--2
2
3
4
5
6
7
8
9
10