# freemarker
FreeMarker是一个用Java语言编写的模板引擎,它基于模板来生成文本输出。FreeMarker与Web容器无关,即在Web运行时,它并不知道Servlet或HTTP。它不仅可以用作表现层的实现技术,而且还可以用于生成XML,JSP或Java 等。
这是一个相当老牌的开源的免费的模版引擎。通过 Freemarker 模版,我们可以将数据渲染成 HTML 网页、电子邮件、配置文件以及源代码等。Freemarker 不是面向最终用户的,而是一个 Java 类库,我们可以将之作为一个普通的组件嵌入到我们的产品中。
Freemarker 模版后缀为 .ftl(FreeMarker Template Language)。FTL 是一种简单的、专用的语言,它不是像 Java 那样成熟的编程语言。在模板中,你可以专注于如何展现数据, 而在模板之外可以专注于要展示什么数据。
# 内建函数
| 含义 | 函数 |
|---|---|
| 获取当前时间 | ${.now} |
# 语法
图片要显示,需放在div中
注意:使用freemaker,要求所有标签必须闭合,否则会导致freemaker无法解析。
freemaker注释:<#-- 注释内容 -->格式部分,不会输出
# 基础语法
- 1、字符输出
| 语法 | 含义 |
|---|---|
${emp.name?if_exists} | 变量存在,输出该变量,否则不输出 |
${emp.name!} | 变量存在,输出该变量,否则不输出 |
${emp.name?default("xxx")} | 变量不存在,取默认值xxx |
${emp.name!"xxx"} | 变量不存在,取默认值xxx |
| 常用内部函数 | |
${"123<br>456"?html} | 对字符串进行HTML编码,对html中特殊字符进行转义 |
${"str"?cap_first} | 使字符串第一个字母大写subs |
${"Str"?lower_case} | 将字符串转换成小写 |
${"Str"?upper_case} | 将字符串转换成大写 |
${"str"?trim} | 去掉字符串前后的空白字符 |
| 字符串的两种拼接方式拼接 | |
${"hello${emp.name!}"} | 输出hello+变量名 |
${"hello"+emp.name!} | 使用+号来连接,输出hello+变量名 |
| 可以通过如下语法来截取子串 | |
<#assign str = "abcdefghijklmn"/> | 定义变量str |
${str?substring(0,4)} | 输出abcd |
${str[0]}${str[4]} | 结果是ae |
${str[1..4]} | 结果是bcde |
${str?index_of("n")} | 返回指定字符的索引 |
2、日期输出
date、time、datetime--><#assign test1 = "2009-01-22"?date("yyyy-MM-dd") />
${emp.date?string('yyyy-MM-dd')}-->日期格式
<font color="red"> ${date?string('yyyy-MM-dd HH:mm:ss')} </font>${var?html}
转义HTML内容
- 3、数字输出(以数字20为例)
| 语法 | 含义 |
|---|---|
${emp.name?string.number} | 输出20 |
${emp.name?string.currency} | ¥20.00 |
${emp.name?string.percent} | 20% |
${1.222?int} | 将小数转为int,输出1 |
<#setting number_format="percent"/> | 设置数字默认输出方式('percent',百分比) |
<#assign answer=42/> | 声明变量 answer 42 |
#{answer} | 输出 4,200% |
${answer?string} | 输出 4,200% |
${answer?string.number} | 输出 42 |
${answer?string.currency} | 输出 ¥42.00 |
${answer?string.percent} | 输出 4,200% |
#{answer} | 输出 42 |
数字格式化插值可采用#{expr;format}形式来格式化数字,其中format可以是:
mX:小数部分最小X位
MX:小数部分最大X位
如下面的例子:
<#assign x=2.582/><#assign y=4/>
#{x; M2} // 输出2.58
#{y; M2} // 输出4
#{x; m2} // 输出2.58
#{y; m2} // 输出4.0
#{x; m1M2} // 输出2.58
#{y; m1M2} // 输出4.0
- 4、申明变量
<#assign foo=false/>// 声明变量,插入布尔值进行显示,注意不要用引号
${foo?string("yes","no")} // 当为true时输出"yes",否则输出"no"
申明变量的几种方式
<#assign name=value>
<#assign name1=value1 name2=value2 ... nameN=valueN>
<#assign same as above... in namespacehash>
<#assign name> capture this </#assign>
<#assign name in namespacehash> capture this </#assign>
- 5、比较运算符
表达式中支持的比较运算符有如下几个:
= 或 == :判断两个值是否相等.
!= :判断两个值是否不等.
> 或 gt :判断左边值是否大于右边值
>= 或 gte :判断左边值是否大于等于右边值
< 或 lt :判断左边值是否小于右边值
<= 或 lte :判断左边值是否小于等于右边值
- 6、算术运算符
FreeMarker表达式中完全支持算术运算,FreeMarker支持的算术运算符包括:
+, - , - , / , % 注意:
(1)、运算符两边必须是数字
(2)、使用+运算符时,如果一边是数字,一边是字符串,就会自动将数字转换为字符串再连接,如:${3 + "5"},结果是:35
- 7、逻辑运算符
逻辑运算符有如下几个:
逻辑与:&&
逻辑或:||
逻辑非:!
逻辑运算符只能作用于布尔值,否则将产生错误
- 8、FreeMarker中的运算符优先级如下(由高到低排列):
①、一元运算符:!
②、内建函数:?
③、乘除法:*, / , %
④、加减法:- , +
⑤、比较:> , < , >= , <= (lt , lte , gt , gte)
⑥、相等:== , = , !=
⑦、逻辑与:&&
⑧、逻辑或:||
⑨、数字范围:..
实际上,我们在开发过程中应该使用括号来严格区分,这样的可读性好,出错少
- 9、if 逻辑判断(注意:elseif 不加空格)
<#if condition>
...
<#elseif condition2>
...
<#elseif condition3>
...
<#else>
...
</#if>
2
3
4
5
6
7
8
9
if 空值判断 // 当 photoList 不为空时<#if photoList??>...</#if>
值得注意的是,${..}只能用于文本部分,不能用于表达式
下面的代码是错误的:
<#if ${isBig}>Wow!</#if>
<#if "${isBig}">Wow!</#if>
正确写法--><#if isBig>Wow!</#if>
- 10、switch (条件可为数字,可为字符串)
<#switch value>
 <#case refValue1>
 ....
<#break>
<#case refValue2>
....
<#break>
 <#case refValueN>
 ....
<#break>
 <#default>
 ....
 </#switch>
2
3
4
5
6
7
8
9
10
11
12
13
- 11、集合 & 循环
- 遍历集合:
<#list empList! as emp>
    ${emp.name!}
</#list>
2
3
!表示取值,可以省掉
- 可以这样遍历集合:
<#list 0..(empList!?size-1) as i>
    ${empList[i].name!}
</#list>
2
3
与jstl循环类似,也可以访问循环的状态。
empList?size: // 取集合的长度
emp_index: // int类型,当前对象的索引值
emp_has_next: // boolean类型,是否存在下一个对象
索引问题
<#list empList[4..6] as emp> ${emp_index} </#list>
循环输出的index值为:0,1,2
使用<#break>跳出循环
<#if emp_index = 0><#break></#if>
集合长度判断
<#if empList?size != 0></#if> // 判断=的时候,注意只要一个=符号,而不是==
<#assign l=0..100/> // 定义一个int区间的0~100的集合,数字范围也支持反递增,如100..2
<#list 0..100 as i>  // 等效于java for(int i=0; i <= 100; i++)
  ${i}
</#list>
2
3
截取子集合:
empList[3..5] //返回empList集合的子集合,子集合中的元素是empList集合中的第4-6个元素
创建集合:
<#list ["星期一", "星期二", "星期三", "星期四", "星期五", "星期六", "星期天"] as x>
集合连接运算,将两个集合连接成一个新的集合
<#list ["星期一","星期二","星期三"] + ["星期四","星期五","星期六","星期天"] as x>
除此之外,集合元素也可以是表达式,例子如下:
[2 + 2, [1, 2, 3, 4], "whatnot"]
seq_contains:判断序列中的元素是否存在
<#assign x = ["red", 16, "blue", "cyan"]>
${x?seq_contains("blue")?string("yes", "no")}    // yes
${x?seq_contains("yellow")?string("yes", "no")}  // no
${x?seq_contains(16)?string("yes", "no")}        // yes
${x?seq_contains("16")?string("yes", "no")}      // no
2
3
4
5
seq_index_of:第一次出现的索引
<#assign x = ["red", 16, "blue", "cyan", "blue"]>
${x?seq_index_of("blue")}  // 2
2
sort_by:排序(升序)
<#list movies?sort_by("showtime") as movie></#list>
sort_by:排序(降序)
<#list movies?sort_by("showtime")?reverse as movie></#list>
具体介绍:
不排序的情况:
<#list movies as moive>
  <a href="${moive.url}">${moive.name}</a>
</#list>
//要是排序,则用
<#list movies?sort as movie>
  <a href="${movie.url}">${movie.name}</a>
</#list>

// 这是按元素的首字母排序。若要按list中对象元素的某一属性排序的话,则用
<#list moives?sort_by(["name"]) as movie>
  <a href="${movie.url}">${movie.name}</a>
</#list>

//这个是按list中对象元素的[name]属性排序的,是升序,如果需要降序的话,如下所示:
<#list movies?sort_by(["name"])?reverse as movie>
  <a href="${movie.url}">${movie.name}</a>
</#list>
2
3
4
5
6
7
8
9
10
11
12
13
14
15
16
17
- 12、Map对象
// 创建map
<#assign scores = {"语文":86,"数学":78}>

// Map连接运算符
<#assign scores = {"语文":86,"数学":78} + {"数学":87,"Java":93}>

// Map元素输出
emp.name       // 全部使用点语法
emp["name"]    // 使用方括号
2
3
4
5
6
7
8
9
- 13、FreeMarker支持如下转义字符:
| 转义字符 | 含义 |
|---|---|
\" | 双引号(u0022) |
\' | 单引号(u0027) |
\\ | 反斜杠(u005C) |
\n | 换行(u000A) |
\r | 回车(u000D) |
\t | Tab(u0009) |
\b | 退格键(u0008) |
\f | Form feed(u000C) |
\l | < |
\g | > |
\a | & |
\{ | { |
\xCode | 直接通过4位的16进制数来指定Unicode码,输出该unicode码对应的字符. |
如果某段文本中包含大量的特殊符号,FreeMarker提供了另一种特殊格式:
可以在指定字符串内容的引号前增加r标记,在r标记后的文件将会直接输出.看如下代码:
${r"${foo}"}    // 输出 ${foo}
${r"C:/foo/bar"}    // 输出 C:/foo/bar
2
- 14、include指令
// include指令的作用类似于JSP的包含指令:
<#include "/test.ftl" encoding="UTF-8" parse=true>

// 在上面的语法格式中,两个参数的解释如下:
encoding="GBK"  // 编码格式
parse=true    // 是否作为ftl语法解析,默认是true,false就是以文本方式引入,
2
3
4
5
6
注意:在ftl文件里布尔值都是直接赋值的如parse=true,而不是parse="true"
- 15、import指令
// 类似于jsp里的import,它导入文件,然后就可以在当前文件里使用被导入文件里的宏组件
<#import "/libs/mylib.ftl" as my>
// 上面的代码将导入/lib/common.ftl模板文件中的所有变量,
2
3
交将这些变量放置在一个名为com的Map对象中,"my"在freemarker里被称作namespace
- 16、compress 压缩
// 用来压缩空白空间和空白的行
<#compress>
    ...
</#compress>
<#t> // 去掉左右空白和回车换行
<#lt>// 去掉左边空白和回车换行
<#rt>// 去掉右边空白和回车换行
<#nt>// 取消上面的效果
2
3
4
5
6
7
8
- 17、escape,noescape 对字符串进行HTML编码
// escape指令导致body区的插值都会被自动加上escape表达式,但不会影响字符串内的插值,只会影响到body内出现的插值,
使用escape指令的语法格式如下:
<#escape x as x?html>
  First name: ${firstName}
<#noescape>Last name: ${lastName}</#noescape>
  Maiden name: ${maidenName}
</#escape>

// 相同表达式
First name: ${firstName?html}
Last name: ${lastName}
Maiden name: ${maidenName?html}
2
3
4
5
6
7
8
9
10
# 高级语法
- 1、global全局赋值语法
<#global name=value>
<#global name1=value1 name2=value2 ... nameN=valueN>

<#global name>
  capture this
</#global>
// 利用这个语法给变量赋值,那么这个变量在所有的namespace中是可见的,
2
3
4
5
6
7
如果这个变量被当前的assign语法覆盖如<#global x=2><#assign x=1>在当前页面里x=2将被隐藏,或者通过${.globals.x} 来访问
- 2、setting 语法
// 用来设置整个系统的一个环境
locale // zh_CN 中文环境
number_format
boolean_format
date_format , time_format , datetime_format
time_zone
classic_compatible
// 例1:
<#setting number_format="percent"/>    // 设置数字默认输出方式('percent',百分比)

// 例2:
// 假如当前是匈牙利的设置,然后修改成美国
${1.2} // 输出1,2
<#setting locale="en_US">
${1.2} // 输出1.2,因为匈牙利是采用", "作为十进制的分隔符,美国是用". "
2
3
4
5
6
7
8
9
10
11
12
13
14
15
- 3、macro宏指令
例子1:
<#-- 定义宏 -->
<#macro test foo bar="Bar" baaz=-1>
  Text: ${foo}, ${bar}, ${baaz}
</#macro>

<#-- 使用宏 -->
<@test foo="a" bar="b" baaz=5*5/>  // 输出:Text: a, b, 25
<@test foo="a" bar="b"/>        // 输出:Text: a, b, -1
<@test foo="a" baaz=5*5-2/>     // 输出:Text: a, Bar, 23
<@test foo="a"/>                   // 输出:Text: a, Bar, -1
2
3
4
5
6
7
8
9
10
例子2:
<#-- 定义一个循环输出的宏 -->
<#macro list title items>
  ${title}
  <#list items as x>
    *${x}
  </#list>
</#macro>

<#-- 使用宏 -->
<@list items=["mouse", "elephant", "python"] title="Animals"/>
// 输出Animals *mouse *elephant *python
2
3
4
5
6
7
8
9
10
11
例子3:
<#-- 嵌套宏 -->
<#macro border>
  <table>
    <#nested>
  </table>
</#macro>

<#-- 嵌套宏使用 -->
<@border>
  <tr><td>hahaha</td></tr>
</@border>
2
3
4
5
6
7
8
9
10
11
输出结果:
<table>
  <tr><td>hahaha</td></tr>
</table>
2
3
例子4:在nested指令中使用循环变量时,可以使用多个循环变量,看如下代码:
<#-- 循环嵌套宏 --><#macro repeat count>
<#list 1..count as x>
<#nested x, x/2, x==count>
 // 使用nested指令时指定了三个循环变量
</#list></#macro><#-- 使用宏 -->
<@repeat count = 4; c, halfc, last>
${c}. ${halfc}<#if last> Last!</#if></@repeat>
// 输出结果:// 1. 0.5// 2. 1// 3. 1.5// 4. 2 Last!
2
3
4
5
6
7
8
freemarker 宏嵌套nested 的使用:
- 4、结束macro指令
// return指令用于结束macro指令
<#-- 创建宏 -->
<#macro book>
  spring
  <#return>
  j2ee
</#macro>

<#-- 使用宏 -->
<@book />
// 上面的代码输出:spring,而j2ee位于return指令之后,不会输出.
2
3
4
5
6
7
8
9
10
11
# 模板加载器
- ClassTemplateLoader:从classpath中加载模板。
- FileTemplateLoader:在文件系统中从指定文件夹加载模板。
- StringTemplateLoader:从一个字符串 Map 中加载模板。
- URLTemplateLoader:从 URL 中加载模板。 你必须要实现 getURL 方法。
- WebappTemplateLoader:从 servlet 上下文中加载模板。
Configuration configuration = new Configuration();
configuration.setTemplateLoader(
new WebappTemplateLoader(servletContext, "WEB-INF/content"));
2
3
# 导出word
freemarker模板来生成word文档。
# 编写word模板
编写完成后,另存为xml文件类型,此处推荐使用vsCode(从未有过如此丝般顺滑的编辑器)来格式化生成的xml(需要安装插件XML Tools)文件
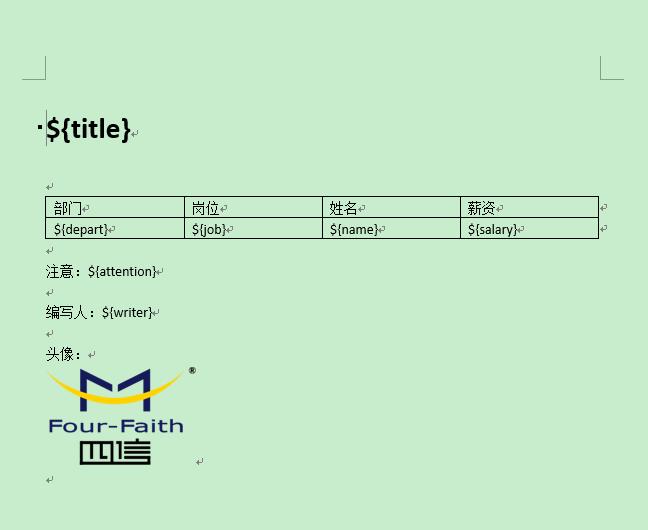
# 文字部分
需要替换的部分采用${}形式,编写完成后需要另存为xml文件,然后利用工具格式化xml文件,我这里采用vscode来进行xml文件的的格式化,得到如下文件:
<w:r>
    <w:rPr>
        <w:rFonts w:hint="eastAsia"/>
    </w:rPr>
    <w:t>${</w:t>
</w:r>
<w:r>
    <w:t>depart</w:t>
</w:r>
<w:r>
    <w:rPr>
        <w:rFonts w:hint="eastAsia"/>
    </w:rPr>
    <w:t>}</w:t>
2
3
4
5
6
7
8
9
10
11
12
13
14
可以发现,部分${}被拆开了,需要我们手动将其中的部分删去,如下:
<w:rPr>
        <w:rFonts w:hint="eastAsia"/>
    </w:rPr>
    <w:t>${depart}</w:t>
</w:r>
2
3
4
5
此处建议一种方式来填写这些待替换的变量——通过excel,如下图:
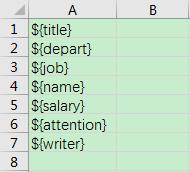
然后将这些复制粘贴到word模板中对应的位置,即可实现大部分的${}不会被拆开
<w:tc>
    <w:tcPr>
        <w:tcW w:w="2074" w:type="dxa"/>
    </w:tcPr>
    <w:p w:rsidR="007E690B" w:rsidRDefault="00952002" w:rsidP="007E690B">
        <w:r w:rsidRPr="00952002">
            <w:t>${depart}</w:t>
        </w:r>
    </w:p>
</w:tc>
<w:tc>
    <w:tcPr>
        <w:tcW w:w="2074" w:type="dxa"/>
    </w:tcPr>
    <w:p w:rsidR="007E690B" w:rsidRDefault="00952002" w:rsidP="007E690B">
        <w:r w:rsidRPr="00952002">
            <w:t>${job}</w:t>
        </w:r>
    </w:p>
</w:tc>
<w:tc>
    <w:tcPr>
        <w:tcW w:w="2074" w:type="dxa"/>
    </w:tcPr>
    <w:p w:rsidR="007E690B" w:rsidRDefault="00952002" w:rsidP="007E690B">
        <w:r w:rsidRPr="00952002">
            <w:t>${name}</w:t>
        </w:r>
    </w:p>
</w:tc>
2
3
4
5
6
7
8
9
10
11
12
13
14
15
16
17
18
19
20
21
22
23
24
25
26
27
28
29
30
对于替换量较大的模板更省时。
# 图片部分
可以看到xml中图片已被转换,搜索binaryData或者binData,可以发现一大段的编码,现将其替换成${}形式,具体名称自定,保持跟代码中一致即可
<pkg:binaryData>iVBORw0KGgoAAAANSUhEUgAAAPsAAAClCAYAAAHt8bu3AAAAAXNSR0IArs4c6QAAAARnQU1BAACx
jwv8YQUAAAAJcEhZcwAACxMAAAsTAQCanBgAABlvSURBVHhe7Z09rCRLdcdvTOIneQHdZ2E/gSVb
DtAzKZYgeAkSPFYW...
2
3
<pkg:binaryData>${image}</pkg:binaryData>
完成后保存并修改文件类型后缀为ftl,编码实现word导出
import freemarker.template.Configuration;
import freemarker.template.Template;
import freemarker.template.TemplateException;
import org.apache.commons.codec.binary.Base64;
import org.springframework.util.ResourceUtils;
import org.springframework.web.servlet.view.freemarker.FreeMarkerConfigurer;

import java.io.*;
import java.nio.charset.StandardCharsets;
import java.util.HashMap;
import java.util.Map;
import java.util.Optional;

/**
 - 导出word类
 - @author huting
 */
public class ExportWordUtil {
    public static void main(String... args){
//        FreeMarkerConfigurer freeMarkerConfigurer = new FreeMarkerConfigurer();
        Configuration configuration = new Configuration();
        File outFile = new File("D:/JAVA_WORK/result.doc");
        try(Writer out = new BufferedWriter(
                new OutputStreamWriter(
                        new FileOutputStream(outFile),StandardCharsets.UTF_8),10204)) {
//            response.setContentType("octets/stream");
//            response.setHeader("content-Type", "application/msword");
//            String wordName="result";
//            response.setHeader("Content-Disposition", "attachment;filename="
//                    +new String( wordName.getBytes("gb2312"), "ISO8859-1" )
//                    +".doc");
            String rootTemplatePath = Optional.ofNullable(ResourceUtils.getURL("classpath:").getPath())
                    .orElse("D:/JAVA_WORK/MyTestSpringBoot/src/main/resources/");
//            configuration.setClassForTemplateLoading(ExportWordUtil.class,"/com");
            configuration.setDirectoryForTemplateLoading(new File(rootTemplatePath));
            Template template = configuration.getTemplate("templates/wordAlarm.ftl","utf-8");
            String imgFile = rootTemplatePath+"static/images/banner.jpg";
            Map<String,String> dataMap = generateDataMap();
            dataMap.put("image",transferImgToBase64(imgFile));
            template.process(dataMap,out);
        } catch (IOException | TemplateException e) {
            e.printStackTrace();
        }
    }

    private static String transferImgToBase64(String filePath) throws IOException {
        Base64 b64Encoder = new Base64();
        File file = new File(filePath);
        FileInputStream fis = new FileInputStream(file);
        byte[] imgByte = new byte[fis.available()];
        fis.read(imgByte);
        fis.close();
        return  b64Encoder.encodeAsString(imgByte);
    }

    private static Map<String, String> generateDataMap(){
        Map<String,String> map = new HashMap<>(10);
        map.put("title","某公司员工列表");
        map.put("depart","研发中心");
        map.put("job","攻城狮");
        map.put("name","某某");
        map.put("salary","¥-12,000.00");
        map.put("attention","快来围观");
        map.put("writer","某男");

        return map;
    }
}
2
3
4
5
6
7
8
9
10
11
12
13
14
15
16
17
18
19
20
21
22
23
24
25
26
27
28
29
30
31
32
33
34
35
36
37
38
39
40
41
42
43
44
45
46
47
48
49
50
51
52
53
54
55
56
57
58
59
60
61
62
63
64
65
66
67
68
# 带循环的导出
还是刚才的word模板,查找w:tr,第一对是标题的,找到第二对的w:tr,做处理;
<#list listDataMap as dataMap>
<w:tr w:rsidR="007E690B" w:rsidTr="007E690B">
    <w:tc>
        <w:tcPr>
            <w:tcW w:w="2074" w:type="dxa"/>
        </w:tcPr>
        <w:p w:rsidR="007E690B" w:rsidRDefault="00952002" w:rsidP="007E690B">
            <w:r w:rsidRPr="00952002">
                <w:t>${dataMap.depart}</w:t>
            </w:r>
        </w:p>
    </w:tc>
    <w:tc>
        <w:tcPr>
            <w:tcW w:w="2074" w:type="dxa"/>
        </w:tcPr>
        <w:p w:rsidR="007E690B" w:rsidRDefault="00952002" w:rsidP="007E690B">
            <w:r w:rsidRPr="00952002">
                <w:t>${dataMap.job}</w:t>
            </w:r>
        </w:p>
    </w:tc>
    <w:tc>
        <w:tcPr>
            <w:tcW w:w="2074" w:type="dxa"/>
        </w:tcPr>
        <w:p w:rsidR="007E690B" w:rsidRDefault="00952002" w:rsidP="007E690B">
            <w:r w:rsidRPr="00952002">
                <w:t>${dataMap.name}</w:t>
            </w:r>
        </w:p>
    </w:tc>
    <w:tc>
        <w:tcPr>
            <w:tcW w:w="2074" w:type="dxa"/>
        </w:tcPr>
        <w:p w:rsidR="007E690B" w:rsidRDefault="00952002" w:rsidP="007E690B">
            <w:r w:rsidRPr="00952002">
                <w:t>${dataMap.salary}</w:t>
            </w:r>
        </w:p>
    </w:tc>
</w:tr>
</#list>
2
3
4
5
6
7
8
9
10
11
12
13
14
15
16
17
18
19
20
21
22
23
24
25
26
27
28
29
30
31
32
33
34
35
36
37
38
39
40
41
42
43
44
编码如下:
public class ExportWordUtil {
    public static void main(String... args){
//        FreeMarkerConfigurer freeMarkerConfigurer = new FreeMarkerConfigurer();
        Configuration configuration = new Configuration();
        File outFile = new File("D:/JAVA_WORK/result.doc");
        try(Writer out = new BufferedWriter(
                new OutputStreamWriter(
                        new FileOutputStream(outFile),StandardCharsets.UTF_8),10204)) {
//            response.setContentType("octets/stream");
//            response.setHeader("content-Type", "application/msword");
//            String wordName="result";
//            response.setHeader("Content-Disposition", "attachment;filename="
//                    +new String( wordName.getBytes("gb2312"), "ISO8859-1" )
//                    +".doc");
//            template.process(root, new BufferedWriter(new OutputStreamWriter(response.getOutputStream(),"utf-8"),10240));
            String rootTemplatePath = Optional.ofNullable(ResourceUtils.getURL("classpath:").getPath())
                    .orElse("D:/JAVA_WORK/MyTestSpringBoot/src/main/resources/");
//            configuration.setClassForTemplateLoading(ExportWordUtil.class,"/com");
            configuration.setDirectoryForTemplateLoading(new File(rootTemplatePath));
            Template template = configuration.getTemplate("templates/wordAlarm.ftl","utf-8");
            String imgFile = rootTemplatePath+"static/images/banner.jpg";
            Map<String,Object> dataMap = new HashMap<>(2);
            dataMap.put("listDataMap",generateListDataMap(8));
            dataMap.put("image",transferImgToBase64(imgFile));
            dataMap.put("title","某公司员工列表");
            dataMap.put("attention","快来围观");
            dataMap.put("writer","某男");
            template.process(dataMap,out);
        } catch (IOException | TemplateException e) {
            e.printStackTrace();
        }
    }

    private static String transferImgToBase64(String filePath) throws IOException {
        Base64 b64Encoder = new Base64();
        File file = new File(filePath);
        FileInputStream fis = new FileInputStream(file);
        byte[] imgByte = new byte[fis.available()];
        fis.read(imgByte);
        fis.close();
        return  b64Encoder.encodeAsString(imgByte);
    }

    private static Map<String, String> generateDataMap(int i){
        Map<String,String> map = new HashMap<>(10);
        map.put("depart","研发中心");
        map.put("job","攻城狮"+i);
        map.put("name","某某"+i);
        map.put("salary","¥-12,000.00");

        return map;
    }

    private static List<Map<String, String>> generateListDataMap(Integer length){
        List<Map<String,String>> lists = new ArrayList<>();
        for (int i = 1; i < Optional.ofNullable(length).filter(len->len<=0).orElse(6); i++){
            lists.add(generateDataMap(i));
        }
        return lists;
    }
}
2
3
4
5
6
7
8
9
10
11
12
13
14
15
16
17
18
19
20
21
22
23
24
25
26
27
28
29
30
31
32
33
34
35
36
37
38
39
40
41
42
43
44
45
46
47
48
49
50
51
52
53
54
55
56
57
58
59
60
61
# 导出excel
类似word,制作好excel文件,另存为xml,调整需要调整的xml文件中的位置,进行动态替换即可。
# freemarker与sping整合
@Autowired
private FreeMarkerConfigurer freeMarkerConfigurer;

Template template = freeMarkerConfigurer.getConfiguration().getTemplate("wordAlarm.ftl","utf-8");
2
3
4
# 整合springboot
pom文件
<dependency>
            <groupId>org.springframework.boot</groupId>
            <artifactId>spring-boot-starter-freemarker</artifactId>
<!--            <version>2.1.6.RELEASE</version>-->
        </dependency>
2
3
4
5
可以看到freemarker的自动配置
package org.springframework.boot.autoconfigure.freemarker;

@Configuration
@ConditionalOnClass({ freemarker.template.Configuration.class, FreeMarkerConfigurationFactory.class })
@EnableConfigurationProperties(FreeMarkerProperties.class)
@Import({ FreeMarkerServletWebConfiguration.class, FreeMarkerReactiveWebConfiguration.class,
    FreeMarkerNonWebConfiguration.class })
public class FreeMarkerAutoConfiguration {

private static final Log logger = LogFactory.getLog(FreeMarkerAutoConfiguration.class);

private final ApplicationContext applicationContext;

private final FreeMarkerProperties properties;

public FreeMarkerAutoConfiguration(ApplicationContext applicationContext, FreeMarkerProperties properties) {
    this.applicationContext = applicationContext;
    this.properties = properties;
}

@PostConstruct
public void checkTemplateLocationExists() {
    if (logger.isWarnEnabled() && this.properties.isCheckTemplateLocation()) {
        List<TemplateLocation> locations = getLocations();
        if (locations.stream().noneMatch(this::locationExists)) {
            logger.warn("Cannot find template location(s): " + locations + " (please add some templates, "
                    + "check your FreeMarker configuration, or set "
                    + "spring.freemarker.checkTemplateLocation=false)");
        }
    }
}
2
3
4
5
6
7
8
9
10
11
12
13
14
15
16
17
18
19
20
21
22
23
24
25
26
27
28
29
30
31
从这里可以看出,当 classpath 下存在 freemarker.template.Configuration 以及 FreeMarkerConfigurationFactory 时,配置才会生效,也就是说当我们引入了 Freemarker 之后,配置就会生效。但是这里的自动化配置只做了模板位置检查,其他配置则是在导入的 FreeMarkerServletWebConfiguration 配置中完成的。那么我们再来看看
@Configuration
@ConditionalOnWebApplication(type = ConditionalOnWebApplication.Type.SERVLET)
@ConditionalOnClass({ Servlet.class, FreeMarkerConfigurer.class })
@AutoConfigureAfter(WebMvcAutoConfiguration.class)
class FreeMarkerServletWebConfiguration extends AbstractFreeMarkerConfiguration {

protected FreeMarkerServletWebConfiguration(FreeMarkerProperties properties) {
    super(properties);
}

@Bean
@ConditionalOnMissingBean(FreeMarkerConfig.class)
public FreeMarkerConfigurer freeMarkerConfigurer() {
    FreeMarkerConfigurer configurer = new FreeMarkerConfigurer();
    applyProperties(configurer);
    return configurer;
}

@Bean
public freemarker.template.Configuration freeMarkerConfiguration(FreeMarkerConfig configurer) {
    return configurer.getConfiguration();
}

@Bean
@ConditionalOnMissingBean(name = "freeMarkerViewResolver")
@ConditionalOnProperty(name = "spring.freemarker.enabled", matchIfMissing = true)
public FreeMarkerViewResolver freeMarkerViewResolver() {
    FreeMarkerViewResolver resolver = new FreeMarkerViewResolver();
    getProperties().applyToMvcViewResolver(resolver);
    return resolver;
}
2
3
4
5
6
7
8
9
10
11
12
13
14
15
16
17
18
19
20
21
22
23
24
25
26
27
28
29
30
31
我们来简单看下这段源码:
@ConditionalOnWebApplication 表示当前配置在 web 环境下才会生效
ConditionalOnClass 表示当前配置在存在 Servlet 和 FreeMarkerConfigurer 时才会生效。
@AutoConfigureAfter 表示当前自动化配置在 WebMvcAutoConfiguration 之后完成。
代码中,主要提供了 FreeMarkerConfigurer 和 FreeMarkerViewResolver。
FreeMarkerConfigurer 是 Freemarker 的一些基本配置,例如 templateLoaderPath、defaultEncoding 等
FreeMarkerViewResolver 则是视图解析器的基本配置,包含了viewClass、suffix、allowRequestOverride、allowSessionOverride 等属性。
构造方法中配置了基本信息
@ConfigurationProperties(prefix = "spring.freemarker")
public class FreeMarkerProperties extends AbstractTemplateViewResolverProperties {

public static final String DEFAULT_TEMPLATE_LOADER_PATH = "classpath:/templates/";

public static final String DEFAULT_PREFIX = "";

public static final String DEFAULT_SUFFIX = ".ftl";

/**
    - Well-known FreeMarker keys which are passed to FreeMarker's Configuration.
    */
private Map<String, String> settings = new HashMap<>();java
2
3
4
5
6
7
8
9
10
11
12
13
如需要修改配置文件:
spring.freemarker.allow-request-override=false
spring.freemarker.allow-session-override=false
spring.freemarker.cache=false
spring.freemarker.charset=UTF-8
spring.freemarker.check-template-location=true
spring.freemarker.content-type=text/html
spring.freemarker.expose-request-attributes=false
spring.freemarker.expose-session-attributes=false
spring.freemarker.suffix=.ftl
spring.freemarker.template-loader-path=classpath:/templates/
2
3
4
5
6
7
8
9
10
配置文件按照顺序依次解释如下:
HttpServletRequest的属性是否可以覆盖controller中model的同名项
HttpSession的属性是否可以覆盖controller中model的同名项
是否开启缓存
模板文件编码
是否检查模板位置
Content-Type的值
是否将HttpServletRequest中的属性添加到Model中
是否将HttpSession中的属性添加到Model中
模板文件后缀
模板文件位置