# deepComponent
# 13、过滤器
Vue.js 允许你自定义过滤器,可被用于一些常见的文本格式化。过滤器可以用在两个地方:双花括号插值和 v-bind 表达式 (后者从 2.1.0+ 开始支持)。过滤器应该被添加在 JavaScript 表达式的尾部,由“管道”符号指示:
<!-- 在双花括号中 -->
{{ message | capitalize }}

<!-- 在 `v-bind` 中 -->
<div v-bind:id="rawId | formatId"></div>
2
3
4
5
你可以在一个组件的选项中定义本地的过滤器:
filters: {
  capitalize: function (value) {
    if (!value) return ''
    value = value.toString()
    return value.charAt(0).toUpperCase() + value.slice(1)
  }
}
2
3
4
5
6
7
或者在创建 Vue 实例之前全局定义过滤器:
Vue.filter('capitalize', function (value) {
  if (!value) return ''
  value = value.toString()
  return value.charAt(0).toUpperCase() + value.slice(1)
})

new Vue({
  // ...
})
2
3
4
5
6
7
8
9
当全局过滤器和局部过滤器重名时,会采用局部过滤器。
# 下面这个例子用到了 capitalize 过滤器
过滤器函数总接收表达式的值 (之前的操作链的结果) 作为第一个参数。在上述例子中,capitalize 过滤器函数将会收到 message 的值作为第一个参数。
过滤器可以串联:
{{ message | filterA | filterB }}
在这个例子中,filterA 被定义为接收单个参数的过滤器函数,表达式 message 的值将作为参数传入到函数中。然后继续调用同样被定义为接收单个参数的过滤器函数 filterB,将 filterA 的结果传递到 filterB 中。
过滤器是 JavaScript 函数,因此可以接收参数:
{{ message | filterA('arg1', arg2) }}
这里,filterA 被定义为接收三个参数的过滤器函数。其中 message 的值作为第一个参数,普通字符串 'arg1' 作为第二个参数,表达式 arg2 的值作为第三个参数。
# 12、插件
插件通常用来为 Vue 添加全局功能。插件的功能范围没有严格的限制——一般有下面几种:
- 添加全局方法或者属性。如: vue-custom-element
- 添加全局资源:指令/过滤器/过渡等。如 vue-touch
- 通过全局混入来添加一些组件选项。如 vue-router
- 添加 Vue 实例方法,通过把它们添加到 Vue.prototype 上实现。
- 一个库,提供自己的 API,同时提供上面提到的一个或多个功能。如 vue-router
# 使用插件
通过全局方法 Vue.use() 使用插件。它需要在你调用 new Vue() 启动应用之前完成:
// 调用 `MyPlugin.install(Vue)`
Vue.use(MyPlugin)

new Vue({
  // ...组件选项
})
2
3
4
5
6
也可以传入一个可选的选项对象:
Vue.use(MyPlugin, { someOption: true })
Vue.use 会自动阻止多次注册相同插件,届时即使多次调用也只会注册一次该插件。
Vue.js 官方提供的一些插件 (例如 vue-router) 在检测到 Vue 是可访问的全局变量时会自动调用 Vue.use()。然而在像 CommonJS 这样的模块环境中,你应该始终显式地调用 Vue.use():
// 用 Browserify 或 webpack 提供的 CommonJS 模块环境时
var Vue = require('vue')
var VueRouter = require('vue-router')

// 不要忘了调用此方法
Vue.use(VueRouter)
2
3
4
5
6
# 开发插件
Vue.js 的插件应该暴露一个 install 方法。这个方法的第一个参数是 Vue 构造器,第二个参数是一个可选的选项对象:
MyPlugin.install = function (Vue, options) {
  // 1. 添加全局方法或属性
  Vue.myGlobalMethod = function () {
    // 逻辑...
  }

  // 2. 添加全局资源
  Vue.directive('my-directive', {
    bind (el, binding, vnode, oldVnode) {
      // 逻辑...
    }
    ...
  })

  // 3. 注入组件选项
  Vue.mixin({
    created: function () {
      // 逻辑...
    }
    ...
  })

  // 4. 添加实例方法
  Vue.prototype.$myMethod = function (methodOptions) {
    // 逻辑...
  }
}
2
3
4
5
6
7
8
9
10
11
12
13
14
15
16
17
18
19
20
21
22
23
24
25
26
27
# 11、渲染函数 & JSX
# 基础
Vue 推荐在绝大多数情况下使用模板来创建你的 HTML。然而在一些场景中,你真的需要 JavaScript 的完全编程的能力。这时你可以用渲染函数,它比模板更接近编译器。
让我们深入一个简单的例子,这个例子里 render 函数很实用。假设我们要生成一些带锚点的标题:
<h1>
  <a name="hello-world" href="#hello-world">
    Hello world!
  </a>
</h1>
2
3
4
5
对于上面的 HTML,你决定这样定义组件接口:
<anchored-heading :level="1">Hello world!</anchored-heading>
当开始写一个只能通过 level prop 动态生成标题 (heading) 的组件时,你可能很快想到这样实现:
<script type="text/x-template" id="anchored-heading-template">
  <h1 v-if="level === 1">
    <slot></slot>
  </h1>
  <h2 v-else-if="level === 2">
    <slot></slot>
  </h2>
  <h3 v-else-if="level === 3">
    <slot></slot>
  </h3>
  <h4 v-else-if="level === 4">
    <slot></slot>
  </h4>
  <h5 v-else-if="level === 5">
    <slot></slot>
  </h5>
  <h6 v-else-if="level === 6">
    <slot></slot>
  </h6>
</script>
2
3
4
5
6
7
8
9
10
11
12
13
14
15
16
17
18
19
20
Vue.component('anchored-heading', {
  template: '#anchored-heading-template',
  props: {
    level: {
      type: Number,
      required: true
    }
  }
})
2
3
4
5
6
7
8
9
这里用模板并不是最好的选择:不但代码冗长,而且在每一个级别的标题中重复书写了 <slot></slot>,在要插入锚点元素时还要再次重复。
虽然模板在大多数组件中都非常好用,但是显然在这里它就不合适了。那么,我们来尝试使用 render 函数重写上面的例子:
Vue.component('anchored-heading', {
  render: function (createElement) {
    return createElement(
      'h' + this.level,   // 标签名称
      this.$slots.default // 子节点数组
    )
  },
  props: {
    level: {
      type: Number,
      required: true
    }
  }
})
2
3
4
5
6
7
8
9
10
11
12
13
14
看起来简单多了!这样代码精简很多,但是需要非常熟悉 Vue 的实例属性。在这个例子中,你需要知道,向组件中传递不带 v-slot 指令的子节点时,比如 anchored-heading 中的 Hello world!,这些子节点被存储在组件实例中的 $slots.default 中。如果你还不了解,在深入渲染函数之前推荐阅读实例属性 API。
# 节点、树以及虚拟 DOM
在深入渲染函数之前,了解一些浏览器的工作原理是很重要的。以下面这段 HTML 为例:
<div>
  <h1>My title</h1>
  Some text content
  <!-- TODO: Add tagline -->
</div>
2
3
4
5
当浏览器读到这些代码时,它会建立一个“DOM 节点”树来保持追踪所有内容,如同你会画一张家谱树来追踪家庭成员的发展一样。
上述 HTML 对应的 DOM 节点树如下图所示:
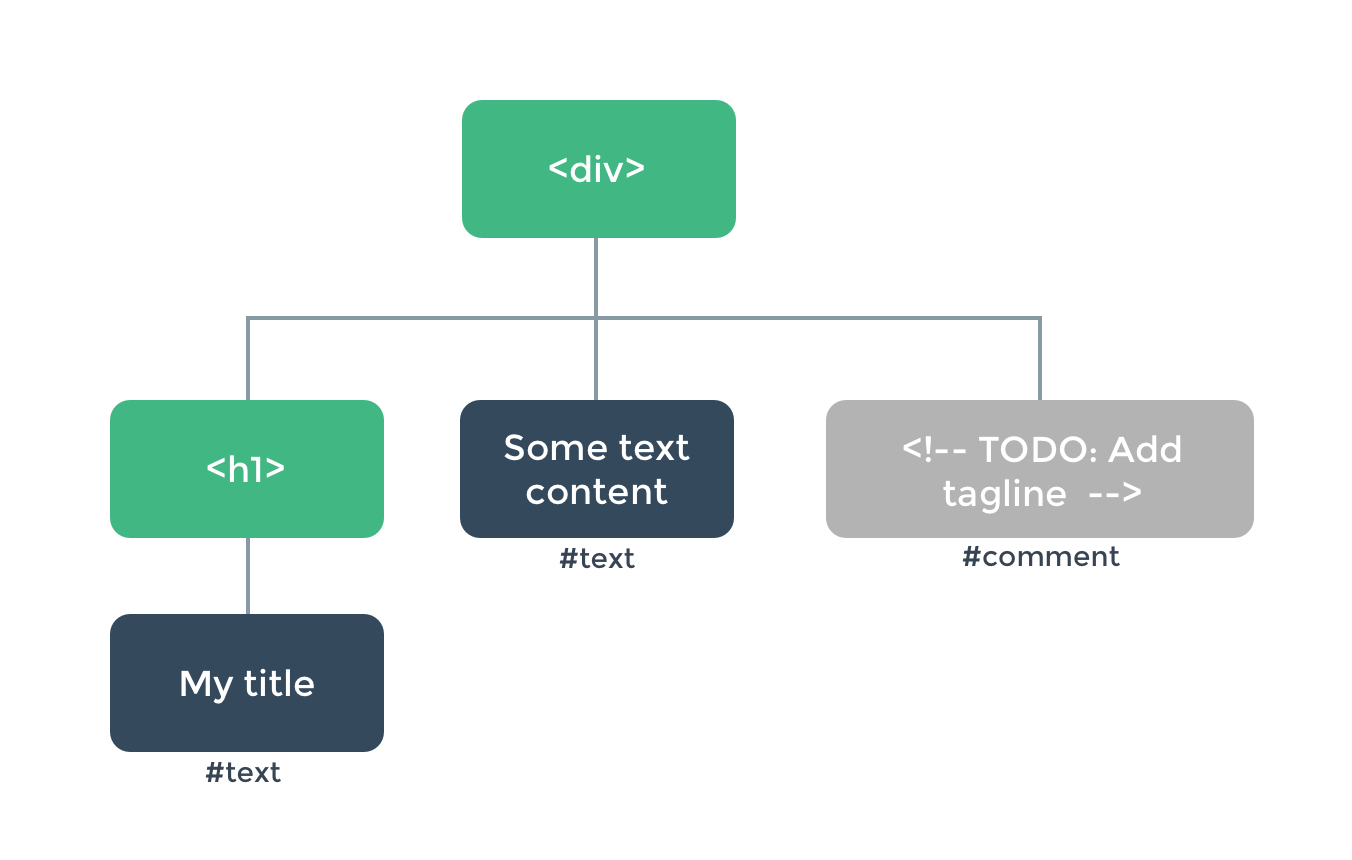
每个元素都是一个节点。每段文字也是一个节点。甚至注释也都是节点。一个节点就是页面的一个部分。就像家谱树一样,每个节点都可以有孩子节点 (也就是说每个部分可以包含其它的一些部分)。
高效地更新所有这些节点会是比较困难的,不过所幸你不必手动完成这个工作。你只需要告诉 Vue 你希望页面上的 HTML 是什么,这可以是在一个模板里:
<h1>{{ blogTitle }}</h1>
或者一个渲染函数里:
render: function (createElement) {
  return createElement('h1', this.blogTitle)
}
2
3
在这两种情况下,Vue 都会自动保持页面的更新,即便 blogTitle 发生了改变。
# 虚拟 DOM
Vue 通过建立一个虚拟 DOM 来追踪自己要如何改变真实 DOM。请仔细看这行代码:
return createElement('h1', this.blogTitle)
createElement 到底会返回什么呢?其实不是一个实际的 DOM 元素。它更准确的名字可能是 createNodeDescription,因为它所包含的信息会告诉 Vue 页面上需要渲染什么样的节点,包括及其子节点的描述信息。我们把这样的节点描述为“虚拟节点 (virtual node)”,也常简写它为“VNode”。“虚拟 DOM”是我们对由 Vue 组件树建立起来的整个 VNode 树的称呼。
# createElement 参数
接下来你需要熟悉的是如何在 createElement 函数中使用模板中的那些功能。这里是 createElement 接受的参数:
// @returns {VNode}
createElement(
  // {String | Object | Function}
  // 一个 HTML 标签名、组件选项对象,或者
  // resolve 了上述任何一种的一个 async 函数。必填项。
  'div',

  // {Object}
  // 一个与模板中属性对应的数据对象。可选。
  {
    // (详情见下一节)
  },

  // {String | Array}
  // 子级虚拟节点 (VNodes),由 `createElement()` 构建而成,
  // 也可以使用字符串来生成“文本虚拟节点”。可选。
  [
    '先写一些文字',
    createElement('h1', '一则头条'),
    createElement(MyComponent, {
      props: {
        someProp: 'foobar'
      }
    })
  ]
)
2
3
4
5
6
7
8
9
10
11
12
13
14
15
16
17
18
19
20
21
22
23
24
25
26
# 深入数据对象
有一点要注意:正如 v-bind:class 和 v-bind:style 在模板语法中会被特别对待一样,它们在 VNode 数据对象中也有对应的顶层字段。该对象也允许你绑定普通的 HTML attribute,也允许绑定如 innerHTML 这样的 DOM 属性 (这会覆盖 v-html 指令)。
{
  // 与 `v-bind:class` 的 API 相同,
  // 接受一个字符串、对象或字符串和对象组成的数组
  'class': {
    foo: true,
    bar: false
  },
  // 与 `v-bind:style` 的 API 相同,
  // 接受一个字符串、对象,或对象组成的数组
  style: {
    color: 'red',
    fontSize: '14px'
  },
  // 普通的 HTML attribute
  attrs: {
    id: 'foo'
  },
  // 组件 prop
  props: {
    myProp: 'bar'
  },
  // DOM 属性
  domProps: {
    innerHTML: 'baz'
  },
  // 事件监听器在 `on` 属性内,
  // 但不再支持如 `v-on:keyup.enter` 这样的修饰器。
  // 需要在处理函数中手动检查 keyCode。
  on: {
    click: this.clickHandler
  },
  // 仅用于组件,用于监听原生事件,而不是组件内部使用
  // `vm.$emit` 触发的事件。
  nativeOn: {
    click: this.nativeClickHandler
  },
  // 自定义指令。注意,你无法对 `binding` 中的 `oldValue`
  // 赋值,因为 Vue 已经自动为你进行了同步。
  directives: [
    {
      name: 'my-custom-directive',
      value: '2',
      expression: '1 + 1',
      arg: 'foo',
      modifiers: {
        bar: true
      }
    }
  ],
  // 作用域插槽的格式为
  // { name: props => VNode | Array<VNode> }
  scopedSlots: {
    default: props => createElement('span', props.text)
  },
  // 如果组件是其它组件的子组件,需为插槽指定名称
  slot: 'name-of-slot',
  // 其它特殊顶层属性
  key: 'myKey',
  ref: 'myRef',
  // 如果你在渲染函数中给多个元素都应用了相同的 ref 名,
  // 那么 `$refs.myRef` 会变成一个数组。
  refInFor: true
}
2
3
4
5
6
7
8
9
10
11
12
13
14
15
16
17
18
19
20
21
22
23
24
25
26
27
28
29
30
31
32
33
34
35
36
37
38
39
40
41
42
43
44
45
46
47
48
49
50
51
52
53
54
55
56
57
58
59
60
61
62
63
# 完整示例
有了这些知识,我们现在可以完成我们最开始想实现的组件:
var getChildrenTextContent = function (children) {
  return children.map(function (node) {
    return node.children
      ? getChildrenTextContent(node.children)
      : node.text
  }).join('')
}

Vue.component('anchored-heading', {
  render: function (createElement) {
    // 创建 kebab-case 风格的 ID
    var headingId = getChildrenTextContent(this.$slots.default)
      .toLowerCase()
      .replace(/\W+/g, '-')
      .replace(/(^-|-$)/g, '')

    return createElement(
      'h' + this.level,
      [
        createElement('a', {
          attrs: {
            name: headingId,
            href: '#' + headingId
          }
        }, this.$slots.default)
      ]
    )
  },
  props: {
    level: {
      type: Number,
      required: true
    }
  }
})
2
3
4
5
6
7
8
9
10
11
12
13
14
15
16
17
18
19
20
21
22
23
24
25
26
27
28
29
30
31
32
33
34
35
# 约束
- VNode 必须唯一
组件树中的所有 VNode 必须是唯一的。这意味着,下面的渲染函数是不合法的:
render: function (createElement) {
  var myParagraphVNode = createElement('p', 'hi')
  return createElement('div', [
    // 错误 - 重复的 VNode
    myParagraphVNode, myParagraphVNode
  ])
}
2
3
4
5
6
7
如果你真的需要重复很多次的元素/组件,你可以使用工厂函数来实现。例如,下面这渲染函数用完全合法的方式渲染了 20 个相同的段落:
render: function (createElement) {
  return createElement('div',
    Array.apply(null, { length: 20 }).map(function () {
      return createElement('p', 'hi')
    })
  )
}
2
3
4
5
6
7
# 使用 JavaScript 代替模板功能
# v-if 和 v-for
只要在原生的 JavaScript 中可以轻松完成的操作,Vue 的渲染函数就不会提供专有的替代方法。比如,在模板中使用的 v-if 和 v-for:
<ul v-if="items.length">
  <li v-for="item in items">{{ item.name }}</li>
</ul>
<p v-else>No items found.</p>
2
3
4
这些都可以在渲染函数中用 JavaScript 的 if/else 和 map 来重写:
props: ['items'],
render: function (createElement) {
  if (this.items.length) {
    return createElement('ul', this.items.map(function (item) {
      return createElement('li', item.name)
    }))
  } else {
    return createElement('p', 'No items found.')
  }
}
2
3
4
5
6
7
8
9
10
# v-model
渲染函数中没有与 v-model 的直接对应——你必须自己实现相应的逻辑:
props: ['value'],
render: function (createElement) {
  var self = this
  return createElement('input', {
    domProps: {
      value: self.value
    },
    on: {
      input: function (event) {
        self.$emit('input', event.target.value)
      }
    }
  })
}
2
3
4
5
6
7
8
9
10
11
12
13
14
这就是深入底层的代价,但与 v-model 相比,这可以让你更好地控制交互细节。
# 事件 & 按键修饰符
对于 .passive、.capture 和 .once 这些事件修饰符, Vue 提供了相应的前缀可以用于 on:
| 修饰符 | 前缀 |
|---|---|
| .passive | & |
| .capture | ! |
| .once | ~ |
| .capture.once 或.once.capture | ~! |
例如:
on: {
  '!click': this.doThisInCapturingMode,
  '~keyup': this.doThisOnce,
  '~!mouseover': this.doThisOnceInCapturingMode
}
2
3
4
5
对于所有其它的修饰符,私有前缀都不是必须的,因为你可以在事件处理函数中使用事件方法:
| 修饰符 | 处理函数中的等价操作 |
|---|---|
| .stop | event.stopPropagation() |
| .prevent | event.preventDefault() |
| .self | if (event.target !== event.currentTarget) return |
| 按键:.enter, .13 | if (event.keyCode !== 13) return (对于别的按键修饰符来说,可将 13 改为另一个按键码) |
| 修饰键:.ctrl, .alt, .shift, .meta | if (!event.ctrlKey) return (将 ctrlKey 分别修改为 altKey、shiftKey 或者 metaKey) |
这里是一个使用所有修饰符的例子:
on: {
  keyup: function (event) {
    // 如果触发事件的元素不是事件绑定的元素
    // 则返回
    if (event.target !== event.currentTarget) return
    // 如果按下去的不是 enter 键或者
    // 没有同时按下 shift 键
    // 则返回
    if (!event.shiftKey || event.keyCode !== 13) return
    // 阻止 事件冒泡
    event.stopPropagation()
    // 阻止该元素默认的 keyup 事件
    event.preventDefault()
    // ...
  }
}
2
3
4
5
6
7
8
9
10
11
12
13
14
15
16
# 4、插槽
你可以通过 this.$slots 访问静态插槽的内容,每个插槽都是一个 VNode 数组:
render: function (createElement) {
  // `<div><slot></slot></div>`
  return createElement('div', this.$slots.default)
}
2
3
4
也可以通过 this.$scopedSlots 访问作用域插槽,每个作用域插槽都是一个返回若干 VNode 的函数:
props: ['message'],
render: function (createElement) {
  // `<div><slot :text="message"></slot></div>`
  return createElement('div', [
    this.$scopedSlots.default({
      text: this.message
    })
  ])
}
2
3
4
5
6
7
8
9
如果要用渲染函数向子组件中传递作用域插槽,可以利用 VNode 数据对象中的 scopedSlots 字段:
render: function (createElement) {
  return createElement('div', [
    createElement('child', {
      // 在数据对象中传递 `scopedSlots`
      // 格式为 { name: props => VNode | Array<VNode> }
      scopedSlots: {
        default: function (props) {
          return createElement('span', props.text)
        }
      }
    })
  ])
}
2
3
4
5
6
7
8
9
10
11
12
13
# JSX
如果你写了很多 render 函数,可能会觉得下面这样的代码写起来很痛苦:
createElement(
  'anchored-heading', {
    props: {
      level: 1
    }
  }, [
    createElement('span', 'Hello'),
    ' world!'
  ]
)
2
3
4
5
6
7
8
9
10
特别是对应的模板如此简单的情况下:
<anchored-heading :level="1">
  <span>Hello</span> world!
</anchored-heading>
2
3
这就是为什么会有一个 Babel 插件,用于在 Vue 中使用 JSX 语法,它可以让我们回到更接近于模板的语法上。
import AnchoredHeading from './AnchoredHeading.vue'

new Vue({
  el: '#demo',
  render: function (h) {
    return (
      <AnchoredHeading level={1}>
        <span>Hello</span> world!
      </AnchoredHeading>
    )
  }
})
2
3
4
5
6
7
8
9
10
11
12
将 h 作为 createElement 的别名是 Vue 生态系统中的一个通用惯例,实际上也是 JSX 所要求的。从 Vue 的 Babel 插件的 3.4.0 版本开始,我们会在以 ES2015 语法声明的含有 JSX 的任何方法和 getter 中 (不是函数或箭头函数中) 自动注入
const h = this.$createElement,这样你就可以去掉 (h) 参数了。对于更早版本的插件,如果 h 在当前作用域中不可用,应用会抛错。
要了解更多关于 JSX 如何映射到 JavaScript,请阅读使用文档。
# 函数式组件
之前创建的锚点标题组件是比较简单,没有管理任何状态,也没有监听任何传递给它的状态,也没有生命周期方法。实际上,它只是一个接受一些 prop 的函数。 在这样的场景下,我们可以将组件标记为 functional,这意味它无状态 (没有响应式数据),也没有实例 (没有 this 上下文)。 一个函数式组件就像这样:
Vue.component('my-component', {
  functional: true,
  // Props 是可选的
  props: {
    // ...
  },
  // 为了弥补缺少的实例
  // 提供第二个参数作为上下文
  render: function (createElement, context) {
    // ...
  }
})
2
3
4
5
6
7
8
9
10
11
12
注意:在 2.3.0 之前的版本中,如果一个函数式组件想要接收 prop,则 props 选项是必须的。在 2.3.0 或以上的版本中,你可以省略 props 选项,所有组件上的 attribute 都会被自动隐式解析为 prop。
当使用函数式组件时,该引用将会是 HTMLElement,因为他们是无状态的也是无实例的。
在 2.5.0 及以上版本中,如果你使用了单文件组件,那么基于模板的函数式组件可以这样声明:
<template functional>
</template>
2
组件需要的一切都是通过 context 参数传递,它是一个包括如下字段的对象:
- props:提供所有 prop 的对象
- children: VNode 子节点的数组
- slots: 一个函数,返回了包含所有插槽的对象
- scopedSlots: (2.6.0+) 一个暴露传入的作用域插槽的对象。也以函数形式暴露普通插槽。
- data:传递给组件的整个数据对象,作为 createElement 的第二个参数传入组件
- parent:对父组件的引用
- listeners: (2.3.0+) 一个包含了所有父组件为当前组件注册的事件监听器的对象。这是 data.on 的一个别名。
- injections: (2.3.0+) 如果使用了 inject 选项,则该对象包含了应当被注入的属性。
在添加 functional: true 之后,需要更新我们的锚点标题组件的渲染函数,为其增加 context 参数,并将 this.$slots.default 更新为 context.children,然后将 this.level 更新为 context.props.level。
因为函数式组件只是函数,所以渲染开销也低很多。
在作为包装组件时它们也同样非常有用。比如,当你需要做这些时:
- 程序化地在多个组件中选择一个来代为渲染;
- 在将 children、props、data 传递给子组件之前操作它们。
下面是一个 smart-list 组件的例子,它能根据传入 prop 的值来代为渲染更具体的组件:
var EmptyList = { /* ... */ }
var TableList = { /* ... */ }
var OrderedList = { /* ... */ }
var UnorderedList = { /* ... */ }

Vue.component('smart-list', {
  functional: true,
  props: {
    items: {
      type: Array,
      required: true
    },
    isOrdered: Boolean
  },
  render: function (createElement, context) {
    function appropriateListComponent () {
      var items = context.props.items

      if (items.length === 0)           return EmptyList
      if (typeof items[0] === 'object') return TableList
      if (context.props.isOrdered)      return OrderedList

      return UnorderedList
    }

    return createElement(
      appropriateListComponent(),
      context.data,
      context.children
    )
  }
})
2
3
4
5
6
7
8
9
10
11
12
13
14
15
16
17
18
19
20
21
22
23
24
25
26
27
28
29
30
31
32
# 向子元素或子组件传递 attribute 和事件
在普通组件中,没有被定义为 prop 的 attribute 会自动添加到组件的根元素上,将已有的同名 attribute 进行替换或与其进行智能合并。
然而函数式组件要求你显式定义该行为:
Vue.component('my-functional-button', {
  functional: true,
  render: function (createElement, context) {
    // 完全透传任何 attribute、事件监听器、子节点等。
    return createElement('button', context.data, context.children)
  }
})
2
3
4
5
6
7
通过向 createElement 传入 context.data 作为第二个参数,我们就把 my-functional-button 上面所有的 attribute 和事件监听器都传递下去了。事实上这是非常透明的,以至于那些事件甚至并不要求 .native 修饰符。
如果你使用基于模板的函数式组件,那么你还需要手动添加 attribute 和监听器。因为我们可以访问到其独立的上下文内容,所以我们可以使用 data.attrs 传递任何 HTML attribute,也可以使用 listeners (即 data.on 的别名) 传递任何事件监听器。
<template functional>
  <button
    class="btn btn-primary"
    v-bind="data.attrs"
    v-on="listeners"
  >
    <slot/>
  </button>
</template>
2
3
4
5
6
7
8
9
# slots() 和 children 对比
你可能想知道为什么同时需要 slots() 和 children。slots().default 不是和 children 类似的吗?在一些场景中,是这样——但如果是如下的带有子节点的函数式组件呢?
<my-functional-component>
  <p v-slot:foo>
    first
  </p>
  <p>second</p>
</my-functional-component>
2
3
4
5
6
对于这个组件,children 会给你两个段落标签,而 slots().default 只会传递第二个匿名段落标签,slots().foo 会传递第一个具名段落标签。同时拥有 children 和 slots(),因此你可以选择让组件感知某个插槽机制,还是简单地通过传递 children,移交给其它组件去处理。
# 模板编译
你可能会有兴趣知道,Vue 的模板实际上被编译成了渲染函数。这是一个实现细节,通常不需要关心。但如果你想看看模板的功能具体是怎样被编译的,可能会发现会非常有意思。下面是一个使用 Vue.compile 来实时编译模板字符串的简单示例:
# 10、自定义指令
# 简介
除了核心功能默认内置的指令 (v-model 和 v-show),Vue 也允许注册自定义指令。注意,在 Vue2.0 中,代码复用和抽象的主要形式是组件。然而,有的情况下,你仍然需要对普通 DOM 元素进行底层操作,这时候就会用到自定义指令。举个聚焦输入框的例子,如下:
当页面加载时,该元素将获得焦点 (注意:autofocus 在移动版 Safari 上不工作)。事实上,只要你在打开这个页面后还没点击过任何内容,这个输入框就应当还是处于聚焦状态。现在让我们用指令来实现这个功能:
// 注册一个全局自定义指令 `v-focus`
Vue.directive('focus', {
  // 当被绑定的元素插入到 DOM 中时……
  inserted: function (el) {
    // 聚焦元素
    el.focus()
  }
})
2
3
4
5
6
7
8
如果想注册局部指令,组件中也接受一个 directives 的选项:
directives: {
  focus: {
    // 指令的定义
    inserted: function (el) {
      el.focus()
    }
  }
}
2
3
4
5
6
7
8
然后你可以在模板中任何元素上使用新的 v-focus 属性,如下:
<input v-focus>
# 钩子函数
一个指令定义对象可以提供如下几个钩子函数 (均为可选):
- bind:只调用一次,指令第一次绑定到元素时调用。在这里可以进行一次性的初始化设置。
- inserted:被绑定元素插入父节点时调用 (仅保证父节点存在,但不一定已被插入文档中)。
- update:所在组件的 VNode 更新时调用,但是可能发生在其子 VNode 更新之前。指令的值可能发生了改变,也可能没有。但是你可以通过比较更新前后的值来忽略不必要的模板更新 (详细的钩子函数参数见下)。
我们会在稍后讨论渲染函数时介绍更多 VNodes 的细节。
- componentUpdated:指令所在组件的 VNode 及其子 VNode 全部更新后调用。
- unbind:只调用一次,指令与元素解绑时调用。
接下来我们来看一下钩子函数的参数 (即 el、binding、vnode 和 oldVnode)。
# 钩子函数参数
指令钩子函数会被传入以下参数:
- el:指令所绑定的元素,可以用来直接操作 DOM 。
- binding:一个对象,包含以下属性:
- name:指令名,不包括 v- 前缀。
- value:指令的绑定值,例如:v-my-directive="1 + 1" 中,绑定值为 2。 -oldValue:指令绑定的前一个值,仅在 update 和 componentUpdated 钩子中可用。无论值是否改变都可用。 -expression:字符串形式的指令表达式。例如 v-my-directive="1 + 1" 中,表达式为 "1 + 1"。 -arg:传给指令的参数,可选。例如 v-my-directive:foo 中,参数为 "foo"。 -modifiers:一个包含修饰符的对象。例如:v-my-directive.foo.bar 中,修饰符对象为 { foo: true, bar: true }。
- vnode:Vue 编译生成的虚拟节点。移步 VNode API 来了解更多详情。
- oldVnode:上一个虚拟节点,仅在 update 和 componentUpdated 钩子中可用。
除了 el 之外,其它参数都应该是只读的,切勿进行修改。如果需要在钩子之间共享数据,建议通过元素的 dataset 来进行。
这是一个使用了这些属性的自定义钩子样例:
<div id="hook-arguments-example" v-demo:foo.a.b="message"></div>
Vue.directive('demo', {
  bind: function (el, binding, vnode) {
    var s = JSON.stringify
    el.innerHTML =
      'name: '       + s(binding.name) + '<br>' +
      'value: '      + s(binding.value) + '<br>' +
      'expression: ' + s(binding.expression) + '<br>' +
      'argument: '   + s(binding.arg) + '<br>' +
      'modifiers: '  + s(binding.modifiers) + '<br>' +
      'vnode keys: ' + Object.keys(vnode).join(', ')
  }
})

new Vue({
  el: '#hook-arguments-example',
  data: {
    message: 'hello!'
  }
})
2
3
4
5
6
7
8
9
10
11
12
13
14
15
16
17
18
19
# 动态指令参数
指令的参数可以是动态的。例如,在 v-mydirective:[argument]="value" 中,argument 参数可以根据组件实例数据进行更新!这使得自定义指令可以在应用中被灵活使用。
例如你想要创建一个自定义指令,用来通过固定布局将元素固定在页面上。我们可以像这样创建一个通过指令值来更新竖直位置像素值的自定义指令:
<div id="baseexample">
  <p>Scroll down the page</p>
  <p v-pin="200">Stick me 200px from the top of the page</p>
</div>
2
3
4
Vue.directive('pin', {
  bind: function (el, binding, vnode) {
    el.style.position = 'fixed'
    el.style.top = binding.value + 'px'
  }
})

new Vue({
  el: '#baseexample'
})
2
3
4
5
6
7
8
9
10
这会把该元素固定在距离页面顶部 200 像素的位置。但如果场景是我们需要把元素固定在左侧而不是顶部又该怎么办呢?这时使用动态参数就可以非常方便地根据每个组件实例来进行更新。
<div id="dynamicexample">
  <h3>Scroll down inside this section ↓</h3>
  <p v-pin:[direction]="200">I am pinned onto the page at 200px to the left.</p>
</div>
2
3
4
Vue.directive('pin', {
  bind: function (el, binding, vnode) {
    el.style.position = 'fixed'
    var s = (binding.arg == 'left' ? 'left' : 'top')
    el.style[s] = binding.value + 'px'
  }
})

new Vue({
  el: '#dynamicexample',
  data: function () {
    return {
      direction: 'left'
    }
  }
})
2
3
4
5
6
7
8
9
10
11
12
13
14
15
16
这样这个自定义指令现在的灵活性就足以支持一些不同的用例了。
# 函数简写
在很多时候,你可能想在 bind 和 update 时触发相同行为,而不关心其它的钩子。比如这样写:
Vue.directive('color-swatch', function (el, binding) {
  el.style.backgroundColor = binding.value
})
2
3
# 对象字面量
如果指令需要多个值,可以传入一个 JavaScript 对象字面量。记住,指令函数能够接受所有合法的 JavaScript 表达式。
<div v-demo="{ color: 'white', text: 'hello!' }"></div>
Vue.directive('demo', function (el, binding) {
  console.log(binding.value.color) // => "white"
  console.log(binding.value.text)  // => "hello!"
})
2
3
4
# 9、混入
# 混入基础
混入 (mixin) 提供了一种非常灵活的方式,来分发 Vue 组件中的可复用功能。一个混入对象可以包含任意组件选项。当组件使用混入对象时,所有混入对象的选项将被“混合”进入该组件本身的选项。
// 定义一个混入对象
var myMixin = {
  created: function () {
    this.hello()
  },
  methods: {
    hello: function () {
      console.log('hello from mixin!')
    }
  }
}

// 定义一个使用混入对象的组件
var Component = Vue.extend({
  mixins: [myMixin]
})

var component = new Component() // => "hello from mixin!"
2
3
4
5
6
7
8
9
10
11
12
13
14
15
16
17
18
# 选项合并
当组件和混入对象含有同名选项时,这些选项将以恰当的方式进行“合并”。
比如,数据对象在内部会进行递归合并,并在发生冲突时以组件数据优先。
var mixin = {
  data: function () {
    return {
      message: 'hello',
      foo: 'abc'
    }
  }
}

new Vue({
  mixins: [mixin],
  data: function () {
    return {
      message: 'goodbye',
      bar: 'def'
    }
  },
  created: function () {
    console.log(this.$data)
    // => { message: "goodbye", foo: "abc", bar: "def" }
  }
})
2
3
4
5
6
7
8
9
10
11
12
13
14
15
16
17
18
19
20
21
22
同名钩子函数将合并为一个数组,因此都将被调用。另外,混入对象的钩子将在组件自身钩子之前调用。
var mixin = {
  created: function () {
    console.log('混入对象的钩子被调用')
  }
}

new Vue({
  mixins: [mixin],
  created: function () {
    console.log('组件钩子被调用')
  }
})

// => "混入对象的钩子被调用"
// => "组件钩子被调用"
2
3
4
5
6
7
8
9
10
11
12
13
14
15
值为对象的选项,例如 methods、components 和 directives,将被合并为同一个对象。两个对象键名冲突时,取组件对象的键值对。
var mixin = {
  methods: {
    foo: function () {
      console.log('foo')
    },
    conflicting: function () {
      console.log('from mixin')
    }
  }
}

var vm = new Vue({
  mixins: [mixin],
  methods: {
    bar: function () {
      console.log('bar')
    },
    conflicting: function () {
      console.log('from self')
    }
  }
})

vm.foo() // => "foo"
vm.bar() // => "bar"
vm.conflicting() // => "from self"
2
3
4
5
6
7
8
9
10
11
12
13
14
15
16
17
18
19
20
21
22
23
24
25
26
注意:Vue.extend() 也使用同样的策略进行合并。
# 全局混入
混入也可以进行全局注册。使用时格外小心!一旦使用全局混入,它将影响每一个之后创建的 Vue 实例。使用恰当时,这可以用来为自定义选项注入处理逻辑。
// 为自定义的选项 'myOption' 注入一个处理器。
Vue.mixin({
  created: function () {
    var myOption = this.$options.myOption
    if (myOption) {
      console.log(myOption)
    }
  }
})

new Vue({
  myOption: 'hello!'
})
// => "hello!"
2
3
4
5
6
7
8
9
10
11
12
13
14
请
谨慎使用全局混入,因为它会影响每个单独创建的 Vue 实例 (包括第三方组件)。大多数情况下,只应当应用于自定义选项,就像上面示例一样。推荐将其作为插件发布,以避免重复应用混入。
# 自定义选项合并策略
自定义选项将使用默认策略,即简单地覆盖已有值。如果想让自定义选项以自定义逻辑合并,可以向 Vue.config.optionMergeStrategies 添加一个函数:
Vue.config.optionMergeStrategies.myOption = function (toVal, fromVal) {
  // 返回合并后的值
}
2
3
对于多数值为对象的选项,可以使用与 methods 相同的合并策略:
var strategies = Vue.config.optionMergeStrategies
strategies.myOption = strategies.methods
2
可以在 Vuex 1.x 的混入策略里找到一个更高级的例子:
const merge = Vue.config.optionMergeStrategies.computed
Vue.config.optionMergeStrategies.vuex = function (toVal, fromVal) {
  if (!toVal) return fromVal
  if (!fromVal) return toVal
  return {
    getters: merge(toVal.getters, fromVal.getters),
    state: merge(toVal.state, fromVal.state),
    actions: merge(toVal.actions, fromVal.actions)
  }
}
2
3
4
5
6
7
8
9
10
# 8、状态过渡
Vue 的过渡系统提供了非常多简单的方法设置进入、离开和列表的动效。那么对于数据元素本身的动效呢,比如:
- 数字和运算
- 颜色的显示
- SVG 节点的位置
- 元素的大小和其他的属性
这些数据要么本身就以数值形式存储,要么可以转换为数值。有了这些数值后,我们就可以结合 Vue 的响应式和组件系统,使用第三方库来实现切换元素的过渡状态。
# 状态动画与侦听器
通过侦听器我们能监听到任何数值属性的数值更新。可能听起来很抽象,所以让我们先来看看使用 GreenSock 一个例子:
<script src="https://cdnjs.cloudflare.com/ajax/libs/gsap/1.20.3/TweenMax.min.js"></script>

<div id="animated-number-demo">
  <input v-model.number="number" type="number" step="20">
  <p>{{ animatedNumber }}</p>
</div>
2
3
4
5
6
new Vue({
  el: '#animated-number-demo',
  data: {
    number: 0,
    tweenedNumber: 0
  },
  computed: {
    animatedNumber: function() {
      return this.tweenedNumber.toFixed(0);
    }
  },
  watch: {
    number: function(newValue) {
      TweenLite.to(this.$data, 0.5, { tweenedNumber: newValue });
    }
  }
})
2
3
4
5
6
7
8
9
10
11
12
13
14
15
16
17
当你把数值更新时,就会触发动画。这个是一个不错的演示,但是对于不能直接像数字一样存储的值,比如 CSS 中的 color 的值,通过下面的例子我们来通过 Tween.js 和 Color.js 实现一个例子:
<script src="https://cdn.jsdelivr.net/npm/tween.js@16.3.4"></script>
<script src="https://cdn.jsdelivr.net/npm/color-js@1.0.3"></script>

<div id="example-7">
  <input
    v-model="colorQuery"
    v-on:keyup.enter="updateColor"
    placeholder="Enter a color"
  >
  <button v-on:click="updateColor">Update</button>
  <p>Preview:</p>
  <span
    v-bind:style="{ backgroundColor: tweenedCSSColor }"
    class="example-7-color-preview"
  ></span>
  <p>{{ tweenedCSSColor }}</p>
</div>
2
3
4
5
6
7
8
9
10
11
12
13
14
15
16
17
var Color = net.brehaut.Color

new Vue({
  el: '#example-7',
  data: {
    colorQuery: '',
    color: {
      red: 0,
      green: 0,
      blue: 0,
      alpha: 1
    },
    tweenedColor: {}
  },
  created: function () {
    this.tweenedColor = Object.assign({}, this.color)
  },
  watch: {
    color: function () {
      function animate () {
        if (TWEEN.update()) {
          requestAnimationFrame(animate)
        }
      }

      new TWEEN.Tween(this.tweenedColor)
        .to(this.color, 750)
        .start()

      animate()
    }
  },
  computed: {
    tweenedCSSColor: function () {
      return new Color({
        red: this.tweenedColor.red,
        green: this.tweenedColor.green,
        blue: this.tweenedColor.blue,
        alpha: this.tweenedColor.alpha
      }).toCSS()
    }
  },
  methods: {
    updateColor: function () {
      this.color = new Color(this.colorQuery).toRGB()
      this.colorQuery = ''
    }
  }
})
.example-7-color-preview {
  display: inline-block;
  width: 50px;
  height: 50px;
}
2
3
4
5
6
7
8
9
10
11
12
13
14
15
16
17
18
19
20
21
22
23
24
25
26
27
28
29
30
31
32
33
34
35
36
37
38
39
40
41
42
43
44
45
46
47
48
49
50
51
52
53
54
# 动态状态过渡
就像 Vue 的过渡组件一样,数据背后状态过渡会实时更新,这对于原型设计十分有用。当你修改一些变量,即使是一个简单的 SVG 多边形也可实现很多难以想象的效果。
上述 demo 背后的代码可以通过这个 fiddle 进行详阅。
# 把过渡放到组件里
管理太多的状态过渡会很快的增加 Vue 实例或者组件的复杂性,幸好很多的动画可以提取到专用的子组件。 我们来将之前的示例改写一下:
<script src="https://cdn.jsdelivr.net/npm/tween.js@16.3.4"></script>

<div id="example-8">
  <input v-model.number="firstNumber" type="number" step="20"> +
  <input v-model.number="secondNumber" type="number" step="20"> =
  {{ result }}
  <p>
    <animated-integer v-bind:value="firstNumber"></animated-integer> +
    <animated-integer v-bind:value="secondNumber"></animated-integer> =
    <animated-integer v-bind:value="result"></animated-integer>
  </p>
</div>
2
3
4
5
6
7
8
9
10
11
12
// 这种复杂的补间动画逻辑可以被复用
// 任何整数都可以执行动画
// 组件化使我们的界面十分清晰
// 可以支持更多更复杂的动态过渡
// 策略。
Vue.component('animated-integer', {
  template: '<span>{{ tweeningValue }}</span>',
  props: {
    value: {
      type: Number,
      required: true
    }
  },
  data: function () {
    return {
      tweeningValue: 0
    }
  },
  watch: {
    value: function (newValue, oldValue) {
      this.tween(oldValue, newValue)
    }
  },
  mounted: function () {
    this.tween(0, this.value)
  },
  methods: {
    tween: function (startValue, endValue) {
      var vm = this
      function animate () {
        if (TWEEN.update()) {
          requestAnimationFrame(animate)
        }
      }

      new TWEEN.Tween({ tweeningValue: startValue })
        .to({ tweeningValue: endValue }, 500)
        .onUpdate(function () {
          vm.tweeningValue = this.tweeningValue.toFixed(0)
        })
        .start()

      animate()
    }
  }
})

// 所有的复杂度都已经从 Vue 的主实例中移除!
new Vue({
  el: '#example-8',
  data: {
    firstNumber: 20,
    secondNumber: 40
  },
  computed: {
    result: function () {
      return this.firstNumber + this.secondNumber
    }
  }
})
2
3
4
5
6
7
8
9
10
11
12
13
14
15
16
17
18
19
20
21
22
23
24
25
26
27
28
29
30
31
32
33
34
35
36
37
38
39
40
41
42
43
44
45
46
47
48
49
50
51
52
53
54
55
56
57
58
59
60
我们能在组件中结合使用这一节讲到各种过渡策略和 Vue 内建的过渡系统。总之,对于完成各种过渡动效几乎没有阻碍。
# 赋予设计以生命
只要一个动画,就可以带来生命。不幸的是,当设计师创建图标、logo 和吉祥物的时候,他们交付的通常都是图片或静态的 SVG。所以,虽然 GitHub 的章鱼猫、Twitter 的小鸟以及其它许多 logo 类似于生灵,它们看上去实际上并不是活着的。
Vue 可以帮到你。因为 SVG 的本质是数据,我们只需要这些动物兴奋、思考或警戒的样例。然后 Vue 就可以辅助完成这几种状态之间的过渡动画,来制作你的欢迎页面、加载指示、以及更加带有情感的提示。
Sarah Drasner 展示了下面这个 demo,这个 demo 结合了时间和交互相关的状态改变:
# 7、进入/离开 & 列表过渡
# 概述
Vue 在插入、更新或者移除 DOM 时,提供多种不同方式的应用过渡效果。 包括以下工具:
- 在 CSS 过渡和动画中自动应用 class
- 可以配合使用第三方 CSS 动画库,如 Animate.css
- 在过渡钩子函数中使用 JavaScript 直接操作 DOM
- 可以配合使用第三方 JavaScript 动画库,如 Velocity.js
在这里,我们只会讲到进入、离开和列表的过渡,你也可以看下一节的 管理过渡状态。
# 单元素/组件的过渡
Vue 提供了 transition 的封装组件,在下列情形中,可以给任何元素和组件添加进入/离开过渡
- 条件渲染 (使用 v-if)
- 条件展示 (使用 v-show)
- 动态组件
- 组件根节点
这里是一个典型的例子:
<div id="demo">
  <button v-on:click="show = !show">
    Toggle
  </button>
  <transition name="fade">
    <p v-if="show">hello</p>
  </transition>
</div>
new Vue({
  el: '#demo',
  data: {
    show: true
  }
})
.fade-enter-active, .fade-leave-active {
  transition: opacity .5s;
}
.fade-enter, .fade-leave-to /* .fade-leave-active below version 2.1.8 */ {
  opacity: 0;
}
2
3
4
5
6
7
8
9
10
11
12
13
14
15
16
17
18
19
20
当插入或删除包含在 transition 组件中的元素时,Vue 将会做以下处理:
- 自动嗅探目标元素是否应用了 CSS 过渡或动画,如果是,在恰当的时机添加/删除 CSS 类名。
- 如果过渡组件提供了 JavaScript 钩子函数,这些钩子函数将在恰当的时机被调用。
- 如果没有找到 JavaScript 钩子并且也没有检测到 CSS 过渡/动画,DOM 操作 (插入/删除) 在下一帧中立即执行。(注意:此指浏览器逐帧动画机制,和 Vue 的 nextTick 概念不同)
# 过渡的类名
在进入/离开的过渡中,会有 6 个 class 切换。
- v-enter:定义进入过渡的开始状态。在元素被插入之前生效,在元素被插入之后的下一帧移除。
- v-enter-active:定义进入过渡生效时的状态。在整个进入过渡的阶段中应用,在元素被插入之前生效,在过渡/动画完成之后移除。这个类可以被用来定义进入过渡的过程时间,延迟和曲线函数。
- v-enter-to: 2.1.8版及以上 定义进入过渡的结束状态。在元素被插入之后下一帧生效 (与此同时 v-enter 被移除),在过渡/动画完成之后移除。
- v-leave: 定义离开过渡的开始状态。在离开过渡被触发时立刻生效,下一帧被移除。
- v-leave-active:定义离开过渡生效时的状态。在整个离开过渡的阶段中应用,在离开过渡被触发时立刻生效,在过渡/动画完成之后移除。这个类可以被用来定义离开过渡的过程时间,延迟和曲线函数。
- v-leave-to: 2.1.8版及以上 定义离开过渡的结束状态。在离开过渡被触发之后下一帧生效 (与此同时 v-leave 被删除),在过渡/动画完成之后移除。
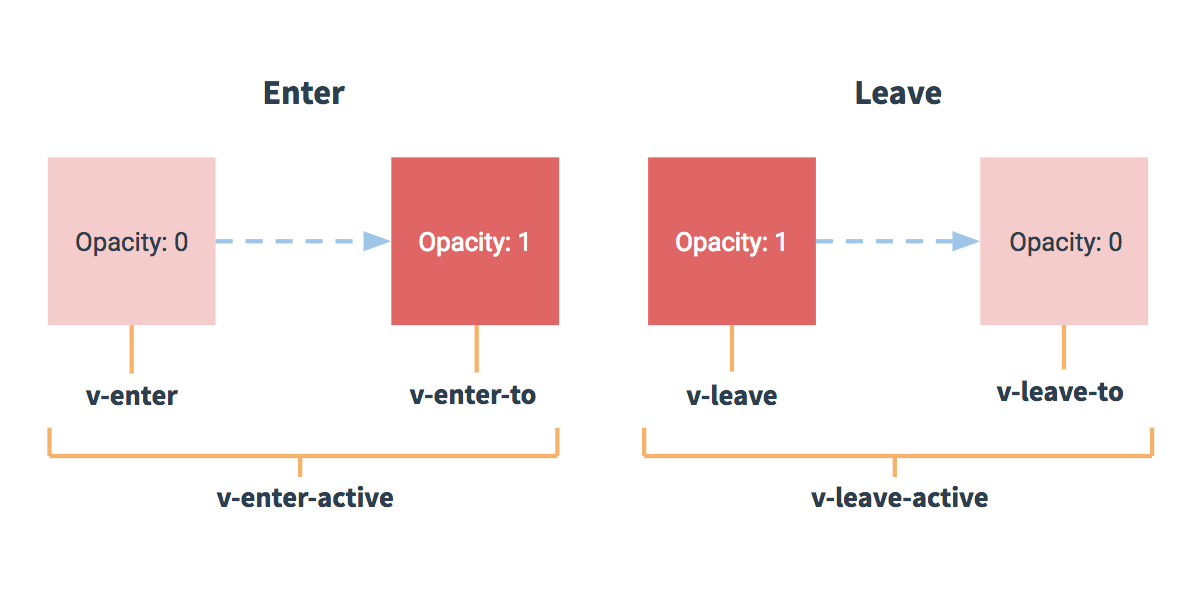
对于这些在过渡中切换的类名来说,如果你使用一个没有名字的 <transition>,则 v- 是这些类名的默认前缀。如果你使用了 <transition name="my-transition">,那么 v-enter 会替换为 my-transition-enter。
v-enter-active 和 v-leave-active 可以控制进入/离开过渡的不同的缓和曲线,在下面章节会有个示例说明。
# CSS 过渡
常用的过渡都是使用 CSS 过渡。
下面是一个简单例子:
<div id="example-1">
  <button @click="show = !show">
    Toggle render
  </button>
  <transition name="slide-fade">
    <p v-if="show">hello</p>
  </transition>
</div>
new Vue({
  el: '#example-1',
  data: {
    show: true
  }
})
/* 可以设置不同的进入和离开动画 */
/* 设置持续时间和动画函数 */
.slide-fade-enter-active {
  transition: all .3s ease;
}
.slide-fade-leave-active {
  transition: all .8s cubic-bezier(1.0, 0.5, 0.8, 1.0);
}
.slide-fade-enter, .slide-fade-leave-to
/* .slide-fade-leave-active for below version 2.1.8 */ {
  transform: translateX(10px);
  opacity: 0;
}
2
3
4
5
6
7
8
9
10
11
12
13
14
15
16
17
18
19
20
21
22
23
24
25
26
27
# CSS 动画
CSS 动画用法同 CSS 过渡,区别是在动画中 v-enter 类名在节点插入 DOM 后不会立即删除,而是在 animationend 事件触发时删除。
示例:(省略了兼容性前缀)
<div id="example-2">
  <button @click="show = !show">Toggle show</button>
  <transition name="bounce">
    <p v-if="show">Lorem ipsum dolor sit amet, consectetur adipiscing elit. Mauris facilisis enim libero, at lacinia diam fermentum id. Pellentesque habitant morbi tristique senectus et netus.</p>
  </transition>
</div>
new Vue({
  el: '#example-2',
  data: {
    show: true
  }
})
.bounce-enter-active {
  animation: bounce-in .5s;
}
.bounce-leave-active {
  animation: bounce-in .5s reverse;
}
@keyframes bounce-in {
  0% {
    transform: scale(0);
  }
  50% {
    transform: scale(1.5);
  }
  100% {
    transform: scale(1);
  }
}
2
3
4
5
6
7
8
9
10
11
12
13
14
15
16
17
18
19
20
21
22
23
24
25
26
27
28
29
# 自定义过渡的类名
我们可以通过以下 attribute 来自定义过渡类名:
- enter-class
- enter-active-class
- enter-to-class (2.1.8+)
- leave-class
- leave-active-class
- leave-to-class (2.1.8+)
他们的优先级高于普通的类名,这对于 Vue 的过渡系统和其他第三方 CSS 动画库,如 Animate.css 结合使用十分有用。
示例:
<link href="https://cdn.jsdelivr.net/npm/animate.css@3.5.1" rel="stylesheet" type="text/css">

<div id="example-3">
  <button @click="show = !show">
    Toggle render
  </button>
  <transition
    name="custom-classes-transition"
    enter-active-class="animated tada"
    leave-active-class="animated bounceOutRight"
  >
    <p v-if="show">hello</p>
  </transition>
</div>
new Vue({
  el: '#example-3',
  data: {
    show: true
  }
})
2
3
4
5
6
7
8
9
10
11
12
13
14
15
16
17
18
19
20
# 同时使用过渡和动画
Vue 为了知道过渡的完成,必须设置相应的事件监听器。它可以是 transitionend 或 animationend,这取决于给元素应用的 CSS 规则。如果你使用其中任何一种,Vue 能自动识别类型并设置监听。
但是,在一些场景中,你需要给同一个元素同时设置两种过渡动效,比如 animation 很快的被触发并完成了,而 transition 效果还没结束。在这种情况中,你就需要使用 type attribute 并设置 animation 或 transition 来明确声明你需要 Vue 监听的类型。
# 显性的过渡持续时间
- 2.2.0 新增
在很多情况下,Vue 可以自动得出过渡效果的完成时机。默认情况下,Vue 会等待其在过渡效果的根元素的第一个 transitionend 或 animationend 事件。然而也可以不这样设定——比如,我们可以拥有一个精心编排的一系列过渡效果,其中一些嵌套的内部元素相比于过渡效果的根元素有延迟的或更长的过渡效果。
在这种情况下你可以用 <transition> 组件上的 duration 属性定制一个显性的过渡持续时间 (以毫秒计):
<transition :duration="1000">...</transition>
你也可以定制进入和移出的持续时间:
<transition :duration="{ enter: 500, leave: 800 }">...</transition>
# JavaScript 钩子
可以在属性中声明 JavaScript 钩子
<transition
  v-on:before-enter="beforeEnter"
  v-on:enter="enter"
  v-on:after-enter="afterEnter"
  v-on:enter-cancelled="enterCancelled"

  v-on:before-leave="beforeLeave"
  v-on:leave="leave"
  v-on:after-leave="afterLeave"
  v-on:leave-cancelled="leaveCancelled"
>
  <!-- ... -->
</transition>
2
3
4
5
6
7
8
9
10
11
12
13
// ...
methods: {
  // --------
  // 进入中
  // --------

  beforeEnter: function (el) {
    // ...
  },
  // 当与 CSS 结合使用时
  // 回调函数 done 是可选的
  enter: function (el, done) {
    // ...
    done()
  },
  afterEnter: function (el) {
    // ...
  },
  enterCancelled: function (el) {
    // ...
  },

  // --------
  // 离开时
  // --------

  beforeLeave: function (el) {
    // ...
  },
  // 当与 CSS 结合使用时
  // 回调函数 done 是可选的
  leave: function (el, done) {
    // ...
    done()
  },
  afterLeave: function (el) {
    // ...
  },
  // leaveCancelled 只用于 v-show 中
  leaveCancelled: function (el) {
    // ...
  }
}
2
3
4
5
6
7
8
9
10
11
12
13
14
15
16
17
18
19
20
21
22
23
24
25
26
27
28
29
30
31
32
33
34
35
36
37
38
39
40
41
42
43
这些钩子函数可以结合 CSS transitions/animations 使用,也可以单独使用。
当只用 JavaScript 过渡的时候,在 enter 和 leave 中必须使用 done 进行回调。否则,它们将被同步调用,过渡会立即完成。
推荐对于仅使用 JavaScript 过渡的元素添加 v-bind:css="false",Vue 会跳过 CSS 的检测。这也可以避免过渡过程中 CSS 的影响。
一个使用 Velocity.js 的简单例子:
<!--
Velocity 和 jQuery.animate 的工作方式类似,也是用来实现 JavaScript 动画的一个很棒的选择
-->
<script src="https://cdnjs.cloudflare.com/ajax/libs/velocity/1.2.3/velocity.min.js"></script>

<div id="example-4">
  <button @click="show = !show">
    Toggle
  </button>
  <transition
    v-on:before-enter="beforeEnter"
    v-on:enter="enter"
    v-on:leave="leave"
    v-bind:css="false"
  >
    <p v-if="show">
      Demo
    </p>
  </transition>
</div>
new Vue({
  el: '#example-4',
  data: {
    show: false
  },
  methods: {
    beforeEnter: function (el) {
      el.style.opacity = 0
      el.style.transformOrigin = 'left'
    },
    enter: function (el, done) {
      Velocity(el, { opacity: 1, fontSize: '1.4em' }, { duration: 300 })
      Velocity(el, { fontSize: '1em' }, { complete: done })
    },
    leave: function (el, done) {
      Velocity(el, { translateX: '15px', rotateZ: '50deg' }, { duration: 600 })
      Velocity(el, { rotateZ: '100deg' }, { loop: 2 })
      Velocity(el, {
        rotateZ: '45deg',
        translateY: '30px',
        translateX: '30px',
        opacity: 0
      }, { complete: done })
    }
  }
})
2
3
4
5
6
7
8
9
10
11
12
13
14
15
16
17
18
19
20
21
22
23
24
25
26
27
28
29
30
31
32
33
34
35
36
37
38
39
40
41
42
43
44
45
46
# 初始渲染的过渡
可以通过 appear attribute 设置节点在初始渲染的过渡
<transition appear>
  <!-- ... -->
</transition>
2
3
这里默认和进入/离开过渡一样,同样也可以自定义 CSS 类名。
<transition
  appear
  appear-class="custom-appear-class"
  appear-to-class="custom-appear-to-class" (2.1.8+)
  appear-active-class="custom-appear-active-class"
>
  <!-- ... -->
</transition>
2
3
4
5
6
7
8
自定义 JavaScript 钩子:
<transition
  appear
  v-on:before-appear="customBeforeAppearHook"
  v-on:appear="customAppearHook"
  v-on:after-appear="customAfterAppearHook"
  v-on:appear-cancelled="customAppearCancelledHook"
>
  <!-- ... -->
</transition>
2
3
4
5
6
7
8
9
在上面的例子中,无论是 appear attribute 还是 v-on:appear 钩子都会生成初始渲染过渡。
# 多个元素的过渡
我们之后讨论多个组件的过渡,对于原生标签可以使用 v-if/v-else。最常见的多标签过渡是一个列表和描述这个列表为空消息的元素:
<transition>
  <table v-if="items.length > 0">
    <!-- ... -->
  </table>
  <p v-else>Sorry, no items found.</p>
</transition>
2
3
4
5
6
可以这样使用,但是有一点需要注意:
当有相同标签名的元素切换时,需要通过 key attribute 设置唯一的值来标记以让 Vue 区分它们,否则 Vue 为了效率只会替换相同标签内部的内容。即使在技术上没有必要,给在 <transition> 组件中的多个元素设置 key 是一个更好的实践。
示例:
<transition>
  <button v-if="isEditing" key="save">
    Save
  </button>
  <button v-else key="edit">
    Edit
  </button>
</transition>
2
3
4
5
6
7
8
在一些场景中,也可以通过给同一个元素的 key attribute 设置不同的状态来代替 v-if 和 v-else,上面的例子可以重写为:
<transition>
  <button v-bind:key="isEditing">
    {{ isEditing ? 'Save' : 'Edit' }}
  </button>
</transition>
2
3
4
5
使用多个 v-if 的多个元素的过渡可以重写为绑定了动态属性的单个元素过渡。例如:
<transition>
  <button v-if="docState === 'saved'" key="saved">
    Edit
  </button>
  <button v-if="docState === 'edited'" key="edited">
    Save
  </button>
  <button v-if="docState === 'editing'" key="editing">
    Cancel
  </button>
</transition>
2
3
4
5
6
7
8
9
10
11
可以重写为:
<transition>
  <button v-bind:key="docState">
    {{ buttonMessage }}
  </button>
</transition>
// ...
computed: {
  buttonMessage: function () {
    switch (this.docState) {
      case 'saved': return 'Edit'
      case 'edited': return 'Save'
      case 'editing': return 'Cancel'
    }
  }
}
2
3
4
5
6
7
8
9
10
11
12
13
14
15
# 过渡模式
这里还有一个问题,试着点击下面的按钮:
在 “on” 按钮和 “off” 按钮的过渡中,两个按钮都被重绘了,一个离开过渡的时候另一个开始进入过渡。这是 <transition> 的默认行为 - 进入和离开同时发生。
- 在元素绝对定位在彼此之上的时候运行正常:
- 然后,我们加上 translate 让它们运动像滑动过渡:
同时生效的进入和离开的过渡不能满足所有要求,所以 Vue 提供了 过渡模式
- in-out:新元素先进行过渡,完成之后当前元素过渡离开。
- out-in:当前元素先进行过渡,完成之后新元素过渡进入。
用 out-in 重写之前的开关按钮过渡:
<transition name="fade" mode="out-in">
  <!-- ... the buttons ... -->
</transition>
2
3
只用添加一个简单的 attribute,就解决了之前的过渡问题而无需任何额外的代码。
in-out 模式不是经常用到,但对于一些稍微不同的过渡效果还是有用的。将之前滑动淡出的例子结合:
# 多个组件的过渡
多个组件的过渡简单很多 - 我们不需要使用 key attribute。相反,我们只需要使用动态组件:
<transition name="component-fade" mode="out-in">
  <component v-bind:is="view"></component>
</transition>
2
3
new Vue({
  el: '#transition-components-demo',
  data: {
    view: 'v-a'
  },
  components: {
    'v-a': {
      template: '<div>Component A</div>'
    },
    'v-b': {
      template: '<div>Component B</div>'
    }
  }
})
.component-fade-enter-active, .component-fade-leave-active {
  transition: opacity .3s ease;
}
.component-fade-enter, .component-fade-leave-to
/* .component-fade-leave-active for below version 2.1.8 */ {
  opacity: 0;
}
2
3
4
5
6
7
8
9
10
11
12
13
14
15
16
17
18
19
20
21
# 列表过渡
目前为止,关于过渡我们已经讲到:
- 单个节点
- 同一时间渲染多个节点中的一个
那么怎么同时渲染整个列表,比如使用 v-for ?在这种场景中,使用 <transition-group> 组件。在我们深入例子之前,先了解关于这个组件的几个特点:
- 不同于
<transition>,它会以一个真实元素呈现:默认为一个<span>。你也可以通过 tag attribute 更换为其他元素。 - 过渡模式不可用,因为我们不再相互切换特有的元素。
- 内部元素 总是需要 提供唯一的 key 属性值。
- CSS 过渡的类将会应用在内部的元素中,而不是这个组/容器本身。
# 列表的进入/离开过渡
现在让我们由一个简单的例子深入,进入和离开的过渡使用之前一样的 CSS 类名。
<div id="list-demo" class="demo">
  <button v-on:click="add">Add</button>
  <button v-on:click="remove">Remove</button>
  <transition-group name="list" tag="p">
    <span v-for="item in items" v-bind:key="item" class="list-item">
      {{ item }}
    </span>
  </transition-group>
</div>
2
3
4
5
6
7
8
9
new Vue({
  el: '#list-demo',
  data: {
    items: [1,2,3,4,5,6,7,8,9],
    nextNum: 10
  },
  methods: {
    randomIndex: function () {
      return Math.floor(Math.random() * this.items.length)
    },
    add: function () {
      this.items.splice(this.randomIndex(), 0, this.nextNum++)
    },
    remove: function () {
      this.items.splice(this.randomIndex(), 1)
    },
  }
})
.list-item {
  display: inline-block;
  margin-right: 10px;
}
.list-enter-active, .list-leave-active {
  transition: all 1s;
}
.list-enter, .list-leave-to
/* .list-leave-active for below version 2.1.8 */ {
  opacity: 0;
  transform: translateY(30px);
}
2
3
4
5
6
7
8
9
10
11
12
13
14
15
16
17
18
19
20
21
22
23
24
25
26
27
28
29
30
这个例子有个问题,当添加和移除元素的时候,周围的元素会瞬间移动到他们的新布局的位置,而不是平滑的过渡,我们下面会解决这个问题。
# 列表的排序过渡
<transition-group> 组件还有一个特殊之处。不仅可以进入和离开动画,还可以改变定位。要使用这个新功能只需了解新增的 v-move attribute,它会在元素的改变定位的过程中应用。像之前的类名一样,可以通过 name 属性来自定义前缀,也可以通过 move-class 属性手动设置。
v-move 对于设置过渡的切换时机和过渡曲线非常有用,你会看到如下的例子:
<script src="https://cdnjs.cloudflare.com/ajax/libs/lodash.js/4.14.1/lodash.min.js"></script>

<div id="flip-list-demo" class="demo">
  <button v-on:click="shuffle">Shuffle</button>
  <transition-group name="flip-list" tag="ul">
    <li v-for="item in items" v-bind:key="item">
      {{ item }}
    </li>
  </transition-group>
</div>
2
3
4
5
6
7
8
9
10
new Vue({
  el: '#flip-list-demo',
  data: {
    items: [1,2,3,4,5,6,7,8,9]
  },
  methods: {
    shuffle: function () {
      this.items = _.shuffle(this.items)
    }
  }
})
.flip-list-move {
  transition: transform 1s;
}
2
3
4
5
6
7
8
9
10
11
12
13
14
这个看起来很神奇,内部的实现,Vue 使用了一个叫 FLIP 简单的动画队列
使用 transforms 将元素从之前的位置平滑过渡新的位置。
我们将之前实现的例子和这个技术结合,使我们列表的一切变动都会有动画过渡。
<script src="https://cdnjs.cloudflare.com/ajax/libs/lodash.js/4.14.1/lodash.min.js"></script>

<div id="list-complete-demo" class="demo">
  <button v-on:click="shuffle">Shuffle</button>
  <button v-on:click="add">Add</button>
  <button v-on:click="remove">Remove</button>
  <transition-group name="list-complete" tag="p">
    <span
      v-for="item in items"
      v-bind:key="item"
      class="list-complete-item"
    >
      {{ item }}
    </span>
  </transition-group>
</div>
2
3
4
5
6
7
8
9
10
11
12
13
14
15
16
new Vue({
  el: '#list-complete-demo',
  data: {
    items: [1,2,3,4,5,6,7,8,9],
    nextNum: 10
  },
  methods: {
    randomIndex: function () {
      return Math.floor(Math.random() * this.items.length)
    },
    add: function () {
      this.items.splice(this.randomIndex(), 0, this.nextNum++)
    },
    remove: function () {
      this.items.splice(this.randomIndex(), 1)
    },
    shuffle: function () {
      this.items = _.shuffle(this.items)
    }
  }
})
.list-complete-item {
  transition: all 1s;
  display: inline-block;
  margin-right: 10px;
}
.list-complete-enter, .list-complete-leave-to
/* .list-complete-leave-active for below version 2.1.8 */ {
  opacity: 0;
  transform: translateY(30px);
}
.list-complete-leave-active {
  position: absolute;
}
2
3
4
5
6
7
8
9
10
11
12
13
14
15
16
17
18
19
20
21
22
23
24
25
26
27
28
29
30
31
32
33
34
需要注意的是
使用 FLIP 过渡的元素不能设置为 display: inline。作为替代方案,可以设置为 display: inline-block 或者放置于 flex 中
FLIP 动画不仅可以实现单列过渡,多维网格也同样可以过渡
# 列表的交错过渡
通过 data 属性与 JavaScript 通信 ,就可以实现列表的交错过渡:
<script src="https://cdnjs.cloudflare.com/ajax/libs/velocity/1.2.3/velocity.min.js"></script>

<div id="staggered-list-demo">
  <input v-model="query">
  <transition-group
    name="staggered-fade"
    tag="ul"
    v-bind:css="false"
    v-on:before-enter="beforeEnter"
    v-on:enter="enter"
    v-on:leave="leave"
  >
    <li
      v-for="(item, index) in computedList"
      v-bind:key="item.msg"
      v-bind:data-index="index"
    >{{ item.msg }}</li>
  </transition-group>
</div>
2
3
4
5
6
7
8
9
10
11
12
13
14
15
16
17
18
19
new Vue({
  el: '#staggered-list-demo',
  data: {
    query: '',
    list: [
      { msg: 'Bruce Lee' },
      { msg: 'Jackie Chan' },
      { msg: 'Chuck Norris' },
      { msg: 'Jet Li' },
      { msg: 'Kung Fury' }
    ]
  },
  computed: {
    computedList: function () {
      var vm = this
      return this.list.filter(function (item) {
        return item.msg.toLowerCase().indexOf(vm.query.toLowerCase()) !== -1
      })
    }
  },
  methods: {
    beforeEnter: function (el) {
      el.style.opacity = 0
      el.style.height = 0
    },
    enter: function (el, done) {
      var delay = el.dataset.index * 150
      setTimeout(function () {
        Velocity(
          el,
          { opacity: 1, height: '1.6em' },
          { complete: done }
        )
      }, delay)
    },
    leave: function (el, done) {
      var delay = el.dataset.index * 150
      setTimeout(function () {
        Velocity(
          el,
          { opacity: 0, height: 0 },
          { complete: done }
        )
      }, delay)
    }
  }
})
2
3
4
5
6
7
8
9
10
11
12
13
14
15
16
17
18
19
20
21
22
23
24
25
26
27
28
29
30
31
32
33
34
35
36
37
38
39
40
41
42
43
44
45
46
47
# 可复用的过渡
过渡可以通过 Vue 的组件系统实现复用。要创建一个可复用过渡组件,你需要做的就是将 <transition> 或者 <transition-group> 作为根组件,然后将任何子组件放置在其中就可以了。
使用 template 的简单例子:
Vue.component('my-special-transition', {
  template: '\
    <transition\
      name="very-special-transition"\
      mode="out-in"\
      v-on:before-enter="beforeEnter"\
      v-on:after-enter="afterEnter"\
    >\
      <slot></slot>\
    </transition>\
  ',
  methods: {
    beforeEnter: function (el) {
      // ...
    },
    afterEnter: function (el) {
      // ...
    }
  }
})
2
3
4
5
6
7
8
9
10
11
12
13
14
15
16
17
18
19
20
函数式组件更适合完成这个任务:
Vue.component('my-special-transition', {
  functional: true,
  render: function (createElement, context) {
    var data = {
      props: {
        name: 'very-special-transition',
        mode: 'out-in'
      },
      on: {
        beforeEnter: function (el) {
          // ...
        },
        afterEnter: function (el) {
          // ...
        }
      }
    }
    return createElement('transition', data, context.children)
  }
})
2
3
4
5
6
7
8
9
10
11
12
13
14
15
16
17
18
19
20
# 动态过渡
在 Vue 中即使是过渡也是数据驱动的!动态过渡最基本的例子是通过 name attribute 来绑定动态值。
<transition v-bind:name="transitionName">
  <!-- ... -->
</transition>
2
3
当你想用 Vue 的过渡系统来定义的 CSS 过渡/动画 在不同过渡间切换会非常有用。
所有过渡 attribute 都可以动态绑定,但我们不仅仅只有 attribute 可以利用,还可以通过事件钩子获取上下文中的所有数据,因为事件钩子都是方法。这意味着,根据组件的状态不同,你的 JavaScript 过渡会有不同的表现。
<script src="https://cdnjs.cloudflare.com/ajax/libs/velocity/1.2.3/velocity.min.js"></script>

<div id="dynamic-fade-demo" class="demo">
  Fade In: <input type="range" v-model="fadeInDuration" min="0" v-bind:max="maxFadeDuration">
  Fade Out: <input type="range" v-model="fadeOutDuration" min="0" v-bind:max="maxFadeDuration">
  <transition
    v-bind:css="false"
    v-on:before-enter="beforeEnter"
    v-on:enter="enter"
    v-on:leave="leave"
  >
    <p v-if="show">hello</p>
  </transition>
  <button
    v-if="stop"
    v-on:click="stop = false; show = false"
  >Start animating</button>
  <button
    v-else
    v-on:click="stop = true"
  >Stop it!</button>
</div>
2
3
4
5
6
7
8
9
10
11
12
13
14
15
16
17
18
19
20
21
22
new Vue({
  el: '#dynamic-fade-demo',
  data: {
    show: true,
    fadeInDuration: 1000,
    fadeOutDuration: 1000,
    maxFadeDuration: 1500,
    stop: true
  },
  mounted: function () {
    this.show = false
  },
  methods: {
    beforeEnter: function (el) {
      el.style.opacity = 0
    },
    enter: function (el, done) {
      var vm = this
      Velocity(el,
        { opacity: 1 },
        {
          duration: this.fadeInDuration,
          complete: function () {
            done()
            if (!vm.stop) vm.show = false
          }
        }
      )
    },
    leave: function (el, done) {
      var vm = this
      Velocity(el,
        { opacity: 0 },
        {
          duration: this.fadeOutDuration,
          complete: function () {
            done()
            vm.show = true
          }
        }
      )
    }
  }
})
2
3
4
5
6
7
8
9
10
11
12
13
14
15
16
17
18
19
20
21
22
23
24
25
26
27
28
29
30
31
32
33
34
35
36
37
38
39
40
41
42
43
44
最后,创建动态过渡的最终方案是组件通过接受 props 来动态修改之前的过渡。一句老话,唯一的限制是你的想象力。
# 6、处理边界情况
# 访问元素 & 组件
在绝大多数情况下,我们最好不要触达另一个组件实例内部或手动操作 DOM 元素。不过也确实在一些情况下做这些事情是合适的。
# 访问根实例
在每个 new Vue 实例的子组件中,其根实例可以通过 $root 属性进行访问。例如,在这个根实例中:
// Vue 根实例
new Vue({
  data: {
    foo: 1
  },
  computed: {
    bar: function () { /* ... */ }
  },
  methods: {
    baz: function () { /* ... */ }
  }
})
2
3
4
5
6
7
8
9
10
11
12
所有的子组件都可以将这个实例作为一个全局 store 来访问或使用。
// 获取根组件的数据
this.$root.foo

// 写入根组件的数据
this.$root.foo = 2

// 访问根组件的计算属性
this.$root.bar

// 调用根组件的方法
this.$root.baz()
2
3
4
5
6
7
8
9
10
11
对于 demo 或非常小型的有少量组件的应用来说这是很方便的。不过这个模式扩展到中大型应用来说就不然了。因此在绝大多数情况下,我们强烈推荐使用 Vuex 来管理应用的状态。
# 访问父级组件实例
和 $root 类似,$parent 属性可以用来从一个子组件访问父组件的实例。它提供了一种机会,可以在后期随时触达父级组件,以替代将数据以 prop 的方式传入子组件的方式。
在绝大多数情况下,触达父级组件会使得你的应用更难调试和理解,尤其是当你变更了父级组件的数据的时候。当我们稍后回看那个组件的时候,很难找出那个变更是从哪里发起的。
另外在一些可能适当的时候,你需要特别地共享一些组件库。举个例子,在和 JavaScript API 进行交互而不渲染 HTML 的抽象组件内,诸如这些假设性的 Google 地图组件一样:
<google-map>
  <google-map-markers v-bind:places="iceCreamShops"></google-map-markers>
</google-map>
2
3
这个 <google-map> 组件可以定义一个 map 属性,所有的子组件都需要访问它。在这种情况下 <google-map-markers> 可能想要通过类似 this.$parent.getMap 的方式访问那个地图,以便为其添加一组标记。你可以在这里查阅这种模式。
请留意,尽管如此,通过这种模式构建出来的那个组件的内部仍然是容易出现问题的。比如,设想一下我们添加一个新的 <google-map-region> 组件,当 <google-map-markers> 在其内部出现的时候,只会渲染那个区域内的标记:
<google-map>
  <google-map-region v-bind:shape="cityBoundaries">
    <google-map-markers v-bind:places="iceCreamShops"></google-map-markers>
  </google-map-region>
</google-map>
2
3
4
5
那么在 <google-map-markers> 内部你可能发现自己需要一些类似这样的 hack:
var map = this.$parent.map || this.$parent.$parent.map
很快它就会失控。这也是我们针对需要向任意更深层级的组件提供上下文信息时推荐依赖注入的原因。
# 访问子组件实例或子元素
尽管存在 prop 和事件,有的时候你仍可能需要在 JavaScript 里直接访问一个子组件。为了达到这个目的,你可以通过 ref 这个 attribute 为子组件赋予一个 ID 引用。例如:
<base-input ref="usernameInput"></base-input>
现在在你已经定义了这个 ref 的组件里,你可以使用:
this.$refs.usernameInput
来访问这个 <base-input> 实例,以便不时之需。比如程序化地从一个父级组件聚焦这个输入框。在刚才那个例子中,该 <base-input> 组件也可以使用一个类似的 ref 提供对内部这个指定元素的访问,例如:
<input ref="input">
甚至可以通过其父级组件定义方法:
methods: {
  // 用来从父级组件聚焦输入框
  focus: function () {
    this.$refs.input.focus()
  }
}
2
3
4
5
6
这样就允许父级组件通过下面的代码聚焦 <base-input> 里的输入框:
this.$refs.usernameInput.focus()
当 ref 和 v-for 一起使用的时候,你得到的引用将会是一个包含了对应数据源的这些子组件的数组。
$refs 只会在组件渲染完成之后生效,并且它们不是响应式的。这仅作为一个用于直接操作子组件的“逃生舱”——你应该避免在模板或计算属性中访问 $refs。
# 依赖注入
在此之前,在我们描述访问父级组件实例的时候,展示过一个类似这样的例子:
<google-map>
  <google-map-region v-bind:shape="cityBoundaries">
    <google-map-markers v-bind:places="iceCreamShops"></google-map-markers>
  </google-map-region>
</google-map>
2
3
4
5
在这个组件里,所有 <google-map> 的后代都需要访问一个 getMap 方法,以便知道要跟哪个地图进行交互。不幸的是,使用 $parent 属性无法很好的扩展到更深层级的嵌套组件上。这也是依赖注入的用武之地,它用到了两个新的实例选项:provide 和 inject。
- provide 选项允许我们指定我们想要提供给后代组件的数据/方法。在这个例子中,就是
<google-map>内部的 getMap 方法:
provide: function () {
  return {
    getMap: this.getMap
  }
}
2
3
4
5
然后在任何后代组件里,我们都可以使用 inject 选项来接收指定的我们想要添加在这个实例上的属性:
inject: ['getMap']
你可以在这里看到完整的示例。相比 $parent 来说,这个用法可以让我们在任意后代组件中访问 getMap,而不需要暴露整个 <google-map> 实例。这允许我们更好的持续研发该组件,而不需要担心我们可能会改变/移除一些子组件依赖的东西。同时这些组件之间的接口是始终明确定义的,就和 props 一样。
实际上,你可以把依赖注入看作一部分“大范围有效的 prop”,除了:
- 祖先组件不需要知道哪些后代组件使用它提供的属性
- 后代组件不需要知道被注入的属性来自哪里
然而,依赖注入还是有负面影响的。它将你应用程序中的组件与它们当前的组织方式耦合起来,使重构变得更加困难。同时所提供的属性是非响应式的。这是出于设计的考虑,因为使用它们来创建一个中心化规模化的数据跟使用 $root做这件事都是不够好的。如果你想要共享的这个属性是你的应用特有的,而不是通用化的,或者如果你想在祖先组件中更新所提供的数据,那么这意味着你可能需要换用一个像 Vuex 这样真正的状态管理方案了。
你可以在 API 参考文档学习更多关于依赖注入的知识。
# 程序化的事件侦听器
现在,你已经知道了 $emit 的用法,它可以被 v-on 侦听,但是 Vue 实例同时在其事件接口中提供了其它的方法。我们可以:
- 通过 $on(eventName, eventHandler) 侦听一个事件
- 通过 $once(eventName, eventHandler) 一次性侦听一个事件
- 通过 $off(eventName, eventHandler) 停止侦听一个事件
你通常不会用到这些,但是当你需要在一个组件实例上手动侦听事件时,它们是派得上用场的。它们也可以用于代码组织工具。例如,你可能经常看到这种集成一个第三方库的模式:
// 一次性将这个日期选择器附加到一个输入框上
// 它会被挂载到 DOM 上。
mounted: function () {
  // Pikaday 是一个第三方日期选择器的库
  this.picker = new Pikaday({
    field: this.$refs.input,
    format: 'YYYY-MM-DD'
  })
},
// 在组件被销毁之前,
// 也销毁这个日期选择器。
beforeDestroy: function () {
  this.picker.destroy()
}
2
3
4
5
6
7
8
9
10
11
12
13
14
这里有两个潜在的问题:
- 它需要在这个组件实例中保存这个 picker,如果可以的话最好只有生命周期钩子可以访问到它。这并不算严重的问题,但是它可以被视为杂物。
- 我们的建立代码独立于我们的清理代码,这使得我们比较难于程序化地清理我们建立的所有东西。
你应该通过一个程序化的侦听器解决这两个问题:
mounted: function () {
  var picker = new Pikaday({
    field: this.$refs.input,
    format: 'YYYY-MM-DD'
  })

  this.$once('hook:beforeDestroy', function () {
    picker.destroy()
  })
}
2
3
4
5
6
7
8
9
10
使用了这个策略,我甚至可以让多个输入框元素同时使用不同的 Pikaday,每个新的实例都程序化地在后期清理它自己:
mounted: function () {
  this.attachDatepicker('startDateInput')
  this.attachDatepicker('endDateInput')
},
methods: {
  attachDatepicker: function (refName) {
    var picker = new Pikaday({
      field: this.$refs[refName],
      format: 'YYYY-MM-DD'
    })

    this.$once('hook:beforeDestroy', function () {
      picker.destroy()
    })
  }
}
2
3
4
5
6
7
8
9
10
11
12
13
14
15
16
查阅这个 fiddle 可以了解到完整的代码。注意,即便如此,如果你发现自己不得不在单个组件里做很多建立和清理的工作,最好的方式通常还是创建更多的模块化组件。在这个例子中,我们推荐创建一个可复用的 <input-datepicker> 组件。
想了解更多程序化侦听器的内容,请查阅实例方法 / 事件相关的 API。
注意 Vue 的事件系统不同于浏览器的 EventTarget API。尽管它们工作起来是相似的,但是
$emit、$on, 和 $off 并不是 dispatchEvent、addEventListener 和 removeEventListener 的别名。
# 循环引用
# 递归组件
组件是可以在它们自己的模板中调用自身的。不过它们只能通过 name 选项来做这件事:
name: 'unique-name-of-my-component'
当你使用 Vue.component 全局注册一个组件时,这个全局的 ID 会自动设置为该组件的 name 选项。
Vue.component('unique-name-of-my-component', {
  // ...
})
2
3
稍有不慎,递归组件就可能导致无限循环:
name: 'stack-overflow',
template: '<div><stack-overflow></stack-overflow></div>'
2
类似上述的组件将会导致“max stack size exceeded”错误,所以请确保递归调用是条件性的 (例如使用一个最终会得到 false 的 v-if)。
# 组件之间的循环引用
假设你需要构建一个文件目录树,像访达或资源管理器那样的。你可能有一个 <tree-folder> 组件,模板是这样的:
<p>
  <span>{{ folder.name }}</span>
  <tree-folder-contents :children="folder.children"/>
</p>
2
3
4
还有一个 <tree-folder-contents> 组件,模板是这样的:
<ul>
  <li v-for="child in children">
    <tree-folder v-if="child.children" :folder="child"/>
    <span v-else>{{ child.name }}</span>
  </li>
</ul>
2
3
4
5
6
当你仔细观察的时候,你会发现这些组件在渲染树中互为对方的后代和祖先——一个悖论!当通过 Vue.component 全局注册组件的时候,这个悖论会被自动解开。如果你是这样做的,那么你可以跳过这里。
然而,如果你使用一个模块系统依赖/导入组件,例如通过 webpack 或 Browserify,你会遇到一个错误:
Failed to mount component: template or render function not defined.
为了解释这里发生了什么,我们先把两个组件称为 A 和 B。模块系统发现它需要 A,但是首先 A 依赖 B,但是 B 又依赖 A,但是 A 又依赖 B,如此往复。这变成了一个循环,不知道如何不经过其中一个组件而完全解析出另一个组件。为了解决这个问题,我们需要给模块系统一个点,在那里“A 反正是需要 B 的,但是我们不需要先解析 B。”
在我们的例子中,把 <tree-folder> 组件设为了那个点。我们知道那个产生悖论的子组件是 <tree-folder-contents> 组件,所以我们会等到生命周期钩子 beforeCreate 时去注册它:
beforeCreate: function () {
  this.$options.components.TreeFolderContents = require('./tree-folder-contents.vue').default
}
2
3
或者,在本地注册组件的时候,你可以使用 webpack 的异步 import:
components: {
  TreeFolderContents: () => import('./tree-folder-contents.vue')
}
2
3
这样问题就解决了!
# 模板定义的替代品
# 内联模板
当 inline-template 这个特殊的 attribute 出现在一个子组件上时,这个组件将会使用其里面的内容作为模板,而不是将其作为被分发的内容。这使得模板的撰写工作更加灵活。
<my-component inline-template>
  <div>
    <p>These are compiled as the component's own template.</p>
    <p>Not parent's transclusion content.</p>
  </div>
</my-component>
2
3
4
5
6
内联模板需要定义在 Vue 所属的 DOM 元素内。
不过,inline-template 会让模板的作用域变得更加难以理解。所以作为最佳实践,请在组件内
优先选择 template 选项或.vue 文件里的一个<template>元素来定义模板。
# X-Template
另一个定义模板的方式是在一个 <script> 元素中,并为其带上 text/x-template 的类型,然后通过一个 id 将模板引用过去。例如:
<script type="text/x-template" id="hello-world-template">
  <p>Hello hello hello</p>
</script>
Vue.component('hello-world', {
  template: '#hello-world-template'
})
2
3
4
5
6
x-template 需要定义在 Vue 所属的 DOM 元素外。
这些可以用于模板特别大的 demo 或极小型的应用,但是其它情况下请避免使用,因为这会将模板和该组件的其它定义分离开。
# 控制更新
感谢 Vue 的响应式系统,它始终知道何时进行更新 (如果你用对了的话)。不过还是有一些边界情况,你想要强制更新,尽管表面上看响应式的数据没有发生改变。也有一些情况是你想阻止不必要的更新。
# 强制更新
如果你发现你自己需要在 Vue 中做一次强制更新,99.9% 的情况,是你在某个地方做错了事。
- 你可能还没有留意到数组或对象的变更检测注意事项,或者你可能依赖了一个未被 Vue 的响应式系统追踪的状态。
- 然而,如果你已经做到了上述的事项仍然发现在极少数的情况下需要手动强制更新,那么你可以通过
$forceUpdate来做这件事。
# 通过 v-once 创建低开销的静态组件
渲染普通的 HTML 元素在 Vue 中是非常快速的,但有的时候你可能有一个组件,这个组件包含了大量静态内容。在这种情况下,你可以在根元素上添加 v-once attribute 以确保这些内容只计算一次然后缓存起来,就像这样:
Vue.component('terms-of-service', {
  template: `
    <div v-once>
      <h1>Terms of Service</h1>
      ... a lot of static content ...
    </div>
  `
})
2
3
4
5
6
7
8
再说一次,试着不要过度使用这个模式。当你需要渲染大量静态内容时,极少数的情况下它会给你带来便利,除非你非常留意渲染变慢了,不然它完全是没有必要的——再加上它在后期会带来很多困惑。例如,设想另一个开发者并不熟悉 v-once 或漏看了它在模板中,他们可能会花很多个小时去找出模板为什么无法正确更新。
# 5、动态组件 & 异步组件
# 在动态组件上使用 keep-alive
我们之前曾经在一个多标签的界面中使用 is attribute 来切换不同的组件:
<component v-bind:is="currentTabComponent"></component>
当在这些组件之间切换的时候,你有时会想保持这些组件的状态,以避免反复重渲染导致的性能问题。例如我们来展开说一说这个多标签界面:
你会注意到,如果你选择了一篇文章,切换到 Archive 标签,然后再切换回 Posts,是不会继续展示你之前选择的文章的。这是因为你每次切换新标签的时候,Vue 都创建了一个新的 currentTabComponent 实例。
重新创建动态组件的行为通常是非常有用的,但是在这个案例中,我们更希望那些标签的组件实例能够被在它们第一次被创建的时候缓存下来。为了解决这个问题,我们可以用一个<keep-alive> 元素将其动态组件包裹起来。
<!-- 失活的组件将会被缓存!-->
<keep-alive>
  <component v-bind:is="currentTabComponent"></component>
</keep-alive>
2
3
4
现在这个 Posts 标签保持了它的状态 (被选中的文章) 甚至当它未被渲染时也是如此。你可以在这个 fiddle 查阅到完整的代码。
注意这个 <keep-alive> 要求被切换到的组件都有自己的名字,不论是通过组件的 name 选项还是局部/全局注册。
你可以在 API 参考文档 查阅更多关于 <keep-alive> 的细节。
# 异步组件
在大型应用中,我们可能需要将应用分割成小一些的代码块,并且只在需要的时候才从服务器加载一个模块。为了简化,Vue 允许你以一个工厂函数的方式定义你的组件,这个工厂函数会异步解析你的组件定义。Vue 只有在这个组件需要被渲染的时候才会触发该工厂函数,且会把结果缓存起来供未来重渲染。例如:
Vue.component('async-example', function (resolve, reject) {
  setTimeout(function () {
    // 向 `resolve` 回调传递组件定义
    resolve({
      template: '<div>I am async!</div>'
    })
  }, 1000)
})
2
3
4
5
6
7
8
如你所见,这个工厂函数会收到一个 resolve 回调,这个回调函数会在你从服务器得到组件定义的时候被调用。你也可以调用 reject(reason) 来表示加载失败。这里的 setTimeout 是为了演示用的,如何获取组件取决于你自己。一个推荐的做法是将异步组件和 webpack 的 code-splitting 功能一起配合使用:
Vue.component('async-webpack-example', function (resolve) {
  // 这个特殊的 `require` 语法将会告诉 webpack
  // 自动将你的构建代码切割成多个包,这些包
  // 会通过 Ajax 请求加载
  require(['./my-async-component'], resolve)
})
2
3
4
5
6
你也可以在工厂函数中返回一个 Promise,所以把 webpack 2 和 ES2015 语法加在一起,我们可以写成这样:
Vue.component(
  'async-webpack-example',
  // 这个 `import` 函数会返回一个 `Promise` 对象。
  () => import('./my-async-component')
)
2
3
4
5
当使用局部注册的时候,你也可以直接提供一个返回 Promise 的函数:
new Vue({
  // ...
  components: {
    'my-component': () => import('./my-async-component')
  }
})
2
3
4
5
6
如果你是一个 Browserify 用户同时喜欢使用异步组件,很不幸这个工具的作者明确表示异步加载“并不会被 Browserify 支持”,至少官方不会。Browserify 社区已经找到了一些变通方案,这些方案可能会对已存在的复杂应用有帮助。对于其它的场景,我们推荐直接使用 webpack,以拥有内置的头等异步支持。
# 处理加载状态
- 2.3.0+ 新增
这里的异步组件工厂函数也可以返回一个如下格式的对象:
const AsyncComponent = () => ({
  // 需要加载的组件 (应该是一个 `Promise` 对象)
  component: import('./MyComponent.vue'),
  // 异步组件加载时使用的组件
  loading: LoadingComponent,
  // 加载失败时使用的组件
  error: ErrorComponent,
  // 展示加载时组件的延时时间。默认值是 200 (毫秒)
  delay: 200,
  // 如果提供了超时时间且组件加载也超时了,
  // 则使用加载失败时使用的组件。默认值是:`Infinity`
  timeout: 3000
})
2
3
4
5
6
7
8
9
10
11
12
13
注意如果你希望在 Vue Router的路由组件中使用上述语法的话,你必须使用 Vue Router 2.4.0+ 版本。
# 插槽讲解
在 2.6.0 中,我们为
具名插槽和作用域插槽引入了一个新的统一的语法 (即v-slot 指令)。它取代了 slot 和 slot-scope 这两个目前[已被废弃但未被移除且仍在文档中的 attribute。新语法的由来可查阅这份 RFC。
# 插槽内容
Vue 实现了一套内容分发的 API,这套 API 的设计灵感源自 Web Components 规范草案,将 <slot> 元素作为承载分发内容的出口。
它允许你像这样合成组件:
<navigation-link url="/profile">
  Your Profile
</navigation-link>
2
3
然后你在 <navigation-link> 的模板中可能会写为:
<a
  v-bind:href="url"
  class="nav-link"
>
  <slot></slot>
</a>
2
3
4
5
6
当组件渲染的时候,<slot></slot> 将会被替换为“Your Profile”。插槽内可以包含任何模板代码,包括 HTML:
<navigation-link url="/profile">
  <!-- 添加一个 Font Awesome 图标 -->
  <span class="fa fa-user"></span>
  Your Profile
</navigation-link>
2
3
4
5
甚至其它的组件:
<navigation-link url="/profile">
  <!-- 添加一个图标的组件 -->
  <font-awesome-icon name="user"></font-awesome-icon>
  Your Profile
</navigation-link>
2
3
4
5
如果 <navigation-link> 没有包含一个 <slot> 元素,则该组件起始标签和结束标签之间的任何内容都会被抛弃。
# 编译作用域
当你想在一个插槽中使用数据时,例如:
<navigation-link url="/profile">
  Logged in as {{ user.name }}
</navigation-link>
2
3
该插槽跟模板的其它地方一样可以访问相同的实例属性 (也就是相同的“作用域”),而不能访问 <navigation-link> 的作用域。例如 url 是访问不到的:
<navigation-link url="/profile">
  Clicking here will send you to: {{ url }}
  <!--
  这里的 `url` 会是 undefined,因为 "/profile" 是
  _传递给_ <navigation-link> 的而不是
  在 <navigation-link> 组件*内部*定义的。
  -->
</navigation-link>
2
3
4
5
6
7
8
作为一条规则,请记住:
父级模板里的所有内容都是在父级作用域中编译的;子模板里的所有内容都是在子作用域中编译的。
# 后备内容(默认值)
有时为一个插槽设置具体的后备 (也就是默认的) 内容是很有用的,它只会在没有提供内容的时候被渲染。例如在一个 <submit-button> 组件中:
<button type="submit">
  <slot></slot>
</button>
2
3
我们可能希望这个 <button> 内绝大多数情况下都渲染文本“Submit”。为了将“Submit”作为后备内容,我们可以将它放在 <slot> 标签内:
<button type="submit">
  <slot>Submit</slot>
</button>
2
3
现在当我在一个父级组件中使用 <submit-button> 并且不提供任何插槽内容时:
<submit-button></submit-button>
后备内容“Submit”将会被渲染:
<button type="submit">
  Submit
</button>
2
3
但是如果我们提供内容:
<submit-button>
  Save
</submit-button>
2
3
则这个提供的内容将会被渲染从而取代后备内容:
<button type="submit">
  Save
</button>
2
3
# 具名插槽
自 2.6.0 起有所更新。已废弃的使用 slot attribute 的语法在这里。
有时我们需要多个插槽。例如对于一个带有如下模板的 <base-layout> 组件:
<div class="container">
  <header>
    <!-- 我们希望把页头放这里 -->
  </header>
  <main>
    <!-- 我们希望把主要内容放这里 -->
  </main>
  <footer>
    <!-- 我们希望把页脚放这里 -->
  </footer>
</div>
2
3
4
5
6
7
8
9
10
11
对于这样的情况,<slot> 元素有一个特殊的 attribute:name。这个 attribute 可以用来定义额外的插槽:
<div class="container">
  <header>
    <slot name="header"></slot>
  </header>
  <main>
    <slot></slot>
  </main>
  <footer>
    <slot name="footer"></slot>
  </footer>
</div>
2
3
4
5
6
7
8
9
10
11
一个不带 name 的 <slot> 出口会带有隐含的名字“default”。
在向具名插槽提供内容的时候,我们可以在一个 <template> 元素上使用 v-slot 指令,并以 v-slot 的参数的形式提供其名称:
<base-layout>
  <template v-slot:header>
    <h1>Here might be a page title</h1>
  </template>

  <p>A paragraph for the main content.</p>
  <p>And another one.</p>

  <template v-slot:footer>
    <p>Here's some contact info</p>
  </template>
</base-layout>
2
3
4
5
6
7
8
9
10
11
12
现在 <template> 元素中的所有内容都将会被传入相应的插槽。任何没有被包裹在带有 v-slot 的 <template> 中的内容都会被视为默认插槽的内容。
然而,如果你希望更明确一些,仍然可以在一个 <template> 中包裹默认插槽的内容:
<base-layout>
  <template v-slot:header>
    <h1>Here might be a page title</h1>
  </template>

  <template v-slot:default>
    <p>A paragraph for the main content.</p>
    <p>And another one.</p>
  </template>

  <template v-slot:footer>
    <p>Here's some contact info</p>
  </template>
</base-layout>
2
3
4
5
6
7
8
9
10
11
12
13
14
任何一种写法都会渲染出:
<div class="container">
  <header>
    <h1>Here might be a page title</h1>
  </header>
  <main>
    <p>A paragraph for the main content.</p>
    <p>And another one.</p>
  </main>
  <footer>
    <p>Here's some contact info</p>
  </footer>
</div>
2
3
4
5
6
7
8
9
10
11
12
注意 v-slot 只能添加在 <template> 上 (只有一种例外情况),这一点和已经废弃的 slot attribute不同。
# 作用域插槽
自 2.6.0 起有所更新。已废弃的使用 slot-scope attribute 的语法在这里。
有时让插槽内容能够访问子组件中才有的数据是很有用的。例如,设想一个带有如下模板的 <current-user> 组件:
<span>
  <slot>{{ user.lastName }}</slot>
</span>
2
3
我们可能想换掉备用内容,用名而非姓来显示。如下:
<current-user>
  {{ user.firstName }}
</current-user>
2
3
然而上述代码不会正常工作,因为只有 <current-user> 组件可以访问到 user 而我们提供的内容是在父级渲染的。
为了让 user 在父级的插槽内容中可用,我们可以将user 作为 <slot> 元素的一个 attribute 绑定上去:
<span>
  <slot v-bind:user="user">
    {{ user.lastName }}
  </slot>
</span>
2
3
4
5
绑定在 <slot> 元素上的 attribute 被称为插槽 prop。现在在父级作用域中,我们可以使用带值的 v-slot 来定义我们提供的插槽 prop 的名字:
<current-user>
  <template v-slot:default="slotProps">
    {{ slotProps.user.firstName }}
  </template>
</current-user>
2
3
4
5
在这个例子中,我们选择将包含所有插槽 prop 的对象命名为 slotProps,但你也可以使用任意你喜欢的名字。
# 独占默认插槽的缩写语法
在上述情况下,当被提供的内容只有默认插槽时,组件的标签才可以被当作插槽的模板来使用。这样我们就可以把 v-slot 直接用在组件上:
<current-user v-slot:default="slotProps">
  {{ slotProps.user.firstName }}
</current-user>
2
3
这种写法还可以更简单。就像假定未指明的内容对应默认插槽一样,不带参数的 v-slot 被假定对应默认插槽:
<current-user v-slot="slotProps">
  {{ slotProps.user.firstName }}
</current-user>
2
3
注意默认插槽的缩写语法不能和具名插槽混用,因为它会导致作用域不明确:
<!-- 无效,会导致警告 -->
<current-user v-slot="slotProps">
  {{ slotProps.user.firstName }}
  <template v-slot:other="otherSlotProps">
    slotProps is NOT available here
  </template>
</current-user>
2
3
4
5
6
7
只要出现多个插槽,请始终为所有的插槽使用完整的基于 <template> 的语法:
<current-user>
  <template v-slot:default="slotProps">
    {{ slotProps.user.firstName }}
  </template>

  <template v-slot:other="otherSlotProps">
    ...
  </template>
</current-user>
2
3
4
5
6
7
8
9
# 解构插槽 Prop
作用域插槽的内部工作原理是将你的插槽内容包括在一个传入单个参数的函数里:
function (slotProps) {
  // 插槽内容
}
2
3
这意味着 v-slot 的值实际上可以是任何能够作为函数定义中的参数的 JavaScript 表达式。所以在支持的环境下 (单文件组件或现代浏览器),你也可以使用 ES2015 解构来传入具体的插槽 prop,如下:
<current-user v-slot="{ user }">
  {{ user.firstName }}
</current-user>
2
3
这样可以使模板更简洁,尤其是在该插槽提供了多个 prop 的时候。它同样开启了 prop 重命名等其它可能,例如将 user 重命名为 person:
<current-user v-slot="{ user: person }">
  {{ person.firstName }}
</current-user>
2
3
你甚至可以定义后备内容,用于插槽 prop 是 undefined 的情形:
<current-user v-slot="{ user = { firstName: 'Guest' } }">
  {{ user.firstName }}
</current-user>
2
3
# 动态插槽名
# 2.6.0 新增
动态指令参数也可以用在 v-slot 上,来定义动态的插槽名:
<base-layout>
  <template v-slot:[dynamicSlotName]>
    ...
  </template>
</base-layout>
2
3
4
5
# 具名插槽的缩写
# 具名插槽的缩写-2.6.0 新增
跟 v-on 和 v-bind 一样,v-slot 也有缩写,即把参数之前的所有内容 (v-slot:) 替换为字符 #。例如 v-slot:header 可以被重写为 #header:
<base-layout>
  <template #header>
    <h1>Here might be a page title</h1>
  </template>

  <p>A paragraph for the main content.</p>
  <p>And another one.</p>

  <template #footer>
    <p>Here's some contact info</p>
  </template>
</base-layout>
2
3
4
5
6
7
8
9
10
11
12
然而,和其它指令一样,该缩写只在其有参数的时候才可用。这意味着以下语法是无效的:
<!-- 这样会触发一个警告 -->
<current-user #="{ user }">
  {{ user.firstName }}
</current-user>
2
3
4
如果你希望使用缩写的话,你必须始终以明确插槽名取而代之:
<current-user #default="{ user }">
  {{ user.firstName }}
</current-user>
2
3
# 其它示例
插槽 prop 允许我们将插槽转换为可复用的模板,这些模板可以基于输入的 prop 渲染出不同的内容。这在设计封装数据逻辑同时允许父级组件自定义部分布局的可复用组件时是最有用的。
例如,我们要实现一个 <todo-list> 组件,它是一个列表且包含布局和过滤逻辑:
<ul>
  <li
    v-for="todo in filteredTodos"
    v-bind:key="todo.id"
  >
    {{ todo.text }}
  </li>
</ul>
2
3
4
5
6
7
8
我们可以将每个 todo 作为父级组件的插槽,以此通过父级组件对其进行控制,然后将 todo 作为一个插槽 prop 进行绑定:
<ul>
  <li
    v-for="todo in filteredTodos"
    v-bind:key="todo.id"
  >
    <!--
    我们为每个 todo 准备了一个插槽,
    将 `todo` 对象作为一个插槽的 prop 传入。
    -->
    <slot name="todo" v-bind:todo="todo">
      <!-- 后备内容 -->
      {{ todo.text }}
    </slot>
  </li>
</ul>
2
3
4
5
6
7
8
9
10
11
12
13
14
15
现在当我们使用 <todo-list> 组件的时候,我们可以选择为 todo 定义一个不一样的 <template> 作为替代方案,并且可以从子组件获取数据:
<todo-list v-bind:todos="todos">
  <template v-slot:todo="{ todo }">
    <span v-if="todo.isComplete">✓</span>
    {{ todo.text }}
  </template>
</todo-list>
2
3
4
5
6
这只是作用域插槽用武之地的冰山一角。想了解更多现实生活中的作用域插槽的用法,我们推荐浏览诸如 Vue Virtual Scroller、Vue Promised 和 Portal Vue 等库。
# 废弃了的语法
v-slot 指令自 Vue 2.6.0 起被引入,提供更好的支持 slot 和 slot-scope attribute 的 API 替代方案。v-slot 完整的由来参见这份 RFC。在接下来所有的 2.x 版本中 slot 和 slot-scope attribute 仍会被支持,但已经被官方废弃且不会出现在 Vue 3 中。
# 带有 slot attribute 的具名插槽
自 2.6.0 起被废弃。新推荐的语法请查阅这里。
在 <template> 上使用特殊的 slot attribute,可以将内容从父级传给具名插槽 (把这里提到过的 <base-layout> 组件作为示例):
<base-layout>
  <template slot="header">
    <h1>Here might be a page title</h1>
  </template>

  <p>A paragraph for the main content.</p>
  <p>And another one.</p>

  <template slot="footer">
    <p>Here's some contact info</p>
  </template>
</base-layout>
2
3
4
5
6
7
8
9
10
11
12
或者直接把 slot attribute 用在一个普通元素上:
<base-layout>
  <h1 slot="header">Here might be a page title</h1>

  <p>A paragraph for the main content.</p>
  <p>And another one.</p>

  <p slot="footer">Here's some contact info</p>
</base-layout>
2
3
4
5
6
7
8
这里其实还有一个未命名插槽,也就是默认插槽,捕获所有未被匹配的内容。上述两个示例的 HTML 渲染结果均为:
<div class="container">
  <header>
    <h1>Here might be a page title</h1>
  </header>
  <main>
    <p>A paragraph for the main content.</p>
    <p>And another one.</p>
  </main>
  <footer>
    <p>Here's some contact info</p>
  </footer>
</div>
2
3
4
5
6
7
8
9
10
11
12
# 带有 slot-scope attribute 的作用域插槽
自 2.6.0 起被废弃。新推荐的语法请查阅这里。
在 <template> 上使用特殊的 slot-scope attribute,可以接收传递给插槽的 prop (把这里提到过的 <slot-example> 组件作为示例):
<slot-example>
  <template slot="default" slot-scope="slotProps">
    {{ slotProps.msg }}
  </template>
</slot-example>
2
3
4
5
这里的 slot-scope 声明了被接收的 prop 对象会作为 slotProps 变量存在于 <template> 作用域中。你可以像命名 JavaScript 函数参数一样随意命名 slotProps。
这里的 slot="default" 可以被忽略为隐性写法:
<slot-example>
  <template slot-scope="slotProps">
    {{ slotProps.msg }}
  </template>
</slot-example>
2
3
4
5
slot-scope attribute 也可以直接用于非 <template> 元素 (包括组件):
<slot-example>
  <span slot-scope="slotProps">
    {{ slotProps.msg }}
  </span>
</slot-example>
2
3
4
5
slot-scope 的值可以接收任何有效的可以出现在函数定义的参数位置上的 JavaScript 表达式。这意味着在支持的环境下 (单文件组件或现代浏览器),你也可以在表达式中使用 ES2015 解构,如下:
<slot-example>
  <span slot-scope="{ msg }">
    {{ msg }}
  </span>
</slot-example>
2
3
4
5
使用这里描述过的 <todo-list> 作为示例,与它等价的使用 slot-scope 的代码是:
<todo-list v-bind:todos="todos">
  <template slot="todo" slot-scope="{ todo }">
    <span v-if="todo.isComplete">✓</span>
    {{ todo.text }}
  </template>
</todo-list>
2
3
4
5
6
# 3、自定义事件
# 事件名
不同于组件和 prop,事件名不存在任何自动化的大小写转换。而是触发的事件名需要完全匹配监听这个事件所用的名称。举个例子,如果触发一个 camelCase 名字的事件:
this.$emit('myEvent')
则监听这个名字的 kebab-case 版本是不会有任何效果的:
<!-- 没有效果 -->
<my-component v-on:my-event="doSomething"></my-component>
2
不同于组件和 prop,事件名不会被用作一个 JavaScript 变量名或属性名,所以就没有理由使用 camelCase 或 PascalCase 了。并且 v-on 事件监听器在 DOM 模板中会被自动转换为全小写 (因为 HTML 是大小写不敏感的),所以 v-on:myEvent 将会变成 v-on:myevent——导致 myEvent 不可能被监听到。
因此,我们推荐你始终使用 kebab-case 的事件名。
# 自定义组件的 v-model
# 2.2.0+ 新增
一个组件上的 v-model 默认会利用名为 value 的 prop 和名为 input 的事件,但是像单选框、复选框等类型的输入控件可能会将 value attribute 用于不同的目的。model 选项可以用来避免这样的冲突:
Vue.component('base-checkbox', {
  model: {
    prop: 'checked',
    event: 'change'
  },
  props: {
    checked: Boolean
  },
  template: `
    <input
      type="checkbox"
      v-bind:checked="checked"
      v-on:change="$emit('change', $event.target.checked)"
    >
  `
})
2
3
4
5
6
7
8
9
10
11
12
13
14
15
16
现在在这个组件上使用 v-model 的时候:
<base-checkbox v-model="lovingVue"></base-checkbox>
这里的 lovingVue 的值将会传入这个名为 checked 的 prop。同时当 <base-checkbox> 触发一个 change 事件并附带一个新的值的时候,这个 lovingVue 的属性将会被更新。
注意你仍然需要在组件的 props 选项里声明 checked 这个 prop。
# 将原生事件绑定到组件
你可能有很多次想要在一个组件的根元素上直接监听一个原生事件。这时,你可以使用 v-on 的 .native 修饰符:
<base-input v-on:focus.native="onFocus"></base-input>
在有的时候这是很有用的,不过在你尝试监听一个类似 <input> 的非常特定的元素时,这并不是个好主意。比如上述 <base-input> 组件可能做了如下重构,所以根元素实际上是一个 <label> 元素:
<label>
  {{ label }}
  <input
    v-bind="$attrs"
    v-bind:value="value"
    v-on:input="$emit('input', $event.target.value)"
  >
</label>
2
3
4
5
6
7
8
这时,父级的 .native 监听器将静默失败。它不会产生任何报错,但是 onFocus 处理函数不会如你预期地被调用。
为了解决这个问题,Vue 提供了一个 $listeners 属性,它是一个对象,里面包含了作用在这个组件上的所有监听器。例如:
{
  focus: function (event) { /* ... */ }
  input: function (value) { /* ... */ },
}
2
3
4
有了这个 $listeners 属性,你就可以配合 v-on="$listeners" 将所有的事件监听器指向这个组件的某个特定的子元素。对于类似 <input> 的你希望它也可以配合 v-model 工作的组件来说,为这些监听器创建一个类似下述 inputListeners 的计算属性通常是非常有用的:
Vue.component('base-input', {
  inheritAttrs: false,
  props: ['label', 'value'],
  computed: {
    inputListeners: function () {
      var vm = this
      // `Object.assign` 将所有的对象合并为一个新对象
      return Object.assign({},
        // 我们从父级添加所有的监听器
        this.$listeners,
        // 然后我们添加自定义监听器,
        // 或覆写一些监听器的行为
        {
          // 这里确保组件配合 `v-model` 的工作
          input: function (event) {
            vm.$emit('input', event.target.value)
          }
        }
      )
    }
  },
  template: `
    <label>
      {{ label }}
      <input
        v-bind="$attrs"
        v-bind:value="value"
        v-on="inputListeners"
      >
    </label>
  `
})
2
3
4
5
6
7
8
9
10
11
12
13
14
15
16
17
18
19
20
21
22
23
24
25
26
27
28
29
30
31
32
现在 <base-input> 组件是一个完全透明的包裹器了,也就是说它可以完全像一个普通的 <input> 元素一样使用了:所有跟它相同的 attribute 和监听器都可以工作。
# .sync 修饰符
# 2.3.0+ 新增
在有些情况下,我们可能需要对一个 prop 进行“双向绑定”。不幸的是,真正的双向绑定会带来维护上的问题,因为子组件可以修改父组件,且在父组件和子组件都没有明显的改动来源。
这也是为什么我们推荐以 update:myPropName 的模式触发事件取而代之。举个例子,在一个包含 title prop 的假设的组件中,我们可以用以下方法表达对其赋新值的意图:
this.$emit('update:title', newTitle)
然后父组件可以监听那个事件并根据需要更新一个本地的数据属性。例如:
<text-document
  v-bind:title="doc.title"
  v-on:update:title="doc.title = $event"
></text-document>
2
3
4
为了方便起见,我们为这种模式提供一个缩写,即 .sync 修饰符:
<text-document v-bind:title.sync="doc.title"></text-document>
注意带有 .sync 修饰符的 v-bind 不能和表达式一起使用 (例如 v-bind:title.sync=”doc.title + ‘!’” 是无效的)。取而代之的是,你只能提供你想要绑定的属性名,类似 v-model。
当我们用一个对象同时设置多个 prop 的时候,也可以将这个 .sync 修饰符和 v-bind 配合使用:
<text-document v-bind.sync="doc"></text-document>
这样会把 doc 对象中的每一个属性 (如 title) 都作为一个独立的 prop 传进去,然后各自添加用于更新的 v-on 监听器。
将 v-bind.sync 用在一个字面量的对象上,例如 v-bind.sync=”{ title: doc.title }”,是无法正常工作的,因为在解析一个像这样的复杂表达式的时候,有很多边缘情况需要考虑。
# 2、Prop
# Prop 的大小写 (camelCase vs kebab-case)
HTML 中的 attribute 名是大小写不敏感的,所以浏览器会把所有大写字符解释为小写字符。这意味着当你使用 DOM 中的模板时,camelCase (驼峰命名法) 的 prop 名需要使用其等价的 kebab-case (短横线分隔命名) 命名:
Vue.component('blog-post', {
  // 在 JavaScript 中是 camelCase 的
  props: ['postTitle'],
  template: '<h3>{{ postTitle }}</h3>'
})
<!-- 在 HTML 中是 kebab-case 的 -->
<blog-post post-title="hello!"></blog-post>
2
3
4
5
6
7
重申一次,如果你使用字符串模板,那么这个限制就不存在了。
# Prop 类型
到这里,我们只看到了以字符串数组形式列出的 prop:
props: ['title', 'likes', 'isPublished', 'commentIds', 'author']
但是,通常你希望每个 prop 都有指定的值类型。这时,你可以以对象形式列出 prop,这些属性的名称和值分别是 prop 各自的名称和类型:
props: {
  title: String,
  likes: Number,
  isPublished: Boolean,
  commentIds: Array,
  author: Object,
  callback: Function,
  contactsPromise: Promise // or any other constructor
}
2
3
4
5
6
7
8
9
这不仅为你的组件提供了文档,还会在它们遇到错误的类型时从浏览器的 JavaScript 控制台提示用户。你会在这个页面接下来的部分看到类型检查和其它 prop 验证。
# 传递静态或动态 Prop
像这样,你已经知道了可以像这样给 prop 传入一个静态的值:
<blog-post title="My journey with Vue"></blog-post>
你也知道 prop 可以通过 v-bind 动态赋值,例如:
<!-- 动态赋予一个变量的值 -->
<blog-post v-bind:title="post.title"></blog-post>

<!-- 动态赋予一个复杂表达式的值 -->
<blog-post
  v-bind:title="post.title + ' by ' + post.author.name"
></blog-post>
2
3
4
5
6
7
在上述两个示例中,我们传入的值都是字符串类型的,但实际上任何类型的值都可以传给一个 prop。
# 传入一个数字
<!-- 即便 `42` 是静态的,我们仍然需要 `v-bind` 来告诉 Vue -->
<!-- 这是一个 JavaScript 表达式而不是一个字符串。-->
<blog-post v-bind:likes="42"></blog-post>

<!-- 用一个变量进行动态赋值。-->
<blog-post v-bind:likes="post.likes"></blog-post>
2
3
4
5
6
# 传入一个布尔值
<!-- 包含该 prop 没有值的情况在内,都意味着 `true`。-->
<blog-post is-published></blog-post>

<!-- 即便 `false` 是静态的,我们仍然需要 `v-bind` 来告诉 Vue -->
<!-- 这是一个 JavaScript 表达式而不是一个字符串。-->
<blog-post v-bind:is-published="false"></blog-post>

<!-- 用一个变量进行动态赋值。-->
<blog-post v-bind:is-published="post.isPublished"></blog-post>
2
3
4
5
6
7
8
9
# 传入一个数组
<!-- 即便数组是静态的,我们仍然需要 `v-bind` 来告诉 Vue -->
<!-- 这是一个 JavaScript 表达式而不是一个字符串。-->
<blog-post v-bind:comment-ids="[234, 266, 273]"></blog-post>

<!-- 用一个变量进行动态赋值。-->
<blog-post v-bind:comment-ids="post.commentIds"></blog-post>
2
3
4
5
6
# 传入一个对象
<!-- 即便对象是静态的,我们仍然需要 `v-bind` 来告诉 Vue -->
<!-- 这是一个 JavaScript 表达式而不是一个字符串。-->
<blog-post
  v-bind:author="{
    name: 'Veronica',
    company: 'Veridian Dynamics'
  }"
></blog-post>

<!-- 用一个变量进行动态赋值。-->
<blog-post v-bind:author="post.author"></blog-post>
2
3
4
5
6
7
8
9
10
11
# 传入一个对象的所有属性
如果你想要将一个对象的所有属性都作为 prop 传入,你可以使用不带参数的 v-bind (取代 v-bind:prop-name)。例如,对于一个给定的对象 post:
post: {
  id: 1,
  title: 'My Journey with Vue'
}
2
3
4
下面的模板:
<blog-post v-bind="post"></blog-post>
等价于:
<blog-post
  v-bind:id="post.id"
  v-bind:title="post.title"
></blog-post>
2
3
4
# 单向数据流
所有的 prop 都使得其父子 prop 之间形成了一个单向下行绑定:父级 prop 的更新会向下流动到子组件中,但是反过来则不行。这样会防止从子组件意外改变父级组件的状态,从而导致你的应用的数据流向难以理解。
额外的,每次父级组件发生更新时,子组件中所有的 prop 都将会刷新为最新的值。这意味着你不应该在一个子组件内部改变 prop。如果你这样做了,Vue 会在浏览器的控制台中发出警告。
这里有两种常见的试图改变一个 prop 的情形:
- 这个 prop 用来传递一个初始值;这个子组件接下来希望将其作为一个本地的 prop 数据来使用。在这种情况下,最好定义一个本地的 data 属性并将这个 prop 用作其初始值:
props: ['initialCounter'],
data: function () {
  return {
    counter: this.initialCounter
  }
}
2
3
4
5
6
- 这个 prop 以一种原始的值传入且需要进行转换。在这种情况下,最好使用这个 prop 的值来定义一个计算属性:
props: ['size'],
computed: {
  normalizedSize: function () {
    return this.size.trim().toLowerCase()
  }
}
2
3
4
5
6
注意在 JavaScript 中对象和数组是通过引用传入的,所以对于一个数组或对象类型的 prop 来说,在子组件中改变这个对象或数组本身将会影响到父组件的状态。
# Prop 验证
我们可以为组件的 prop 指定验证要求,例如你知道的这些类型。如果有一个需求没有被满足,则 Vue 会在浏览器控制台中警告你。这在开发一个会被别人用到的组件时尤其有帮助。
为了定制 prop 的验证方式,你可以为 props 中的值提供一个带有验证需求的对象,而不是一个字符串数组。例如:
Vue.component('my-component', {
  props: {
    // 基础的类型检查 (`null` 和 `undefined` 会通过任何类型验证)
    propA: Number,
    // 多个可能的类型
    propB: [String, Number],
    // 必填的字符串
    propC: {
      type: String,
      required: true
    },
    // 带有默认值的数字
    propD: {
      type: Number,
      default: 100
    },
    // 带有默认值的对象
    propE: {
      type: Object,
      // 对象或数组默认值必须从一个工厂函数获取
      default: function () {
        return { message: 'hello' }
      }
    },
    // 自定义验证函数
    propF: {
      validator: function (value) {
        // 这个值必须匹配下列字符串中的一个
        return ['success', 'warning', 'danger'].indexOf(value) !== -1
      }
    }
  }
})
2
3
4
5
6
7
8
9
10
11
12
13
14
15
16
17
18
19
20
21
22
23
24
25
26
27
28
29
30
31
32
33
当 prop 验证失败的时候,(开发环境构建版本的) Vue 将会产生一个控制台的警告。
注意那些 prop 会在一个组件实例创建之前进行验证,所以实例的属性 (如 data、computed 等) 在 default 或 validator 函数中是不可用的。
# 类型检查
type 可以是下列原生构造函数中的一个:
String
Number
Boolean
Array
Object
Date
Function
Symbol
2
3
4
5
6
7
8
额外的,type 还可以是一个自定义的构造函数,并且通过 instanceof 来进行检查确认。例如,给定下列现成的构造函数:
function Person (firstName, lastName) {
  this.firstName = firstName
  this.lastName = lastName
}
2
3
4
你可以使用:
Vue.component('blog-post', {
  props: {
    author: Person
  }
})
2
3
4
5
来验证 author prop 的值是否是通过 new Person 创建的。
# 非 Prop 的 Attribute
一个非 prop 的 attribute 是指传向一个组件,但是该组件并没有相应 prop 定义的 attribute。
因为显式定义的 prop 适用于向一个子组件传入信息,然而组件库的作者并不总能预见组件会被用于怎样的场景。这也是为什么组件可以接受任意的 attribute,而这些 attribute 会被添加到这个组件的根元素上。
例如,想象一下你通过一个 Bootstrap 插件使用了一个第三方的 <bootstrap-date-input> 组件,这个插件需要在其 <input> 上用到一个 data-date-picker attribute。我们可以将这个 attribute 添加到你的组件实例上:
<bootstrap-date-input data-date-picker="activated"></bootstrap-date-input>
然后这个 data-date-picker="activated" attribute 就会自动添加到 <bootstrap-date-input> 的根元素上。
# 替换/合并已有的 Attribute
想象一下 <bootstrap-date-input> 的模板是这样的:
<input type="date" class="form-control">
为了给我们的日期选择器插件定制一个主题,我们可能需要像这样添加一个特别的类名:
<bootstrap-date-input
  data-date-picker="activated"
  class="date-picker-theme-dark"
></bootstrap-date-input>
2
3
4
在这种情况下,我们定义了两个不同的 class 的值:
- form-control,这是在组件的模板内设置好的
- date-picker-theme-dark,这是从组件的父级传入的
对于绝大多数 attribute 来说,从外部提供给组件的值会替换掉组件内部设置好的值。所以如果传入 type="text" 就会替换掉 type="date" 并把它破坏!庆幸的是,class 和 style attribute 会稍微智能一些,即两边的值会被合并起来,从而得到最终的值:form-control date-picker-theme-dark。
# 禁用 Attribute 继承
如果你不希望组件的根元素继承 attribute,你可以在组件的选项中设置 inheritAttrs: false。例如:
Vue.component('my-component', {
  inheritAttrs: false,
  // ...
})
2
3
4
这尤其适合配合实例的 $attrs 属性使用,该属性包含了传递给一个组件的 attribute 名和 attribute 值,例如:
{
  required: true,
  placeholder: 'Enter your username'
}
2
3
4
有了 inheritAttrs: false 和 $attrs,你就可以手动决定这些 attribute 会被赋予哪个元素。在撰写基础组件的时候是常会用到的:
Vue.component('base-input', {
  inheritAttrs: false,
  props: ['label', 'value'],
  template: `
    <label>
      {{ label }}
      <input
        v-bind="$attrs"
        v-bind:value="value"
        v-on:input="$emit('input', $event.target.value)"
      >
    </label>
  `
})
2
3
4
5
6
7
8
9
10
11
12
13
14
注意 inheritAttrs: false 选项不会影响 style 和 class 的绑定。
这个模式允许你在使用基础组件的时候更像是使用原始的 HTML 元素,而不会担心哪个元素是真正的根元素:
<base-input
  v-model="username"
  required
  placeholder="Enter your username"
></base-input>
2
3
4
5
# 1、组件注册
# 组件名
在注册一个组件的时候,我们始终需要给它一个名字。比如在全局注册的时候我们已经看到了:
Vue.component('my-component-name', { /* ... */ })
该组件名就是 Vue.component 的第一个参数。
你给予组件的名字可能依赖于你打算拿它来做什么。当直接在 DOM 中使用一个组件 (而不是在字符串模板或单文件组件) 的时候,我们强烈推荐遵循 W3C 规范中的自定义组件名 (字母全小写且必须包含一个连字符)。这会帮助你避免和当前以及未来的 HTML 元素相冲突。
你可以在风格指南中查阅到关于组件名的其它建议。
# 组件名大小写
定义组件名的方式有两种:
- 使用 kebab-case
Vue.component('my-component-name', { /* ... */ })
当使用 kebab-case (短横线分隔命名) 定义一个组件时,你也必须在引用这个自定义元素时使用 kebab-case,例如 <my-component-name>。
- 使用 PascalCase
Vue.component('MyComponentName', { /* ... */ })
当使用 PascalCase (首字母大写命名) 定义一个组件时,你在引用这个自定义元素时两种命名法都可以使用。也就是说 <my-component-name> 和 <MyComponentName> 都是可接受的。注意,尽管如此,直接在 DOM (即非字符串的模板) 中使用时只有 kebab-case 是有效的。
# 全局注册
到目前为止,我们只用过 Vue.component 来创建组件:
Vue.component('my-component-name', {
  // ... 选项 ...
})
2
3
这些组件是全局注册的。也就是说它们在注册之后可以用在任何新创建的 Vue 根实例 (new Vue) 的模板中。比如:
Vue.component('component-a', { /* ... */ })
Vue.component('component-b', { /* ... */ })
Vue.component('component-c', { /* ... */ })

new Vue({ el: '#app' })
<div id="app">
  <component-a></component-a>
  <component-b></component-b>
  <component-c></component-c>
</div>
2
3
4
5
6
7
8
9
10
在所有子组件中也是如此,也就是说这三个组件在各自内部也都可以相互使用。
# 局部注册
全局注册往往是不够理想的。比如,如果你使用一个像 webpack 这样的构建系统,全局注册所有的组件意味着即便你已经不再使用一个组件了,它仍然会被包含在你最终的构建结果中。这造成了用户下载的 JavaScript 的无谓的增加。
在这些情况下,你可以通过一个普通的 JavaScript 对象来定义组件:
var ComponentA = { /* ... */ }
var ComponentB = { /* ... */ }
var ComponentC = { /* ... */ }
2
3
然后在 components 选项中定义你想要使用的组件:
new Vue({
  el: '#app',
  components: {
    'component-a': ComponentA,
    'component-b': ComponentB
  }
})
2
3
4
5
6
7
对于 components 对象中的每个属性来说,其属性名就是自定义元素的名字,其属性值就是这个组件的选项对象。
注意
局部注册的组件在其子组件中不可用。例如,如果你希望 ComponentA 在 ComponentB 中可用,则你需要这样写:
var ComponentA = { /* ... */ }

var ComponentB = {
  components: {
    'component-a': ComponentA
  },
  // ...
}
2
3
4
5
6
7
8
或者如果你通过 Babel 和 webpack 使用 ES2015 模块,那么代码看起来更像:
import ComponentA from './ComponentA.vue'

export default {
  components: {
    ComponentA
  },
  // ...
}
2
3
4
5
6
7
8
注意在 ES2015+ 中,在对象中放一个类似 ComponentA 的变量名其实是 ComponentA: ComponentA 的缩写,即这个变量名同时是:
- 用在模板中的自定义元素的名称
- 包含了这个组件选项的变量名
# 模块系统
如果你没有通过 import/require 使用一个模块系统,也许可以暂且跳过这个章节。如果你使用了,那么我们会为你提供一些特殊的使用说明和注意事项。
# 在模块系统中局部注册
如果你还在阅读,说明你使用了诸如 Babel 和 webpack 的模块系统。在这些情况下,我们推荐创建一个 components 目录,并将每个组件放置在其各自的文件中。
然后你需要在局部注册之前导入每个你想使用的组件。例如,在一个假设的 ComponentB.js 或 ComponentB.vue 文件中:
import ComponentA from './ComponentA'
import ComponentC from './ComponentC'

export default {
  components: {
    ComponentA,
    ComponentC
  },
  // ...
}
2
3
4
5
6
7
8
9
10
现在 ComponentA 和 ComponentC 都可以在 ComponentB 的模板中使用了。
# 基础组件的自动化全局注册
可能你的许多组件只是包裹了一个输入框或按钮之类的元素,是相对通用的。我们有时候会把它们称为基础组件,它们会在各个组件中被频繁的用到。
所以会导致很多组件里都会有一个包含基础组件的长列表:
import BaseButton from './BaseButton.vue'
import BaseIcon from './BaseIcon.vue'
import BaseInput from './BaseInput.vue'

export default {
  components: {
    BaseButton,
    BaseIcon,
    BaseInput
  }
}
2
3
4
5
6
7
8
9
10
11
而只是用于模板中的一小部分:
<BaseInput
  v-model="searchText"
  @keydown.enter="search"
/>
<BaseButton @click="search">
  <BaseIcon name="search"/>
</BaseButton>
2
3
4
5
6
7
幸好如果你使用了 webpack (或在内部使用了 webpack 的 Vue CLI 3+),那么就可以使用 require.context 只全局注册这些非常通用的基础组件。这里有一份可以让你在应用入口文件 (比如 src/main.js) 中全局导入基础组件的示例代码:
import Vue from 'vue'
import upperFirst from 'lodash/upperFirst'
import camelCase from 'lodash/camelCase'

const requireComponent = require.context(
  // 其组件目录的相对路径
  './components',
  // 是否查询其子目录
  false,
  // 匹配基础组件文件名的正则表达式
  /Base[A-Z]\w+\.(vue|js)$/
)

requireComponent.keys().forEach(fileName => {
  // 获取组件配置
  const componentConfig = requireComponent(fileName)

  // 获取组件的 PascalCase 命名
  const componentName = upperFirst(
    camelCase(
      // 获取和目录深度无关的文件名
      fileName
        .split('/')
        .pop()
        .replace(/\.\w+$/, '')
    )
  )

  // 全局注册组件
  Vue.component(
    componentName,
    // 如果这个组件选项是通过 `export default` 导出的,
    // 那么就会优先使用 `.default`,
    // 否则回退到使用模块的根。
    componentConfig.default || componentConfig
  )
})
2
3
4
5
6
7
8
9
10
11
12
13
14
15
16
17
18
19
20
21
22
23
24
25
26
27
28
29
30
31
32
33
34
35
36
37
记住全局注册的行为必须在根 Vue 实例 (通过 new Vue) 创建之前发生。这里有一个真实项目情景下的示例。