# flutter
# 环境准备
起点:Idea 集成开发环境
运行flutter doctor,结果如下,则表示环境已经准备好
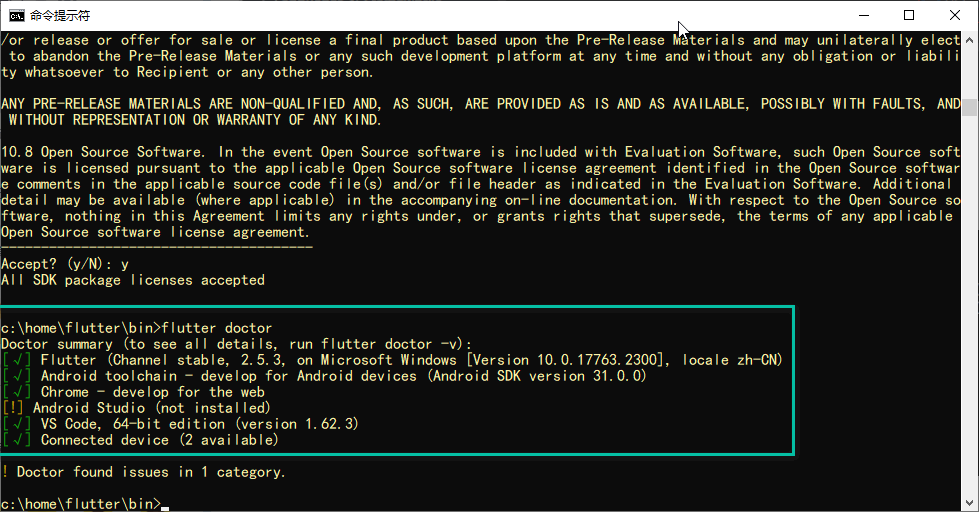
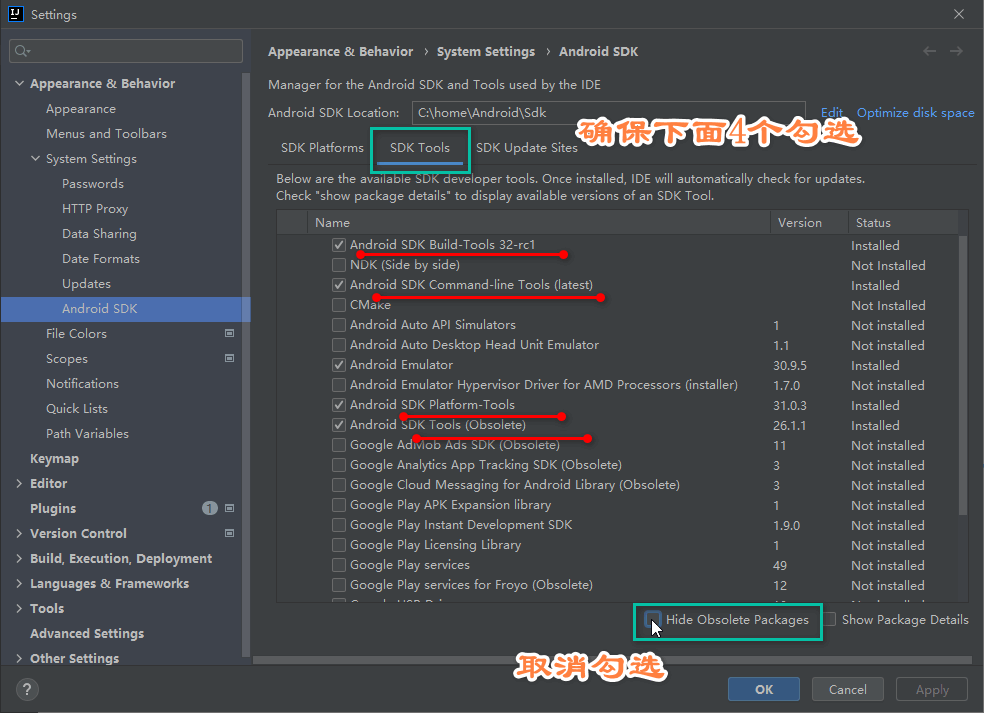
cmdline-tools component is missing
# 打包
# 创建一个用于上传的密钥库
在 macOS 或者 Linux 系统上,执行下面的代码:
keytool -genkey -v -keystore ~/upload-keystore.jks -keyalg RSA -keysize 2048 -validity 10000 -alias upload
在 Windows 系统上,执行下述代码:【htTest】
keytool -genkey -v -keystore c:\Users\htring\upload-keystore.jks -storetype JKS -keyalg RSA -keysize 2048 -validity 10000 -alias upload
htring;
four - faith;
java;
xiamen;
fujian;
cn;
2
3
4
5
6
生成后建议执行,迁移到行业标准
keytool -importkeystore -srckeystore c:\Users\htring\upload-keystore.jks -destkeystore c:\Users\htring\upload-keystore.jks -deststoretype pkcs12
# 集成手机生物识别功能(local_auth 1.1.8+)时
# java 环境时:android api 31
修改 app 目录下的 MainActivity.java 文件
import android.os.Bundle;
import io.flutter.app.FlutterFragmentActivity;
import io.flutter.plugins.flutter_plugin_android_lifecycle.FlutterAndroidLifecyclePlugin;
import io.flutter.plugins.localauth.LocalAuthPlugin;

public class MainActivity extends FlutterFragmentActivity {
    @Override
    protected void onCreate(Bundle savedInstanceState) {
        super.onCreate(savedInstanceState);
        FlutterAndroidLifecyclePlugin.registerWith(
                registrarFor(
                        "io.flutter.plugins.flutter_plugin_android_lifecycle.FlutterAndroidLifecyclePlugin"));
        LocalAuthPlugin.registerWith(registrarFor("io.flutter.plugins.localauth.LocalAuthPlugin"));
    }
}
2
3
4
5
6
7
8
9
10
11
12
13
14
15
修改 app 目录下 AndroidManifest.xml 文件
<manifest xmlns:android="http://schemas.android.com/apk/res/android"
          package="com.limin.htring.htring_password_box">
    <uses-permission android:name="android.permission.USE_BIOMETRIC"/>
    <application
            android:label="password box"
            android:icon="@mipmap/ic_launcher">
        <activity
                android:name="io.flutter.embedding.android.FlutterFragmentActivity"
                android:launchMode="singleTop"
        …………
        </activity>
        …………
    </application>
</manifest>
2
3
4
5
6
7
8
9
10
11
12
13
14
# kotlin 环境时
修改.MainActivity.kt 文件
import io.flutter.embedding.android.FlutterFragmentActivity
import io.flutter.embedding.engine.FlutterEngine
import io.flutter.plugins.GeneratedPluginRegistrant

class MainActivity: FlutterFragmentActivity() {
    override fun configureFlutterEngine(flutterEngine: FlutterEngine) {
        GeneratedPluginRegistrant.registerWith(flutterEngine)
    }
}
2
3
4
5
6
7
8
9
修改 app 目录下 AndroidManifest.xml 文件
<manifest xmlns:android="http://schemas.android.com/apk/res/android"
    package="com.example.password_box_kt">
    <uses-permission android:name="android.permission.USE_BIOMETRIC"/>
    …………
</manifest>
2
3
4
5
# 启动
void main() => runApp(MyApp());
void runApp(Widget app) {
  WidgetsFlutterBinding.ensureInitialized()  //binding初始化(ensureInitialized)
    ..scheduleAttachRootWidget(app) //绑定根节点(scheduleAttachRootWidget)
    ..scheduleWarmUpFrame(); //绘制热身帧(scheduleWarmUpFrame)
}
2
3
4
5
6
ensureInitialized()- WidgetsFlutterBinding 的 ensureInitialized()其实就是一个获取 WidgetsFlutterBinding 单例的过程,真正的初始化实现代码在其 7 个 mixin 中。7 个 mixin 按照严格的先后调用链关系完成不同 binding 的初始化。
# 嵌入原生 View-Android
在 App 项目的 java/包名 目录下创建嵌入 Flutter 中的 Android View,此 View 继承 PlatformView :
class MyFlutterView(context: Context) : PlatformView {
    override fun getView(): View {
        TODO("Not yet implemented")
    }

    override fun dispose() {
        TODO("Not yet implemented")
    }
}
2
3
4
5
6
7
8
9
- getView :返回要嵌入 Flutter 层次结构的 Android View
- dispose:释放此 View 时调用,此方法调用后 View 不可用,此方法需要清除所有对象引用,否则会造成内存泄漏。
返回一个简单的 TextView :
class MyFlutterView(context: Context, messenger: BinaryMessenger, viewId: Int, args: Map<String, Any>?) : PlatformView {

    val textView: TextView = TextView(context)

    init {
        textView.text = "我是Android View"
    }

    override fun getView(): View {

        return textView
    }

    override fun dispose() {
        TODO("Not yet implemented")
    }
}
2
3
4
5
6
7
8
9
10
11
12
13
14
15
16
17
- messenger:用于消息传递,后面介绍 Flutter 与 原生通信时用到此参数。
- viewId:View 生成时会分配一个唯一 ID。
- args:Flutter 传递的初始化参数
# 注册 PlatformView
创建 PlatformViewFactory:
class MyFlutterViewFactory(val messenger: BinaryMessenger) : PlatformViewFactory(StandardMessageCodec.INSTANCE) {

    override fun create(context: Context, viewId: Int, args: Any?): PlatformView {
        val flutterView = MyFlutterView(context, messenger, viewId, args as Map<String, Any>?)
        return flutterView
    }

}
2
3
4
5
6
7
8
创建 MyPlugin :
class MyPlugin : FlutterPlugin {
override fun onAttachedToEngine(binding: FlutterPlugin.FlutterPluginBinding) {
val messenger: BinaryMessenger = binding.binaryMessenger
binding
.platformViewRegistry
.registerViewFactory(
"plugins.flutter.io/custom_platform_view", MyFlutterViewFactory(messenger))
}
companion object {
fun registerWith(registrar: PluginRegistry.Registrar) {
registrar
.platformViewRegistry()
.registerViewFactory(
"plugins.flutter.io/custom_platform_view",
MyFlutterViewFactory(registrar.messenger()))
}
}
override fun onDetachedFromEngine(binding: FlutterPlugin.FlutterPluginBinding) {
}
}
2
3
4
5
6
7
8
9
10
11
12
13
14
15
16
17
18
19
20
21
22
23
24
25
- 记住
plugins.flutter.io/custom_platform_view,这个字符串在 Flutter 中需要与其保持一致 - 在 App 中 MainActivity 中注册:
class MainActivity : FlutterActivity() {
    override fun configureFlutterEngine(flutterEngine: FlutterEngine) {
        super.configureFlutterEngine(flutterEngine)
        flutterEngine.plugins.add(MyPlugin())
    }
}
2
3
4
5
6
如果是 Flutter Plugin,没有 MainActivity,则在对应的 Plugin onAttachedToEngine 和 registerWith 方法修改如下:
public class CustomPlatformViewPlugin : FlutterPlugin,MethodCallHandler {
/// The MethodChannel that will the communication between Flutter and native Android
///
/// This local reference serves to register the plugin with the Flutter Engine and unregister it
/// when the Flutter Engine is detached from the Activity
private lateinit var channel: MethodChannel
override fun onAttachedToEngine( flutterPluginBinding: FlutterPlugin.FlutterPluginBinding) {
channel = MethodChannel(flutterPluginBinding.getFlutterEngine().getDartExecutor(), "custom_platform_view")
channel.setMethodCallHandler(this)
val messenger: BinaryMessenger = flutterPluginBinding.binaryMessenger
flutterPluginBinding
.platformViewRegistry
.registerViewFactory(
"plugins.flutter.io/custom_platform_view", MyFlutterViewFactory(messenger))
}
// This static function is optional and equivalent to onAttachedToEngine. It supports the old
// pre-Flutter-1.12 Android projects. You are encouraged to continue supporting
// plugin registration via this function while apps migrate to use the new Android APIs
// post-flutter-1.12 via https://flutter.dev/go/android-project-migration.
//
// It is encouraged to share logic between onAttachedToEngine and registerWith to keep
// them functionally equivalent. Only one of onAttachedToEngine or registerWith will be called
// depending on the user's project. onAttachedToEngine or registerWith must both be defined
// in the same class.
companion object {
fun registerWith(registrar: Registrar) {
val channel = MethodChannel(registrar.messenger(), "custom_platform_view")
channel.setMethodCallHandler(CustomPlatformViewPlugin())
registrar
.platformViewRegistry()
.registerViewFactory(
"plugins.flutter.io/custom_platform_view",
MyFlutterViewFactory(registrar.messenger()))
}
}
override fun onMethodCall( call: MethodCall, result: Result) {
if (call.method == "getPlatformVersion") {
result.success("Android ${android.os.Build.VERSION.RELEASE}")
} else {
result.notImplemented()
}
}
override fun onDetachedFromEngine( binding: FlutterPlugin.FlutterPluginBinding) {
channel.setMethodCallHandler(null)
}
}
2
3
4
5
6
7
8
9
10
11
12
13
14
15
16
17
18
19
20
21
22
23
24
25
26
27
28
29
30
31
32
33
34
35
36
37
38
39
40
41
42
43
44
45
46
47
48
49
50
51
52
53
54
# 嵌入 Flutter
在 Flutter 中调用
class PlatformViewDemo extends StatelessWidget {
Widget build(BuildContext context) {
Widget platformView(){
if(defaultTargetPlatform == TargetPlatform.android){
return AndroidView(
viewType: 'plugins.flutter.io/custom_platform_view',
);
}
}
return Scaffold(
appBar: AppBar(),
body: Center(
child: platformView(),
),
);
}
}
2
3
4
5
6
7
8
9
10
11
12
13
14
15
16
17
18
上面嵌入的是 Android View,因此通过 defaultTargetPlatform == TargetPlatform.android 判断当前平台加载,在 Android 上运行效果
# 设置初始化参数
Flutter 端修改如下:
AndroidView(
          viewType: 'plugins.flutter.io/custom_platform_view',
          creationParams: {'text': 'Flutter传给AndroidTextView的参数'},
          creationParamsCodec: StandardMessageCodec(),
        )
2
3
4
5
- creationParams :传递的参数,插件可以将此参数传递给 AndroidView 的构造函数。
- creationParamsCodec :将 creationParams 编码后再发送给平台侧,它应该与传递给构造函数的编解码器匹配。值的范围:
- StandardMessageCodec
- JSONMessageCodec
- StringCodec
- BinaryCodec
修改 MyFlutterView :
class MyFlutterView(context: Context, messenger: BinaryMessenger, viewId: Int, args: Map<String, Any>?) : PlatformView {

    val textView: TextView = TextView(context)

    init {
        args?.also {
            textView.text = it["text"] as String
        }
    }

    override fun getView(): View {

        return textView
    }

    override fun dispose() {
        TODO("Not yet implemented")
    }
}
2
3
4
5
6
7
8
9
10
11
12
13
14
15
16
17
18
19
# Flutter 向 Android View 发送消息
修改 Flutter 端,创建 MethodChannel 用于通信:
class PlatformViewDemo extends StatefulWidget {
_PlatformViewDemoState createState() => _PlatformViewDemoState();
}
class _PlatformViewDemoState extends State<PlatformViewDemo> {
static const platform =
const MethodChannel('com.flutter.guide.MyFlutterView');
Widget build(BuildContext context) {
Widget platformView() {
if (defaultTargetPlatform == TargetPlatform.android) {
return AndroidView(
viewType: 'plugins.flutter.io/custom_platform_view',
creationParams: {'text': 'Flutter传给AndroidTextView的参数'},
creationParamsCodec: StandardMessageCodec(),
);
}
}
return Scaffold(
appBar: AppBar(),
body: Column(children: [
RaisedButton(
child: Text('传递参数给原生View'),
onPressed: () {
platform.invokeMethod('setText', {'name': 'laomeng', 'age': 18});
},
),
Expanded(child: platformView()),
]),
);
}
}
2
3
4
5
6
7
8
9
10
11
12
13
14
15
16
17
18
19
20
21
22
23
24
25
26
27
28
29
30
31
32
33
34
35
在 原生 View 中也创建一个 MethodChannel 用于通信:
class MyFlutterView(context: Context, messenger: BinaryMessenger, viewId: Int, args: Map<String, Any>?) : PlatformView, MethodChannel.MethodCallHandler {

    val textView: TextView = TextView(context)
    private var methodChannel: MethodChannel

    init {
        args?.also {
            textView.text = it["text"] as String
        }
        methodChannel = MethodChannel(messenger, "com.flutter.guide.MyFlutterView")
        methodChannel.setMethodCallHandler(this)
    }

    override fun getView(): View {

        return textView
    }

    override fun dispose() {
        methodChannel.setMethodCallHandler(null)
    }

    override fun onMethodCall(call: MethodCall, result: MethodChannel.Result) {
        if (call.method == "setText") {
            val name = call.argument("name") as String?
            val age = call.argument("age") as Int?

            textView.text = "hello,$name,年龄:$age"
        } else {
            result.notImplemented()
        }
    }
}
2
3
4
5
6
7
8
9
10
11
12
13
14
15
16
17
18
19
20
21
22
23
24
25
26
27
28
29
30
31
32
33
# Flutter 向 Android View 获取消息
与上面发送信息不同的是,Flutter 向原生请求数据,原生返回数据到 Flutter 端,修改 MyFlutterView onMethodCall:
override fun onMethodCall(call: MethodCall, result: MethodChannel.Result) {
    if (call.method == "setText") {
        val name = call.argument("name") as String?
        val age = call.argument("age") as Int?
        textView.text = "hello,$name,年龄:$age"
    } else if (call.method == "getData") {
        val name = call.argument("name") as String?
        val age = call.argument("age") as Int?

        var map = mapOf("name" to "hello,$name",
                "age" to "$age"
        )
        result.success(map)
    } else {
        result.notImplemented()
    }
}
2
3
4
5
6
7
8
9
10
11
12
13
14
15
16
17
- result.success(map) 是返回的数据
Flutter 端接收数据:
var _data = '获取数据';

RaisedButton(
  child: Text('$_data'),
  onPressed: () async {
    var result = await platform
        .invokeMethod('getData', {'name': 'laomeng', 'age': 18});
    setState(() {
      _data = '${result['name']},${result['age']}';
    });
  },
),
2
3
4
5
6
7
8
9
10
11
12
# 解决多个原生 View 通信冲突问题
此时点击 传递参数给原生 View 按钮哪个 View 会改变内容,实际上只有最后一个会改变
- 第一种方法:将一个唯一 id 通过初始化参数传递给原生 View,原生 View 使用这个 id 构建不同名称的 MethodChannel。
- 第二种方法(推荐):原生 View 生成时,系统会为其生成唯一 id:viewId,使用 viewId 构建不同名称的 MethodChannel。
class MyFlutterView(context: Context, messenger: BinaryMessenger, viewId: Int, args: Map<String, Any>?) : PlatformView, MethodChannel.MethodCallHandler {

    val textView: TextView = TextView(context)
    private var methodChannel: MethodChannel

    init {
        args?.also {
            textView.text = it["text"] as String
        }
        methodChannel = MethodChannel(messenger, "com.flutter.guide.MyFlutterView_$viewId")
        methodChannel.setMethodCallHandler(this)
    }
  ...
}
2
3
4
5
6
7
8
9
10
11
12
13
14
Flutter 端为每一个原生 View 创建不同的 MethodChannel:
var platforms = [];

AndroidView(
  viewType: 'plugins.flutter.io/custom_platform_view',
  onPlatformViewCreated: (viewId) {
    print('viewId:$viewId');
    platforms
        .add(MethodChannel('com.flutter.guide.MyFlutterView_$viewId'));
  },
  creationParams: {'text': 'Flutter传给AndroidTextView的参数'},
  creationParamsCodec: StandardMessageCodec(),
)
2
3
4
5
6
7
8
9
10
11
12
# 与原生通信
TIP
Flutter 与 Native 端通信是异步的
Flutter 与 Native 端通信有如下 3 个方法:
- MethodChannel:Flutter 与 Native 端相互调用,调用后可以返回结果,可以 Native 端主动调用,也可以 Flutter 主动调用,属于双向通信。此方式为最常用的方式, Native 端调用需要在主线程中执行。
- BasicMessageChannel:用于使用指定的编解码器对消息进行编码和解码,属于双向通信,可以 Native 端主动调用,也可以 Flutter 主动调用。
- EventChannel:用于数据流(event streams)的通信, Native 端主动发送数据给 Flutter,通常用于状态的监听,比如网络变化、传感器数据等
Native 端主动发送数据给 Flutter 时,Native 端代码需要在主线程中执行,Android 端从子线程跳转到主线程方式:
Kotlin 代码:
Handler(Looper.getMainLooper()).post {

}
2
3
Java 代码:
new Handler(Looper.getMainLooper()).post(new Runnable() {
  @Override
  public void run() {

  }
});
2
3
4
5
6
如果可以获取到当前 Activity,也可以使用如下方式:
activity.runOnUiThread {

}
2
3
# MethodChannel
# Flutter 端
Flutter 端创建 MethodChannel 通道,用于与原生端通信:
var channel = MethodChannel('com.flutter.guide.MethodChannel');
com.flutter.guide.MethodChannel是 MethodChannel 的名称,原生端要与之对应。
发送消息:
var result = await channel.invokeMethod('sendData',{'name': 'laomeng', 'age': 18})
- 第一个参数表示 method,方法名称,原生端会解析此参数。
- 第二个参数表示参数,类型任意,多个参数通常使用 Map。
- 返回 Future,原生端返回的数据。
# Android 端
android 下创建 MethodChannelDemo:
package com.flutter.guide;

import io.flutter.plugin.common.BinaryMessenger;
import io.flutter.plugin.common.MethodCall;
import io.flutter.plugin.common.MethodChannel;

class MethodChannelDemo(messenger: BinaryMessenger): MethodChannel.MethodCallHandler {

    private var channel: MethodChannel

    init {
        channel = MethodChannel(messenger, "com.flutter.guide.MethodChannel")
        channel.setMethodCallHandler(this)
    }

    override fun onMethodCall(call: MethodCall, result: MethodChannel.Result) {
        if (call.method == "sendData") {
            val name = call.argument("name") as String?
            val age = call.argument("age") as Int?

            var map = mapOf("name" to "hello,$name",
                    "age" to "$age"
            )
            result.success(map)
        }
    }
}
2
3
4
5
6
7
8
9
10
11
12
13
14
15
16
17
18
19
20
21
22
23
24
25
26
27
- call.method 字符串就是 invokeMethod 方法传入的 method。
- call.argument 是 invokeMethod 传入的参数,由于 Flutter 端传入的是 Map,所以上面的解析按照 Map 解析。
- result.success() 是返回给 Flutter 的结果。
# Flutter 端解析
var result = await channel
    .invokeMethod('sendData', {'name': 'laomeng', 'age': 18});
var name = result['name'];
var age = result['age'];
2
3
4
# 在 MainActivity 启动
class MainActivity : FlutterActivity() {

    override fun configureFlutterEngine(flutterEngine: FlutterEngine) {
        super.configureFlutterEngine(flutterEngine)
        MethodChannelDemo(flutterEngine.dartExecutor.binaryMessenger)
    }
}
2
3
4
5
6
7
# BasicMessageChannel
# BasicMessageChannel-Flutter 端
// com.flutter.guide.BasicMessageChannel 是 BasicMessageChannel 的名称,原生端要与之对应
var channel = BasicMessageChannel('com.flutter.guide.BasicMessageChannel',StandardMessageCodec());

// 发送消息
var result = await channel.send({'name': 'laomeng', 'age': 18});
// 参数类型任意,多个参数通常使用Map。
// 返回 Future,原生端返回的数据
2
3
4
5
6
7
class BasicMessageChannelDemo extends StatefulWidget {
_BasicMessageChannelDemoState createState() => _BasicMessageChannelDemoState();
}
class _BasicMessageChannelDemoState extends State<BasicMessageChannelDemo> {
var channel = BasicMessageChannel('com.flutter.guide.BasicMessageChannel',StandardMessageCodec());
var _data;
Widget build(BuildContext context) {
return Scaffold(
appBar: AppBar(),
body: Column(
children: [
SizedBox(
height: 50,
),
RaisedButton(
child: Text('发送数据到原生'),
onPressed: () async {
var result = await channel.send({'name': 'laomeng', 'age': 18});
var name = result['name'];
var age = result['age'];
setState(() {
_data = '$name,$age';
});
},
),
Text('原生返回数据:$_data'),
],
),
);
}
}
2
3
4
5
6
7
8
9
10
11
12
13
14
15
16
17
18
19
20
21
22
23
24
25
26
27
28
29
30
31
32
33
34
35
36
# BasicMessageChannel-Android 端
android 下创建 BasicMessageChannelDemo
class BasicMessageChannelDemo(messenger: BinaryMessenger) : BasicMessageChannel.MessageHandler<Any> {

    private var channel: BasicMessageChannel<Any>

    init {
        channel = BasicMessageChannel(messenger, "com.flutter.guide.BasicMessageChannel", StandardMessageCodec())
        channel.setMessageHandler(this)
    }

    override fun onMessage(message: Any?, reply: BasicMessageChannel.Reply<Any>) {
        val name = (message as Map<String, Any>)["name"]
        val age = (message as Map<String, Any>)["age"]

        var map = mapOf("name" to "hello,$name",
                "age" to "$age"
        )

        reply.reply(map)
    }
}
2
3
4
5
6
7
8
9
10
11
12
13
14
15
16
17
18
19
20
onMessage方法在 Flutter 端调用 send 方法后调用,解析方法如下:- message 是传入的参数,由于 Flutter 端传入的是 Map,所以上面的解析按照 Map 解析。
- reply.reply() 是返回给 Flutter 的结果。
# BasicMessageChannel-Flutter 端解析
var result = await channel.send({'name': 'laomeng', 'age': 18});
var name = result['name'];
var age = result['age'];
2
3
在 MainActivity 启动:
class MainActivity : FlutterActivity() {

    override fun configureFlutterEngine(flutterEngine: FlutterEngine) {
        super.configureFlutterEngine(flutterEngine)
        BasicMessageChannelDemo(flutterEngine.dartExecutor.binaryMessenger)
        flutterEngine.plugins.add(MyPlugin())
    }
}
2
3
4
5
6
7
8
# EventChannel
# EventChannel-Flutter 端
class EventChannelDemo extends StatefulWidget {
_EventChannelDemoState createState() => _EventChannelDemoState();
}
class _EventChannelDemoState extends State<EventChannelDemo> {
var _eventChannel = EventChannel('com.flutter.guide.EventChannel');
var _data;
void initState() {
super.initState();
_eventChannel.receiveBroadcastStream().listen(_onData);
}
_onData(event){
setState(() {
_data = event;
});
}
Widget build(BuildContext context) {
return Scaffold(
appBar: AppBar(),
body: Center(
child: Text('$_data'),
),
);
}
}
2
3
4
5
6
7
8
9
10
11
12
13
14
15
16
17
18
19
20
21
22
23
24
25
26
27
28
29
30
31
class EventChannelDemo(var activity: Activity, messenger: BinaryMessenger):EventChannel.StreamHandler {
    private var channel: EventChannel
    private var index = 0
    private var events: EventChannel.EventSink? = null
    init {
        channel = EventChannel(messenger, "com.flutter.guide.EventChannel")
        channel.setStreamHandler(this)
        startTimer()
    }


    fun startTimer() {
        var timer = Timer().schedule(timerTask {
            index++
            var map = mapOf("name" to "laomeng${index}",
                    "age" to "${index}"
            )
            activity.runOnUiThread {
                events?.success(map)
            }

        }, 0, 1000)

    }

    override fun onListen(arguments: Any?, events: EventChannel.EventSink?) {
        this.events = events
    }

    override fun onCancel(arguments: Any?) {
        this.events = null
    }
}
2
3
4
5
6
7
8
9
10
11
12
13
14
15
16
17
18
19
20
21
22
23
24
25
26
27
28
29
30
31
32
33
class MainActivity : FlutterActivity() {

    override fun configureFlutterEngine(flutterEngine: FlutterEngine) {
        super.configureFlutterEngine(flutterEngine)
        EventChannelDemo(this,flutterEngine.dartExecutor.binaryMessenger)
        flutterEngine.plugins.add(MyPlugin())
    }
}
2
3
4
5
6
7
8